I’ll be honest — the first time I made this Chicken Katsu Curry Recipe, I wasn’t sure if I could recreate that restaurant-style flavor at home. After one bite, though, I was completely hooked!
The crispy breaded chicken combined with the rich, savory curry sauce is pure comfort food. It’s warm, satisfying, and surprisingly simple to prepare. If you love bold flavors and crunchy textures, this recipe will quickly become one of your favorites.
Let me show you exactly how I make it step by step. If you enjoy exploring more comforting chicken meals, you might also like the lemon chicken pasta with broccoli recipe for another flavorful dinner idea.

Ingredients
Here’s everything you need to make this delicious Chicken Katsu Curry, along with tips for best results.
- 650 g chicken breasts — Slice them evenly and thinly for faster cooking and extra crispiness.
- 70–140 g panko breadcrumbs — These Japanese-style crumbs create the signature light and crunchy coating. Avoid regular breadcrumbs for best texture.
- 2 eggs — Helps the breadcrumbs stick properly to the chicken.
- 300 g white or brown rice — Serves as the base that absorbs the flavorful curry sauce.
- 2 onions, diced — Builds sweetness and depth in the curry sauce.
- 1 carrot, thinly sliced — Adds natural sweetness and texture.
- 3 cloves garlic, minced — Enhances the overall aroma and flavor.
- 1 tablespoon grated ginger — Provides warmth and freshness.
- 1.5 tablespoons curry powder — The key spice for authentic curry flavor.
- ½ teaspoon turmeric — Adds color and earthy notes.
- 600 ml chicken stock — Creates the rich base for the sauce.
- 1 tablespoon honey or brown sugar — Balances the spices with mild sweetness.
- 1.5 tablespoons soy sauce — Adds umami and saltiness.
- 2 tablespoons flour — Helps thicken the curry sauce.
- 1 tablespoon coconut oil — Adds subtle richness.
- 2 tablespoons rapeseed oil — Helps the chicken bake to a golden crisp.
- Spring onions and chili flakes (optional) — For garnish and extra flavor.
Note: Serves 6.
Variations
This recipe is very flexible, and you can adjust it based on dietary needs or taste preferences.
- Use gluten-free panko and tamari instead of soy sauce for a gluten-free version.
- Replace honey with maple syrup for a vegan-friendly alternative.
- Swap chicken for eggplant or tofu for a vegetarian option.
- Add coconut milk for a creamier and richer sauce.
- Serve with cauliflower rice for a lower-carb meal.
- If you enjoy bold and slightly spicy flavors, you may also want to try the cajun sausage pasta recipe for a different but equally satisfying meal.
Cooking Time
- Prep Time: 5 minutes
- Cooking Time: 30 minutes
- Total Time: 35 minutes
This makes it perfect for a quick weeknight dinner.
Equipment You Need
- Large baking tray — For baking the breaded chicken evenly.
- Deep frying pan — For preparing the curry sauce.
- Rice pot or rice cooker — To cook the rice perfectly.
- Blender or hand blender — To make the sauce smooth and creamy.
- Sharp knife — For slicing chicken and vegetables.
How to Make Chicken Katsu Curry Recipe?
Preparing the Curry Sauce
Start by heating coconut oil in a large pan over medium heat. Add the diced onions and carrots with a pinch of salt. Cook until softened and slightly golden.
Next, stir in garlic, ginger, curry powder, and turmeric. Let the spices cook briefly to release their aroma. Add flour, soy sauce, honey, and chicken stock. Simmer until the sauce thickens and the flavors combine beautifully.
Preparing the Chicken
Slice the chicken breasts into thin, even pieces. This ensures they cook quickly and stay juicy inside.
Set up three bowls: one with flour, one with beaten eggs, and one with panko breadcrumbs. Coat each chicken piece in flour, dip in egg, then press into breadcrumbs until fully covered.
Baking the Chicken
Preheat your oven to 200°C. Lightly oil a baking tray and place the breaded chicken on top.
Drizzle a small amount of oil over the pieces to help them crisp. Bake for about 12 minutes, flip carefully, and bake another 12 minutes until golden and cooked through.
Cooking the Rice
While the chicken bakes, cook the rice according to package instructions.
Once done, fluff it with a fork to keep it light and separated.
Blending and Serving
When the curry sauce has thickened, blend it until smooth and creamy.
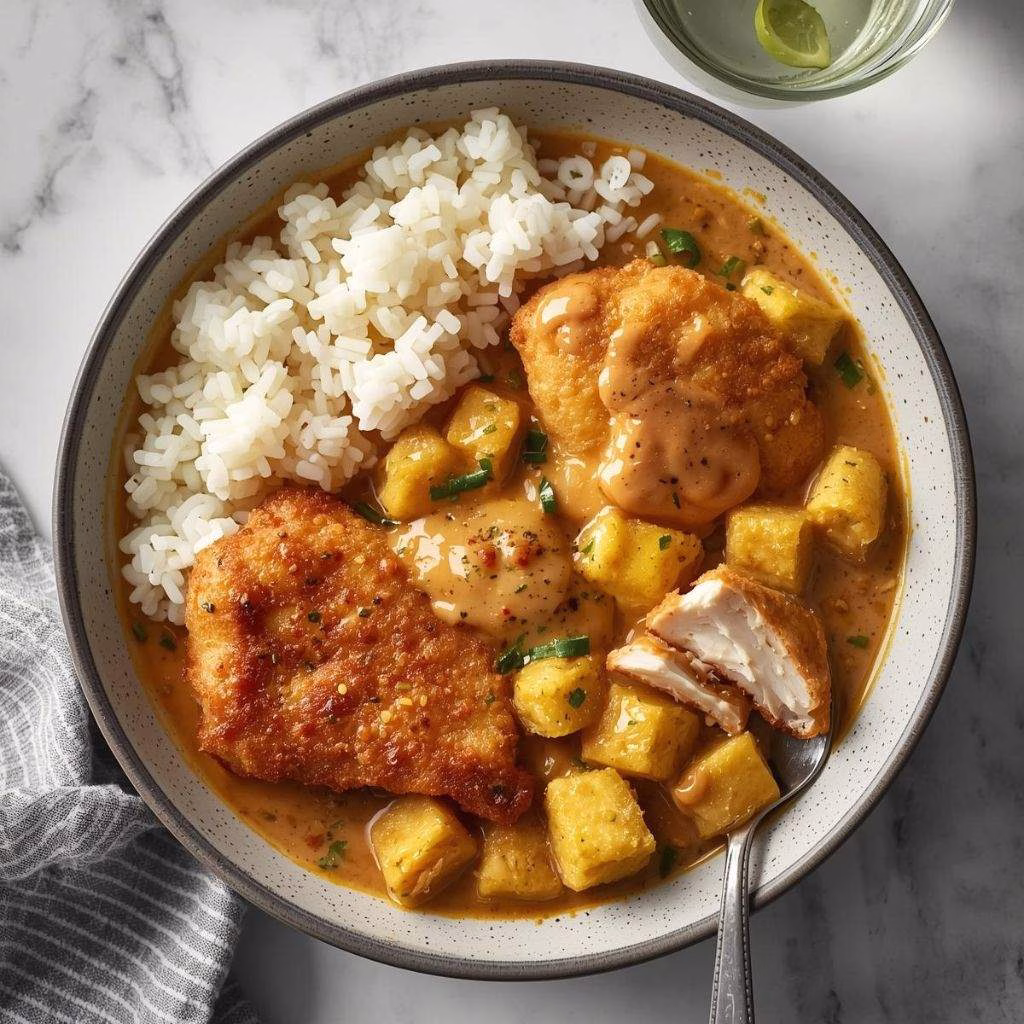
Slice the crispy chicken diagonally for presentation. Serve over rice, pour the curry sauce generously on top, and garnish with spring onions or chili flakes.
Additional Tips for Making This Recipe Better
- I like to let the curry sauce simmer a little longer for deeper flavor.
- I sometimes double-coat the chicken in breadcrumbs for extra crunch.
- Resting the breaded chicken for 10 minutes before baking helps the coating stick better.
- Adding a squeeze of fresh lime at the end brightens the dish.
- I prefer serving it immediately so the chicken stays crispy.
How to Serve Chicken Katsu Curry Recipe?
Serve this dish by placing fluffy rice on one side of the plate and sliced chicken on top. Pour the warm curry sauce generously around or over the chicken.
For presentation, sprinkle chopped spring onions and chili flakes. You can also add pickled vegetables on the side for contrast. The combination of crispy chicken, creamy sauce, and soft rice makes every bite balanced and satisfying.
Nutritional Information
Per serving, approximately:
- Calories: 522 kcal
- Protein: 37 g
- Carbohydrates: 65 g
- Fat: 12 g
This makes it a well-balanced and filling meal.
Make Ahead and Storage
Refrigerating
Store leftover curry sauce in an airtight container in the refrigerator for up to 3–4 days. Reheat gently on the stove before serving.
Freezing
The curry sauce freezes well for up to 2–3 months. Thaw overnight in the refrigerator before reheating.
Reheating
For best texture, reheat the chicken in the oven to maintain crispiness. Avoid microwaving if possible, as it may soften the coating.
Why You’ll Love This Recipe?
Here’s why this Chicken Katsu Curry is such a favorite:
- Easy to prepare — Simple steps make it beginner-friendly.
- Full of flavor — Sweet, savory, and slightly spicy in every bite.
- Family-friendly — Loved by both kids and adults.
- Customizable — Works for gluten-free, vegetarian, or dairy-free diets.
- Perfect for meal prep — Sauce can be made ahead of time.
This crispy Chicken Katsu Curry is comforting, flavorful, and incredibly satisfying. Once you try it at home, you’ll want to make it again and again. Enjoy every delicious bite!
Chicken Katsu Curry Recipe
Ingredients
Method
- Start by heating coconut oil in a large pan over medium heat. Add the diced onions and carrots with a pinch of salt. Cook until softened and slightly golden.
- Next, stir in garlic, ginger, curry powder, and turmeric. Let the spices cook briefly to release their aroma. Add flour, soy sauce, honey, and chicken stock. Simmer until the sauce thickens and the flavors combine beautifully.
- Slice the chicken breasts into thin, even pieces. This ensures they cook quickly and stay juicy inside.
- Set up three bowls: one with flour, one with beaten eggs, and one with panko breadcrumbs. Coat each chicken piece in flour, dip in egg, then press into breadcrumbs until fully covered.
- Preheat your oven to 200°C. Lightly oil a baking tray and place the breaded chicken on top.
- Drizzle a small amount of oil over the pieces to help them crisp. Bake for about 12 minutes, flip carefully, and bake another 12 minutes until golden and cooked through.
- While the chicken bakes, cook the rice according to package instructions.
- Once done, fluff it with a fork to keep it light and separated.
- When the curry sauce has thickened, blend it until smooth and creamy.
- Slice the crispy chicken diagonally for presentation. Serve over rice, pour the curry sauce generously on top, and garnish with spring onions or chili flakes.
Notes
- I like to let the curry sauce simmer a little longer for deeper flavor.
- I sometimes double-coat the chicken in breadcrumbs for extra crunch.
- Resting the breaded chicken for 10 minutes before baking helps the coating stick better.
- Adding a squeeze of fresh lime at the end brightens the dish.
- I prefer serving it immediately so the chicken stays crispy.