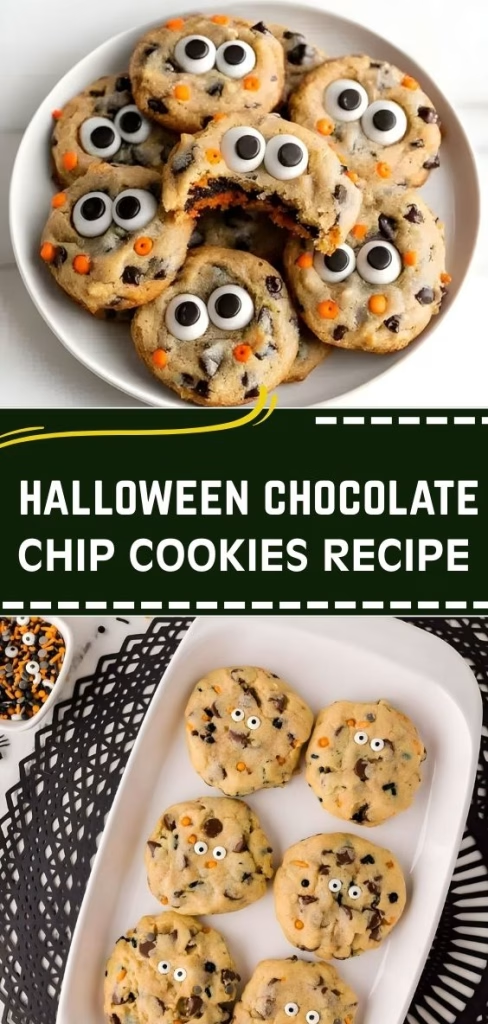
I just have to share how much fun I had making these Halloween Chocolate Chip Cookies! They were incredibly easy to whip up, and they turned into the perfect spooky-but-sweet treat for the season.
My kitchen smelled amazing, and the final cookies, with their googly eyes and festive sprinkles, were a huge hit. This recipe is definitely my new go-to for a quick and fun Halloween bake. You can also enjoy similar flavors with Beef Drunken Noodles Recipe for a savory treat alongside your cookies.
Ingredients
This recipe uses simple, accessible ingredients to create perfectly chewy and delicious cookies. Here’s what you will need to get started.
- 1/2 cup unsalted butter, melted: Using melted butter is the secret to a chewy cookie and makes the dough easy to mix by hand.
- 1/3 cup granulated sugar: Provides sweetness and helps the cookies spread to the perfect shape.
- 1/2 cup packed light brown sugar: Adds moisture and a rich, molasses flavor that pairs perfectly with chocolate.
- 1 large egg: Acts as a binder, holding all the ingredients together for the right cookie structure.
- 1 teaspoon vanilla extract: Enhances the other flavors in the cookie, giving it that classic, warm taste.
- 1/2 teaspoon salt: Balances the sweetness and brings out the depth of the chocolate and butter.
- 1/2 teaspoon baking soda: Helps the cookies rise just enough, keeping them soft in the middle.
- 1 1/2 cups all-purpose flour: Be sure to spoon and level the flour; packing it in can result in dry cookies.
- 1 1/2 cups chocolate chips: You can use semi-sweet, milk, or dark chocolate, depending on your preference.
- 1/2-3/4 cup Halloween sprinkles: These add the festive color and fun. Jimmies work best as they don’t bleed color as much as nonpareils.
- Candy eyes: These are optional but highly recommended for that fun, spooky monster look.
Note: This recipe yields approximately 18-20 cookies.
Variations
One of the best parts about this recipe is how easily you can customize it. You can swap ingredients to fit dietary needs or add new elements for a different flavor experience. Get creative and make these spooky cookies your own. For instance, the rich flavor of Maple Pecan Roasted Acorn Squash Recipe pairs beautifully as a side dessert with your Halloween cookies.
- Spider Cookies: Skip the candy eyes. Once the cookies are out of the oven, use a toothpick to drag the melted chocolate chips outwards, creating the appearance of spider legs.
- Oreo Halloween Cookies: Instead of chocolate chips, roughly chop up about a cup of Oreo cookies and fold them into the dough for a cookies-and-cream twist.
- Add Nuts: For extra crunch and nutty flavor, fold in about ¾ cup of chopped walnuts, pecans, or almonds along with the chocolate chips.
- M&M Cookies: Swap the chocolate chips for Halloween-themed M&M’s to add even more color and a crunchy candy shell.
Cooking Time
- Prep Time: 10 minutes
- Cook Time: 11-13 minutes
- Total Time: 2 hours 25 minutes (includes chilling time)
Equipment You Need
- Mixer: A stand mixer or hand mixer makes combining ingredients quick, but you can also mix by hand.
- Spatula: Use a spatula to scrape the sides of the bowl and gently fold in the chocolate chips and sprinkles.
- Baking Sheet: This is essential for baking the cookies; a standard half-sheet pan works perfectly.
- Parchment Paper or Silicone Baking Mat: Prevents the cookies from sticking to the pan and ensures even baking on the bottom.
- Ice Cream Scoop: An optional but very helpful tool for creating uniformly sized cookie dough balls.
How to Make Halloween Chocolate Chip Cookies
This recipe is designed to be straightforward and fun, using just one bowl for minimal cleanup. By following these steps, you’ll have perfectly festive and delicious cookies ready for any Halloween event. The process is broken down into making the dough, chilling it, and then baking to perfection.
Step 1: Make the Cookie Dough
In a large bowl, combine the melted butter, granulated sugar, and light brown sugar. Mix until the mixture is smooth and well combined. Then, add the egg and vanilla extract, continuing to mix until they are fully incorporated into the sugar mixture.
Next, add the all-purpose flour, salt, and baking soda to the wet ingredients. Mix on low speed or by hand until the dry ingredients are just combined; be careful not to over-mix. Finally, use a spatula to gently fold in the chocolate chips and Halloween sprinkles until they are evenly distributed throughout the dough.
Step 2: Chill the Dough
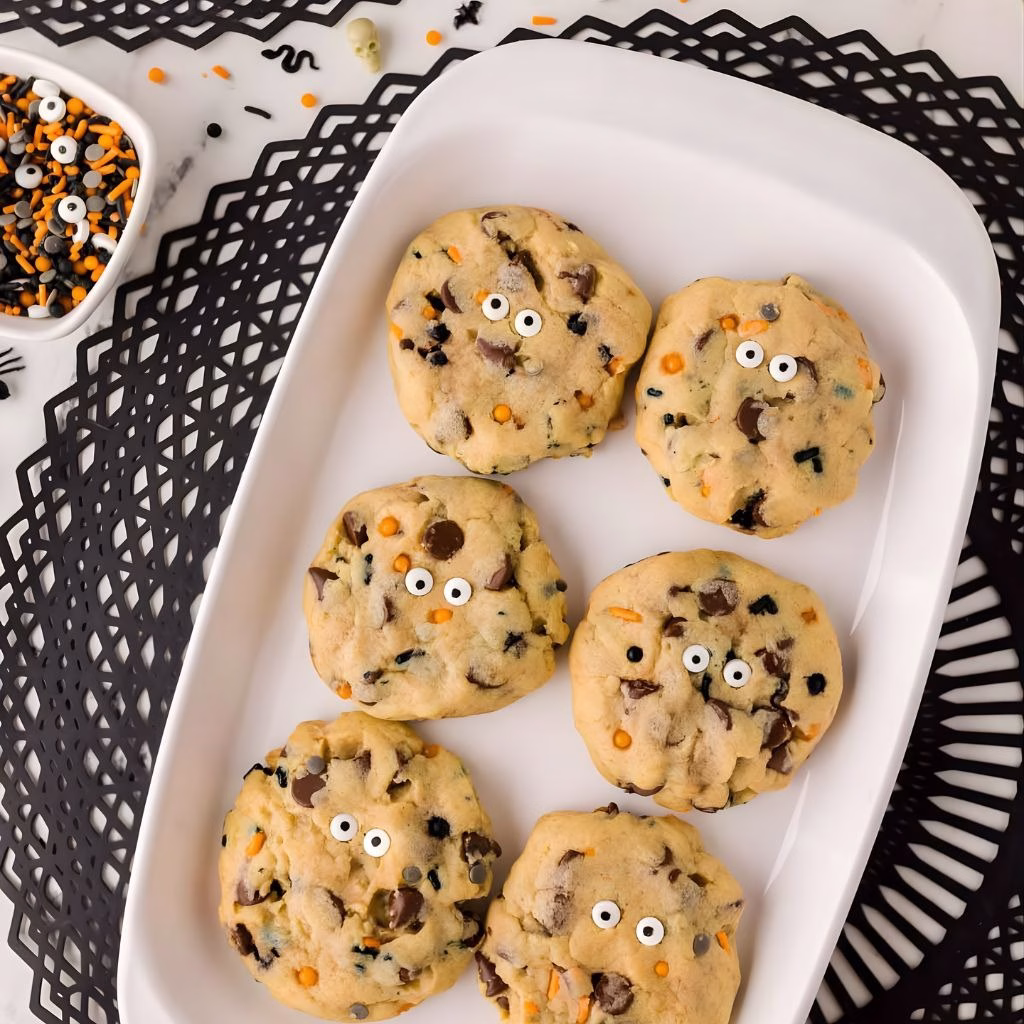
Using an ice cream scoop or two spoons, portion the dough into 2-tablespoon-sized balls. Place the dough balls onto a baking sheet lined with parchment paper. At this stage, they can be close together, as you are only chilling them.
Cover the baking sheet with plastic wrap and place it in the refrigerator to chill for at least 1.5 to 2 hours, or up to 24 hours. Chilling the dough is a crucial step that prevents the cookies from spreading too much while baking.
Step 3: Bake the Cookies
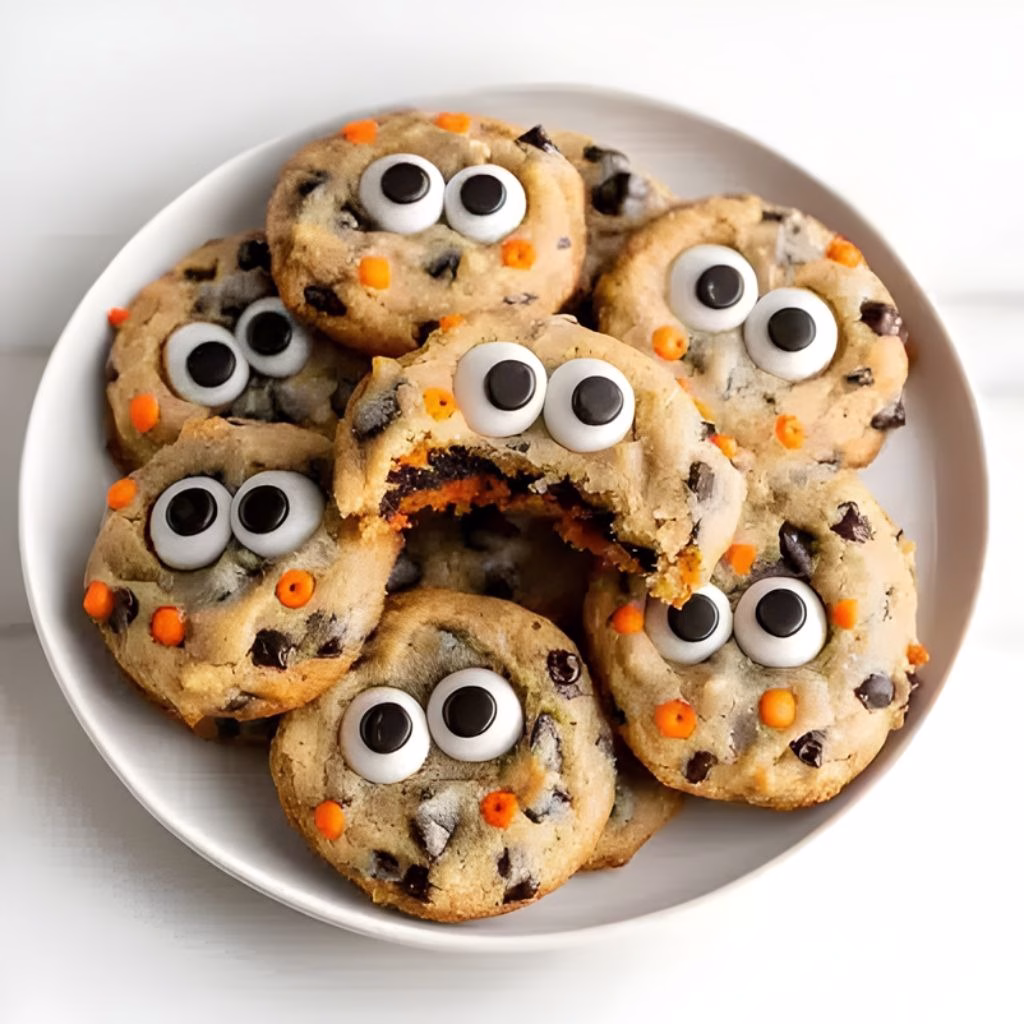
Once the dough has chilled, preheat your oven to 350°F (175°C). Arrange the cold cookie dough balls on a parchment-lined baking sheet, ensuring they are about 2 inches apart to allow for spreading. Bake for 11-13 minutes, or until the edges are golden brown.
Immediately after removing the cookies from the oven, gently press the candy eyes onto the hot cookies. If you wait too long, they won’t stick. Let the cookies cool on the baking sheet for a few minutes before transferring them to a wire rack to cool completely.
Additional Tips for Making this Recipe Better
After making a few batches, I’ve picked up some tricks that really elevate these cookies.
- I found that using a mix of mini and regular-sized chocolate chips creates wonderful pockets of melted chocolate throughout the cookie.
- Don’t skip the chilling step! I once tried baking a batch with only 30 minutes of chilling, and they spread way too much. 1.5 to 2 hours is the sweet spot.
- For the best visual appeal, I recommend reserving some sprinkles and pressing them onto the tops of the dough balls right before baking. This makes the colors pop.
- If your candy eyes are not sticking, I’ve used a tiny dab of leftover melted chocolate as “glue” on the back of the eye. It works like a charm.
How to Serve Halloween Chocolate Chip Cookies
These cookies are fantastic on their own, but a little presentation can make them even more special. Arrange them on a spooky-themed platter or a simple black plate to make the festive colors stand out. You can also package them in clear cellophane bags tied with orange and black ribbons to give as party favors or treats for friends and neighbors. For a decadent dessert, serve a warm cookie alongside a scoop of vanilla ice cream.
Nutritional Information
Here is an approximate nutritional breakdown for one cookie.
- Calories: 219 kcal
- Carbohydrates: 32g
- Protein: 2g
- Fat: 9g
Make Ahead and Storage
These cookies are perfect for preparing in advance, which is a lifesaver during a busy holiday season. Properly stored, the dough and the baked cookies hold up beautifully.
To store baked cookies, place them in an airtight container at room temperature. They will stay fresh and chewy for about 3-5 days.
To make the dough ahead, you can chill the prepared dough balls in the refrigerator for up to 24 hours before baking.
For freezing, you can freeze either the unbaked dough balls or the finished cookies. Place unbaked dough balls on a tray to flash-freeze before transferring them to a freezer bag; they can be baked from frozen by adding a few extra minutes to the baking time. Baked cookies can be frozen in an airtight container for up to 3 months.
Why You’ll Love This Recipe
There are so many reasons to fall in love with this easy and festive recipe. Here are a few of the top reasons why it will become a Halloween favorite.
- Incredibly Easy: With a prep time of just 10 minutes and no need for a stand mixer, this one-bowl recipe is perfect for bakers of all skill levels. It’s a simple, no-fuss way to create a delicious treat.
- Perfectly Delicious: These cookies have all the hallmarks of a classic chocolate chip cookie—crispy edges, a soft and chewy center, and plenty of chocolate. The flavor and texture are simply irresistible.
- Super Fun and Festive: The addition of Halloween sprinkles and candy eyes transforms a simple cookie into a spooky, fun creation. They are perfect for parties, bake sales, or just getting into the holiday spirit.
- Great for Making Ahead: The dough can be made up to 24 hours in advance and chilled, or the dough balls can be frozen for months. This flexibility makes it easy to plan for any event.
Halloween Chocolate Chip Cookies Recipe
Ingredients
Method
- In a large bowl, combine the melted butter, granulated sugar, and light brown sugar. Mix until the mixture is smooth and well combined. Then, add the egg and vanilla extract, continuing to mix until they are fully incorporated into the sugar mixture.
- Next, add the all-purpose flour, salt, and baking soda to the wet ingredients. Mix on low speed or by hand until the dry ingredients are just combined; be careful not to over-mix. Finally, use a spatula to gently fold in the chocolate chips and Halloween sprinkles until they are evenly distributed throughout the dough.
- Using an ice cream scoop or two spoons, portion the dough into 2-tablespoon-sized balls. Place the dough balls onto a baking sheet lined with parchment paper. At this stage, they can be close together, as you are only chilling them.
- Cover the baking sheet with plastic wrap and place it in the refrigerator to chill for at least 1.5 to 2 hours, or up to 24 hours. Chilling the dough is a crucial step that prevents the cookies from spreading too much while baking.
- Once the dough has chilled, preheat your oven to 350°F (175°C). Arrange the cold cookie dough balls on a parchment-lined baking sheet, ensuring they are about 2 inches apart to allow for spreading. Bake for 11-13 minutes, or until the edges are golden brown.
Notes
- I found that using a mix of mini and regular-sized chocolate chips creates wonderful pockets of melted chocolate throughout the cookie.
- Don’t skip the chilling step! I once tried baking a batch with only 30 minutes of chilling, and they spread way too much. 1.5 to 2 hours is the sweet spot.
- For the best visual appeal, I recommend reserving some sprinkles and pressing them onto the tops of the dough balls right before baking. This makes the colors pop.
- If your candy eyes are not sticking, I’ve used a tiny dab of leftover melted chocolate as “glue” on the back of the eye. It works like a charm.