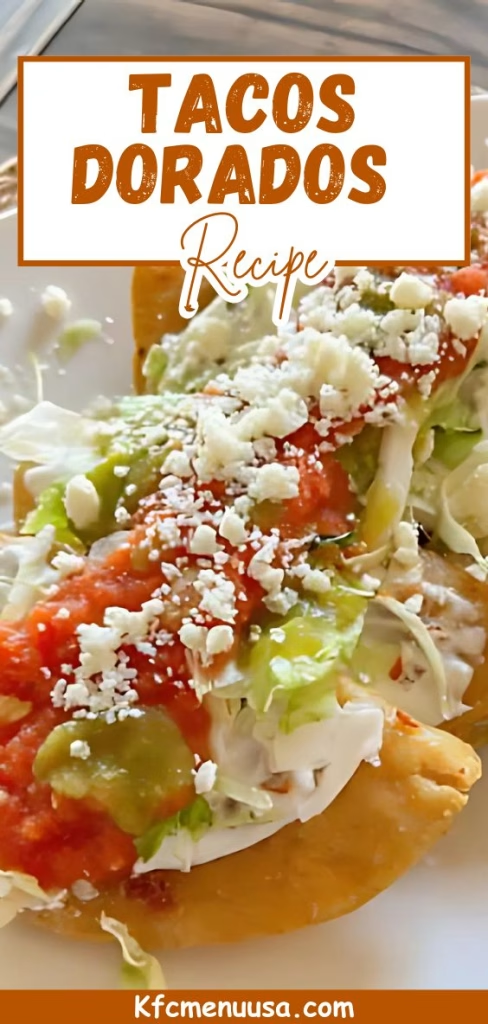
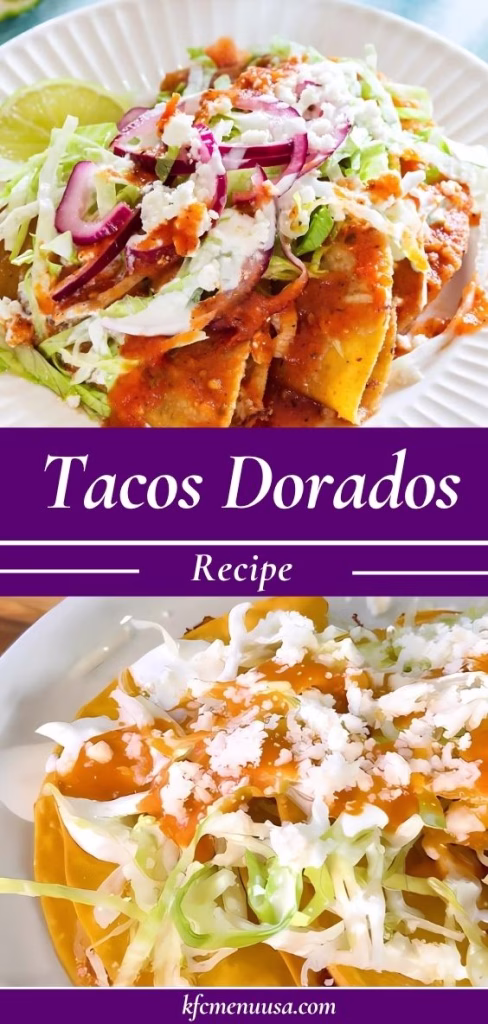
Tacos Dorados Recipe: Crunchy Mexican Classic Made Easy
I made Tacos Dorados last weekend, and let me tell you—they disappeared faster than I could plate them. That crispy shell, the juicy, savory filling, and those fresh toppings made every bite unforgettable.
I’ve tried a lot of taco styles, but this one hit differently. The kitchen smelled amazing while frying, and I had to resist sneaking a few before serving! This recipe is now on repeat in my home.
Ingredients
Each ingredient in this recipe plays a key role in creating the perfect crunch, flavor, and texture. Here’s what you’ll need:
- 2 cups cooked and shredded chicken, beef, or pork – Use rotisserie chicken for a quick option or slow-cooked meat for deeper flavor.
- 1 small onion, finely chopped – Adds sweetness and aroma to the filling.
- 2 cloves garlic, minced – Brings out savory richness in the meat.
- 1 teaspoon ground cumin – Gives the tacos that warm, earthy depth.
- 1 teaspoon chili powder – Adds mild heat and Mexican flair.
- Salt and pepper, to taste – Adjust to balance flavor.
- 16 corn tortillas – Corn holds up better than flour when frying; warm before rolling to prevent cracking.
- Toothpicks – To keep the rolled tacos intact during frying.
- Vegetable oil (as needed) – Use a neutral oil like canola for crisp frying.
- Shredded lettuce – For fresh crunch on top.
- Salsa – Choose a mild or spicy salsa, depending on your taste.
- Mexican crema or sour cream – Adds cool creaminess to balance the heat.
- Queso fresco or cotija cheese – Crumbled on top for salty richness.
- Guacamole – Creamy and zesty for the perfect finish.
Note: This recipe yields several servings—perfect for 4–6 people depending on appetite and sides.
Variations
Want to switch it up or make this dish suit different diets? Here are some ways to personalize your Tacos Dorados:
- Vegetarian: Use mashed potatoes or black beans instead of meat.
- Spicy Upgrade: Mix in chopped jalapeños or a dash of cayenne to the filling.
- Gluten-Free: Stick to certified gluten-free corn tortillas.
- Dairy-Free: Swap crema and cheese with plant-based alternatives or skip them entirely.
Cooking Time
Here’s how much time you’ll need from start to finish:
- Prep Time: 20 minutes
- Cooking Time: 30 minutes
- Total Time: 50 minutes
Equipment You’ll Need
Here’s the basic kitchen gear I used and how it helped:
- Mixing bowl: To combine the filling ingredients evenly.
- Skillet: Perfect for cooking the filling and warming tortillas.
- Tongs: Safe and easy way to handle hot tacos while frying.
- Paper towels: To absorb oil and keep tacos crisp after frying.
- Toothpicks: Hold rolled tortillas together until crisped.
How to Make Tacos Dorados Recipe?
This process is surprisingly simple and super satisfying. Here’s how I made mine from scratch:
Prepare the Filling
I started by sautéing the chopped onion and garlic in a little oil over medium heat. Once soft and fragrant, I added the shredded meat along with the cumin, chili powder, salt, and pepper. I stirred it all together until it was well mixed and warmed through. The smell was absolutely amazing at this point—I could already taste how good the tacos would be.

Warm the Tortillas
Warming your tortillas is a must. I heated mine in a dry skillet for about 20 seconds per side. This made them soft and flexible, so they rolled without cracking. You can also use the microwave wrapped in a damp towel for 30 seconds if you prefer.

Assemble the Tacos
I laid out a tortilla, added a spoonful of filling near one edge, and rolled it up tightly. To keep it from unrolling while frying, I secured it with a toothpick. Repeat this process until all the tacos are rolled and ready.
Fry the Tacos
In a deep skillet, I heated about ½ inch of oil until shimmering. I placed the tacos seam-side down in the oil and fried them in batches, flipping halfway through, until they were golden and crisp on all sides. This took about 3–4 minutes per batch. Once done, I transferred them to a paper towel-lined plate to drain.
Add Toppings and Serve
Once cooled just slightly, I topped the tacos with shredded lettuce, a drizzle of crema, some crumbled queso fresco, and salsa. A side of guacamole sealed the deal. Every bite had crunch, creaminess, and that savory kick from the filling.

Additional Tips for Making This Recipe Better
Here are some things I picked up while making these that really improved the final result:
- Don’t overfill the tortillas – It makes rolling tricky and leads to breakage.
- Warm tortillas thoroughly – A little extra time here prevents cracks and makes rolling smooth.
- Watch your oil temperature – Keep it around 350°F; too hot will burn, too cold will make them soggy.
- Fry in small batches – This helps keep the oil temperature stable and ensures even crisping.
- Use freshly made salsa or crema – It adds a whole new level of freshness and brightness.
How to Serve Tacos Dorados Recipe?
Presentation makes a big difference with these golden beauties! I like to line them up on a long platter, then sprinkle them with queso fresco and chopped cilantro for color. Serve them with little bowls of salsa, guacamole, and crema so everyone can dip or drizzle their own. For drinks, a tangy margarita or sweet horchata pairs perfectly.

Nutritional Information
Here’s a rough idea of what you’re getting per serving:
- Calories: 250
- rotein: 15g
- Carbohydrates: 18g
- Fat: 13g
Great balance of energy and protein—just go easy on the cheese and crema if you’re watching fats!
Make Ahead and Storage
- Make Ahead Tips: I often prep the filling a day in advance and store it in the fridge. That way, all I need to do is roll and fry when it’s time to serve.
- Refrigerator: Store leftover tacos in an airtight container for up to 3 days. Reheat in the oven at 375°F for about 10 minutes to bring back the crisp.
- Freezer: You can assemble the tacos, skip the frying, and freeze them raw for up to 1 month. Just thaw, then fry fresh when ready.
Why You’ll Love This Recipe?
These Tacos Dorados are more than just delicious—they’re versatile, family-friendly, and easy to make! Here’s why I keep coming back to this recipe:
- Quick and beginner-friendly – Great for weeknights or when you’re short on time.Full of flavor and crunch – Every element adds something tasty to the mix.
- Easily customizable – Works with meats, veggies, or cheese, depending on your mood or dietary needs.
- Perfect for sharing – Ideal for parties, family dinners, or meal prep.
- Loved by kids and adults alike – Crunchy, dippable, and fun to make together.

Tacos Dorados Recipe
Ingredients
Method
- I started by sautéing the chopped onion and garlic in a little oil over medium heat. Once soft and fragrant, I added the shredded meat along with the cumin, chili powder, salt, and pepper.
- I stirred it all together until it was well mixed and warmed through. The smell was absolutely amazing at this point—I could already taste how good the tacos would be.
- Warming your tortillas is a must. I heated mine in a dry skillet for about 20 seconds per side. This made them soft and flexible, so they rolled without cracking. You can also use the microwave wrapped in a damp towel for 30 seconds if you prefer.
- I laid out a tortilla, added a spoonful of filling near one edge, and rolled it up tightly. To keep it from unrolling while frying, I secured it with a toothpick. Repeat this process until all the tacos are rolled and ready.
- In a deep skillet, I heated about ½ inch of oil until shimmering. I placed the tacos seam-side down in the oil and fried them in batches, flipping halfway through, until they were golden and crisp on all sides. This took about 3–4 minutes per batch. Once done, I transferred them to a paper towel-lined plate to drain.
- Once cooled just slightly, I topped the tacos with shredded lettuce, a drizzle of crema, some crumbled queso fresco, and salsa. A side of guacamole sealed the deal. Every bite had crunch, creaminess, and that savory kick from the filling.
Notes
- Don’t overfill the tortillas – It makes rolling tricky and leads to breakage.
- Warm tortillas thoroughly – A little extra time here prevents cracks and makes rolling smooth.
- Watch your oil temperature – Keep it around 350°F; too hot will burn, too cold will make them soggy.
- Fry in small batches – This helps keep the oil temperature stable and ensures even crisping.
- Use freshly made salsa or crema – It adds a whole new level of freshness and brightness.