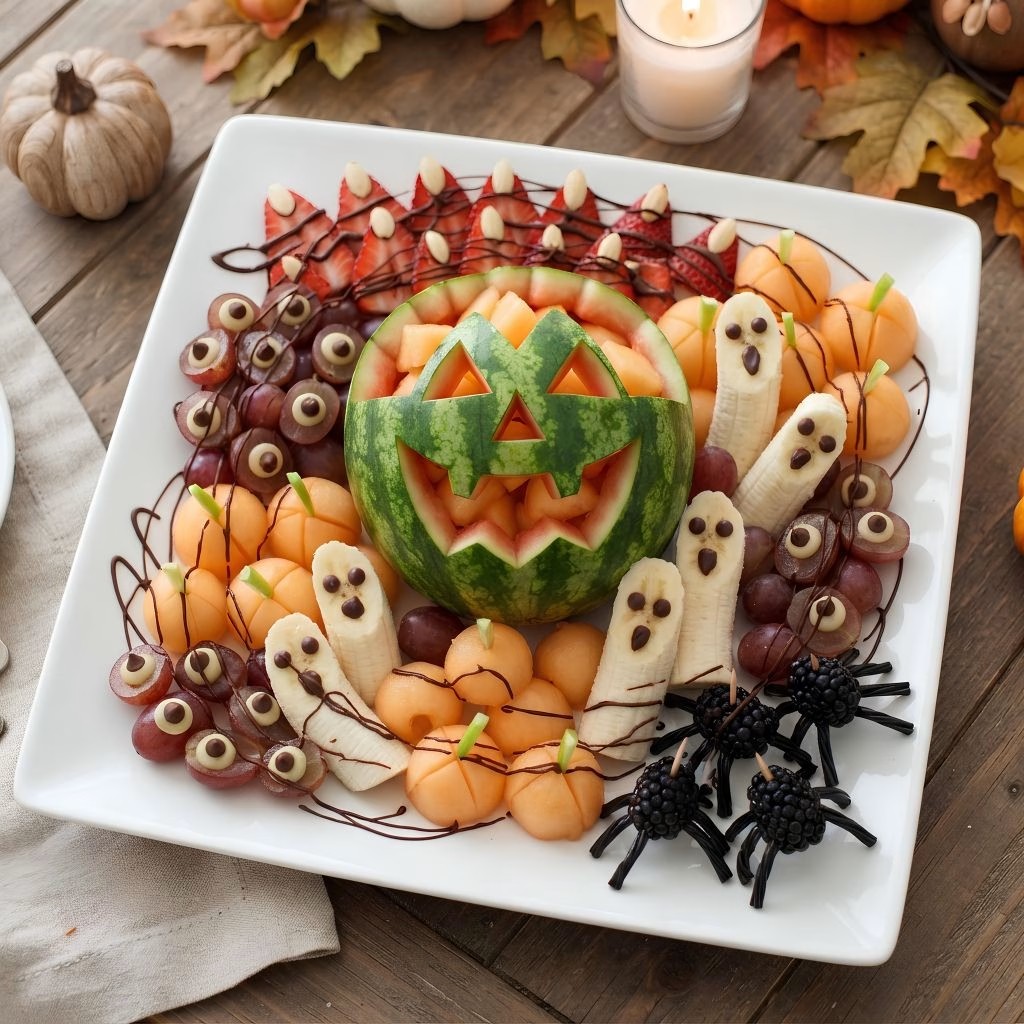
I make this Spooky Fruit Platter Recipe every single October, and it’s become the one dish my kids actually fight over at Halloween parties. I remember the first time I tried turning plain fruit into a “scary” display. I had no carving skills, just a paring knife and a lot of patience, and it still turned out great.
What I love most is that it’s healthy, it’s cheap, and it still gets gasps from guests who expect candy, not cantaloupe. If you’ve been searching for a halloween fruit platter that looks impressive without hours of effort, I promise this one delivers. I’m walking you through exactly how I build mine, step by step, so you can skip my early mistakes.
Cooking Time
- Prep Time: 30 minutes
- Cooking Time: 0 minutes (no cooking required)
- Total Time: 30 minutes
Ingredients
- 1 medium watermelon — the base for my “pumpkin” bowl and carved ghost shapes
- 2 cups green grapes — I use these for “monster eyeballs,” halved and topped with a chocolate chip pupil
- 1 cup blackberries — perfect stand-ins for little “spider” bodies or eerie clusters
- 2 cups strawberries — hulled and sliced for “witch fingers” or bloody drizzle effect
- 1 cantaloupe — carved into small round “pumpkins” once peeled and balled
- 2 bananas — sliced for “ghost” shapes, dipped quickly in lemon juice so they don’t brown
- 1 cup pineapple chunks — fresh, not canned, because fresh holds its shape and sweetness better
- 1 cup blueberries — great filler for dark, moody color contrast on the tray
- 2 kiwis — peeled and sliced into rounds for little “frog eyes” or green accents
- ¼ cup melted dark chocolate — used for drizzling “spiderwebs” or eyeball pupils
- 2 tablespoons lemon juice — keeps cut bananas and apples from browning too fast
- 1 green apple — thinly sliced for “witch teeth” when paired with almond slivers
- 10 almond slivers — tucked into apple slices to form creepy little teeth
Note: This platter serves 10-12 people as a party snack or dessert table item.
Equipment You Need
- Sharp paring knife — for clean, detailed cuts on fruit shapes
- Melon baller — makes quick, uniform “pumpkin” and “eyeball” rounds
- Large serving platter or wooden board — gives you space to arrange everything creatively
- Small bowls — for lemon water soaks and melted chocolate
- Toothpicks or skewers — handy for assembling fruit “spiders” or finger shapes
- Cutting board — a stable surface for all your fruit prep
- Piping bag or spoon — for drizzling chocolate webs with more control
How to Make a Spooky Fruit Platter Recipe?
I always start by prepping my fruit in batches so nothing sits out too long and turns brown or mushy. This recipe really only needs a knife, a steady hand, and a little imagination to pull off. Here’s exactly how I build mine from start to finish.
Prepare the Watermelon Base
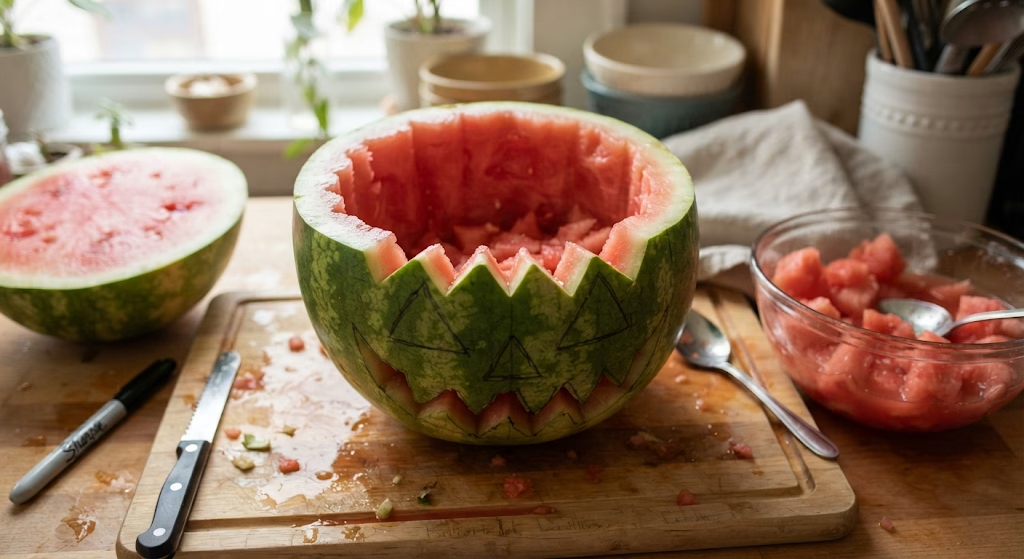
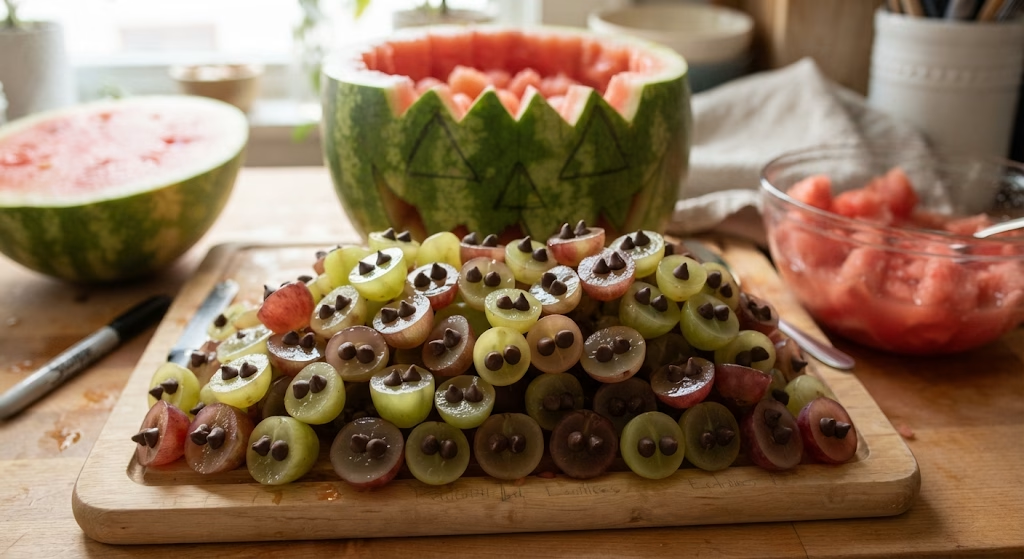
I cut my watermelon in half and scoop out a chunk to act as a bowl or carve a simple jagged “mouth” into the rind. Using a marker, I lightly sketch a spooky face before cutting so my lines stay even. This piece becomes the centerpiece everything else builds around.
Make the Monster Eyeballs
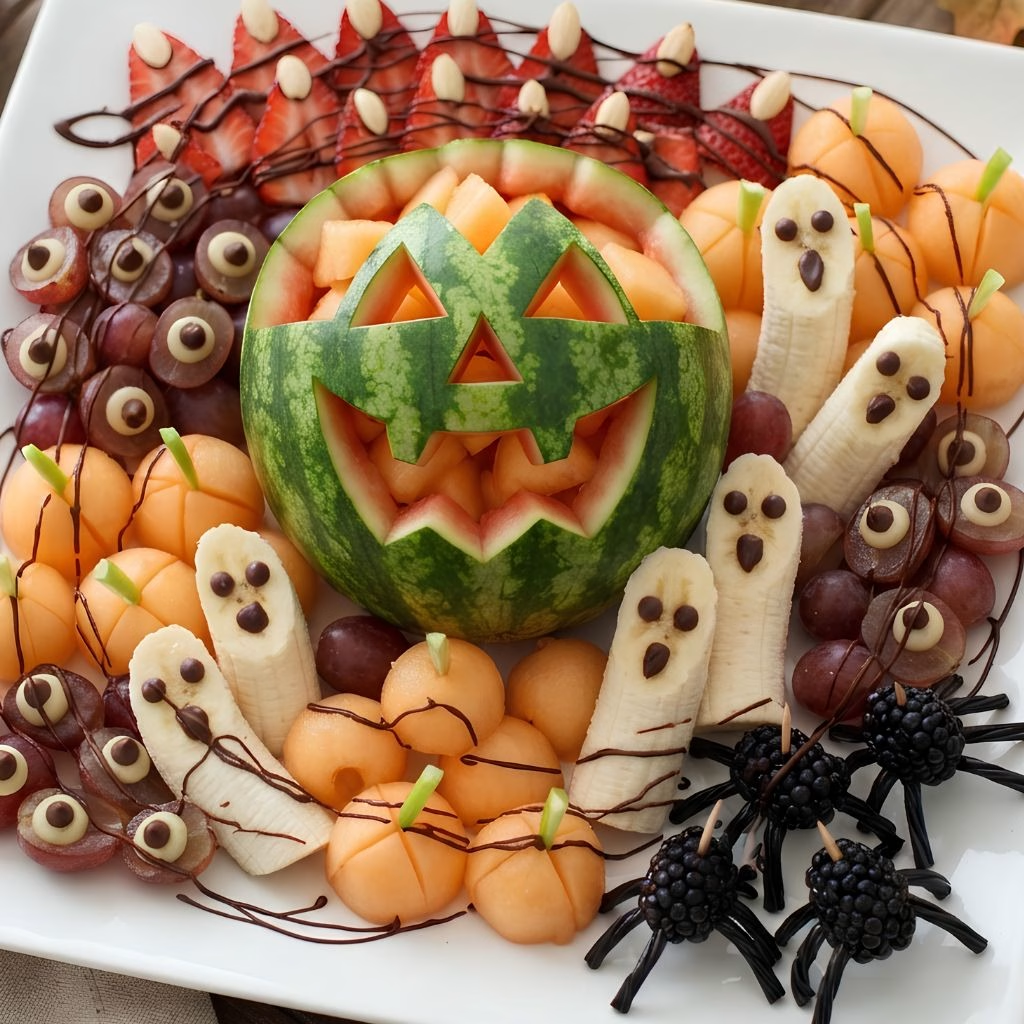
I slice my grapes in half and press a small chocolate chip into the cut side of each one. This step takes a few minutes but it’s the detail guests notice first. I like clustering them together so they look like they’re watching you from the tray.
Shape the Witch Fingers
I slice strawberries lengthwise and tuck a sliver of almond at the tip for a “fingernail.” A light drizzle of melted chocolate or strawberry syrup down the side makes them look delightfully gruesome. I lay these in a loose row near the edge of the platter.
Cut the Little Pumpkins
Using my melon baller, I scoop rounds out of the cantaloupe and score thin vertical lines with a toothpick to mimic pumpkin ridges. A tiny piece of green apple skin on top works as the stem. These add a nice pop of orange across the tray.
Form the Banana Ghosts
I slice bananas into thick ovals, dip them quickly in lemon juice, and add two chocolate chip “eyes” and an open “mouth” using a toothpick dipped in melted chocolate. I place these scattered around so they feel randomly spooky rather than too uniform.
Build the Berry Spiders
I thread blackberries onto toothpicks with thin strips of apple skin or licorice bent to look like legs. It’s a small, fiddly step, but it adds real texture and makes the whole board feel more “alive.” I group two or three together near a corner.
Arrange and Drizzle
Once every piece is ready, I lay everything out on my platter, clustering similar items so the eye has a resting point. Last, I drizzle melted dark chocolate across the top in thin, web-like lines using a piping bag for that final spooky touch.
Chill Before Serving
I pop the finished platter in the fridge for 10-15 minutes before guests arrive. This keeps everything crisp and lets the chocolate set slightly so it doesn’t smear when people start grabbing pieces.
Additional Tips for Making This Recipe Better
I’ve made this platter more times than I can count, and these small tweaks genuinely made a difference for me.
- I always soak my cut bananas and apples in lemon water for a minute it keeps them looking fresh for hours instead of thirty minutes.
- I prep the “messier” items like berry spiders last, right before serving, because they don’t hold up as well sitting out.
- I keep my knife very sharp; a dull blade tears delicate fruit like strawberries instead of giving clean edges.
- I use parchment paper under the platter when drizzling chocolate so cleanup is painless.
- I try to balance my colors across the board too much orange or green in one spot makes it look unplanned.
Common Mistakes to Avoid
I’ve slipped up on all of these at least once, so I’m sharing them so you don’t have to.
- I once used frozen berries by mistake, and they turned mushy and watery within minutes. I always use fresh fruit for this platter.
- I didn’t dip my bananas in lemon juice the first time, and they browned before guests even arrived.
- I overcrowded my platter early on, which made it hard for guests to actually grab pieces without knocking others over.
- I drizzled chocolate too early once, and it hardened into clumps instead of thin web lines timing really matters here.
- I cut my fruit shapes too small the first few times, which made them fall apart when picked up with toothpicks.
How to Serve Spooky Fruit Platter
I like serving this on a dark wooden board or a black platter since it makes the fruit colors pop dramatically. Scattering a few extra chocolate chips, edible “eyeball” candies, or a light dusting of cinnamon around the edges adds an extra festive touch.
I also set out small skewers nearby so guests can build their own mini fruit kabobs straight from the tray. For a bigger spread, I’ll pair this with a dip like yogurt or a light caramel sauce in a small bowl at the center.
Variations
- I swap chocolate chips for raisins when I want a lower-sugar version of the monster eyeballs.
- For a dairy-free version, I use dairy-free dark chocolate chips, which melt and drizzle just as well.
- I sometimes add dragon fruit for a shocking pink-and-black contrast that photographs beautifully.
- For a tropical twist, I mix in mango chunks shaped into little “pumpkins” alongside the cantaloupe.
- I occasionally use a sugar-free chocolate drizzle for guests watching their sugar intake.
- I add fresh mint leaves tucked between fruit pieces for color contrast and a slightly fresher bite.
Nutritional Information
This platter is naturally light, so it’s a guilt-free option for any Halloween spread. Here’s roughly what one serving looks like:
- Calories: 90-110 kcal per serving
- Protein: 1-2 g per serving
- Carbohydrates: 20-24 g per serving
- Fat: 1-2 g per serving
Make Ahead and Storage
I usually prep all my fruit shapes the night before and store them separately in airtight containers in the fridge, assembling the full platter only an hour or two before serving. This keeps everything crisp and prevents sogginess from early assembly.
For storage, leftovers stay fresh in a sealed container in the fridge for about 1-2 days, though bananas and apples soften faster than the rest. I don’t recommend freezing this platter since fresh fruit turns watery and loses its texture once thawed.
Why You’ll Love This Recipe?
I keep coming back to this platter every Halloween because it checks so many boxes at once.
- It’s genuinely easy to prep. Even with all the detailed work, I’m usually done within 30 minutes once my fruit is washed and ready.
- It’s a healthier party option. I love that I can set this next to candy bowls and still have kids reaching for fruit first.
- It’s endlessly customizable. I change up the shapes and fruits depending on what’s in season or what I have on hand.
- It works for any Halloween gathering. I’ve brought this to classroom parties, potlucks, and backyard gatherings, and it fits every time.
- It photographs beautifully. Honestly, half the fun for me is setting it up just right for a quick photo before it disappears.
FAQs
Can I make this spooky fruit platter the night before?
I recommend prepping and cutting fruit the night before, but assembling the full platter only a few hours before serving for the freshest look.
What fruits work best for a halloween fruit tray?
I find watermelon, grapes, strawberries, bananas, and cantaloupe hold their shape and color best for spooky designs.
How do I keep sliced bananas and apples from browning?
I dip my sliced bananas and apples briefly in lemon juice diluted with water, which slows down browning for several hours.
Is this recipe good for Halloween fruit ideas for school parties?
Yes, I’ve brought a simplified version to school events. It’s allergy-friendly, needs no cooking, and kids love the spooky shapes.
Can I turn this into a freaky fruit platter with less prep time?
I sometimes simplify mine by just halving grapes for eyeballs and drizzling chocolate over a bowl of mixed fruit, still spooky, way faster.
Looking for more fun recipes to round out your spread? I also love pairing this platter with a fresh garden salad recipe for guests who want something savory alongside the sweet. If you’re planning a bigger Halloween dessert table, my chocolate dessert recipe is another crowd favorite worth checking out.

Spooky Fruit Platter Recipe
Ingredients
Method
- I cut my watermelon in half and scoop out a chunk to act as a bowl or carve a simple jagged “mouth” into the rind. Using a marker, I lightly sketch a spooky face before cutting so my lines stay even. This piece becomes the centerpiece everything else builds around.
- I slice my grapes in half and press a small chocolate chip into the cut side of each one. This step takes a few minutes but it’s the detail guests notice first. I like clustering them together so they look like they’re watching you from the tray.
- I slice strawberries lengthwise and tuck a sliver of almond at the tip for a “fingernail.” A light drizzle of melted chocolate or strawberry syrup down the side makes them look delightfully gruesome. I lay these in a loose row near the edge of the platter.
- Using my melon baller, I scoop rounds out of the cantaloupe and score thin vertical lines with a toothpick to mimic pumpkin ridges. A tiny piece of green apple skin on top works as the stem. These add a nice pop of orange across the tray.
- I slice bananas into thick ovals, dip them quickly in lemon juice, and add two chocolate chip “eyes” and an open “mouth” using a toothpick dipped in melted chocolate. I place these scattered around so they feel randomly spooky rather than too uniform.
- I thread blackberries onto toothpicks with thin strips of apple skin or licorice bent to look like legs. It’s a small, fiddly step, but it adds real texture and makes the whole board feel more “alive.” I group two or three together near a corner.
- Once every piece is ready, I lay everything out on my platter, clustering similar items so the eye has a resting point. Last, I drizzle melted dark chocolate across the top in thin, web-like lines using a piping bag for that final spooky touch.
- I pop the finished platter in the fridge for 10-15 minutes before guests arrive. This keeps everything crisp and lets the chocolate set slightly so it doesn’t smear when people start grabbing pieces.
Notes
- I always soak my cut bananas and apples in lemon water for a minute. It keeps them looking fresh for hours instead of thirty minutes.
- I prep the “messier” items like berry spiders last, right before serving, because they don’t hold up as well sitting out.
- I keep my knife very sharp; a dull blade tears delicate fruit like strawberries instead of giving clean edges.
- I use parchment paper under the platter when drizzling chocolate so cleanup is painless.
- I try to balance my colors across the board. Too much orange or green in one spot makes it look unplanned.