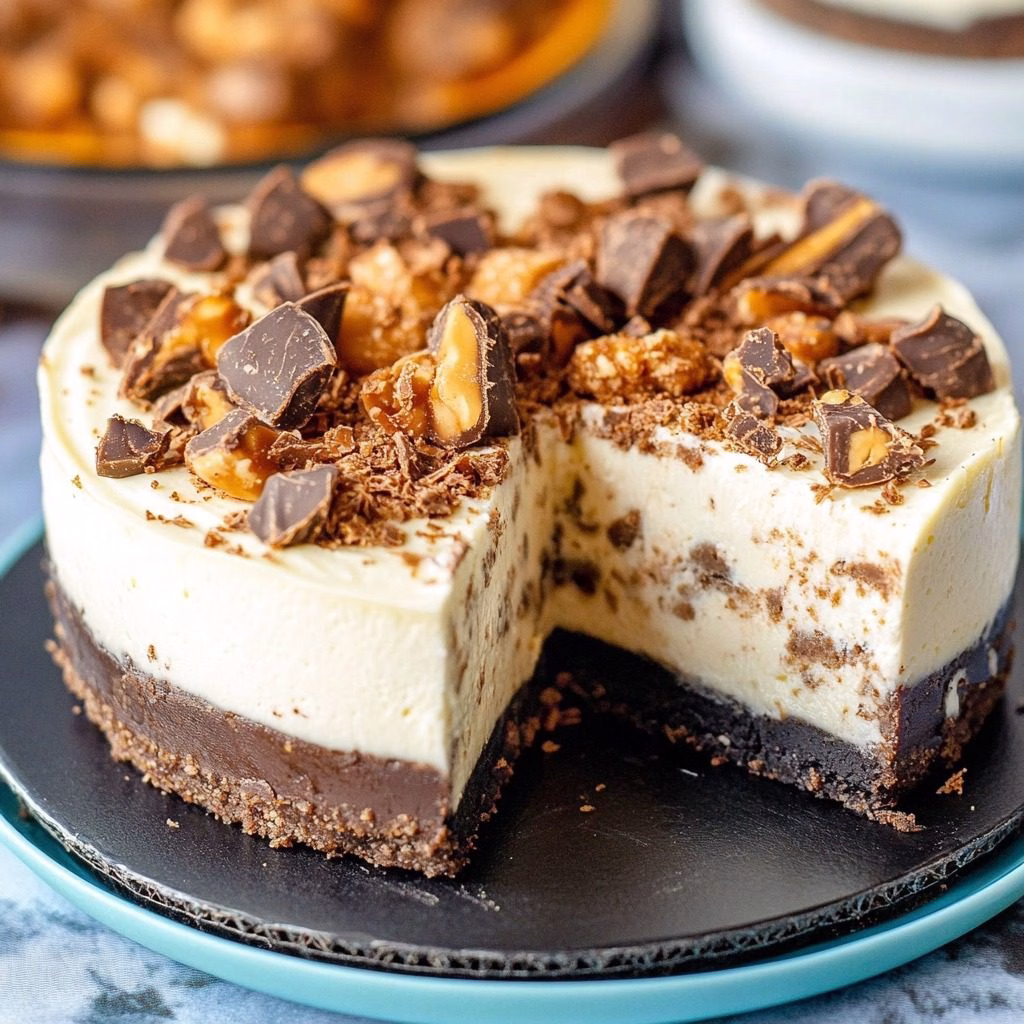
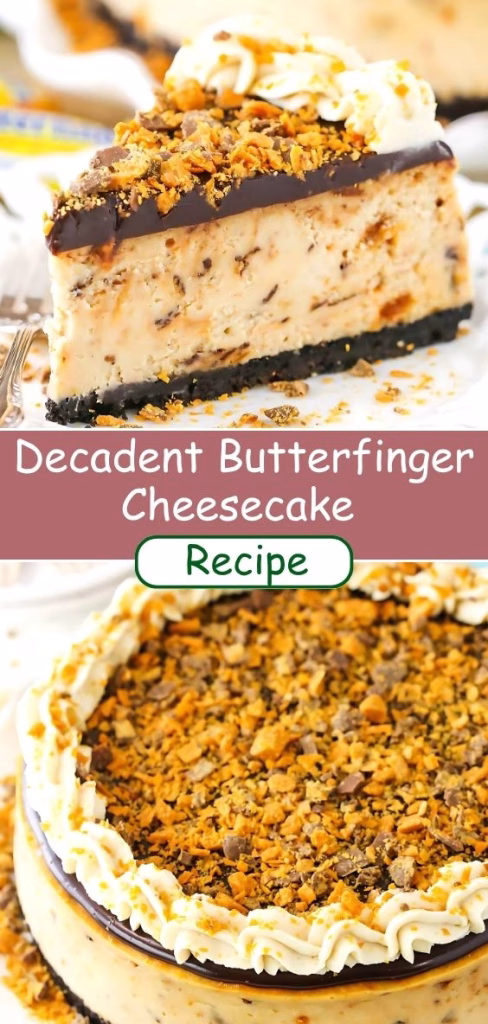
I’m so excited to share this Butterfinger Cheesecake recipe with you! The first time I made this, I knew it was a winner. Imagine a creamy, peanut butter-flavored cheesecake, loaded with chunks of Butterfinger candy bars, all nestled in a chocolate Oreo crust.
Topped with luscious chocolate ganache and a peanut butter-infused whipped cream, it’s truly a dessert masterpiece.
Whether it’s a family gathering or a cozy night at home, this cheesecake will have everyone asking for seconds. Trust me, making this recipe is as enjoyable as eating it!
Ingredients
Here’s everything you’ll need to bring this show-stopping cheesecake to life. Each ingredient has a purpose, so follow along for tips to ensure perfection.
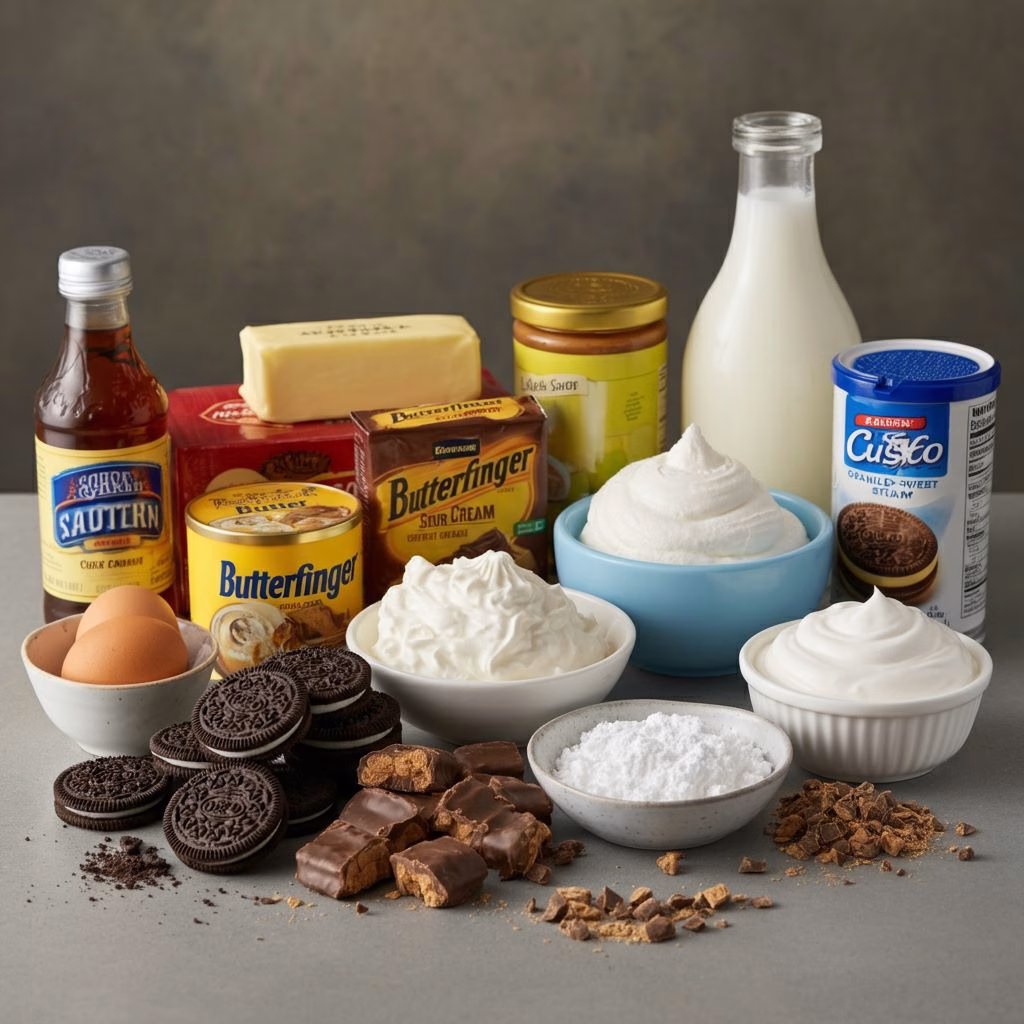
- Oreo cookies, crushed (2 ¼ cups): These serve as the base, and the chocolate flavor pairs perfectly with Butterfingers. No need to remove the filling for this crust!
- Salted butter, melted (4 tbsp): Helps bind the crust together and adds a slight salty balance.
- Cream cheese, room temperature (24 ounces): The star of any cheesecake! Using room-temperature cream cheese ensures a smooth batter.
- Granulated sugar (1 cup): Adds sweetness to complement the peanut butter and Butterfingers.
- All-purpose flour (3 tbsp): Helps stabilize the cheesecake and achieve a creamy texture.
- Sour cream, room temperature (¾ cup): Adds tanginess for balance and a silkier consistency.
- Peanut butter (½ cup): Adds richness and that signature flavor.
- Vanilla extract (1 tsp): Enhances the overall flavor of the cheesecake.
- Large eggs, room temperature (4): Bind the ingredients together while creating a velvety final texture.
- Butterfinger candy bars, chopped (1 ½ cups or 12 fun-sized bars): For that signature crunch and plenty of candy bar goodness.
- Semi-sweet chocolate chips (6 oz): Used to make the chocolate ganache.
- Heavy whipping cream (½ cup): Also for the ganache, plus some reserved for the whipped topping.
- Powdered sugar (½ cup): Sweetens the peanut butter whipped cream to just the right level.
- Additional Butterfingers, chopped (for garnish): Because more is always better in this case!
Note: This recipe yields roughly 12 servings.
Variations
Here are some exciting ways to adapt this recipe to suit your preferences or dietary needs:
- Gluten-Free: Use a gluten-free chocolate cookie instead of Oreos, and switch to a gluten-free flour.
- Sugar-Free: Substitute the sugar with a sugar-free alternative, and consider using sugar-free peanut butter and candy bars.
- Nut-Free: Swap peanut butter for a nut-free alternative, like sunflower seed butter. Use nut-free candies for garnish.
- Extra Flavor: Add a tablespoon of coffee granules to the crust mixture for a rich mocha flavor or drizzle caramel sauce on top before serving.
These tweaks make it versatile enough to sit alongside other dessert ideas like apple slab pie recipe depending on what you’re craving.
Cooking Time
Here’s how long it will take from start to finish:
- Prep Time: 25 minutes
- Cooking Time: 1 hour 25 minutes
- Total Time: Approximately 7 hours (includes cooling and chilling time)
Equipment You Need
You don’t need fancy tools for this cheesecake. Here’s what you’ll need:
- 9-inch springform pan: Essential for a cheesecake that releases easily after baking.
- Parchment paper: Helps prevent sticking at the bottom of the pan.
- Aluminum foil: To wrap the pan and prevent water from seeping in during the water bath.
- Mixing bowls: For mixing the crust, batter, and toppings.
- Electric mixer: Helps achieve a smooth cheesecake batter and whipped cream topping.
- Heatproof bowls: For melting chocolate chips and heavy cream.
- Knife and cutting board: For chopping Butterfingers.
- Piping bag with a star tip (optional): To add decorative whipped cream shells.
How to Make Butterfinger Cheesecake
Creating this Butterfinger Cheesecake might take a little time, but the steps are straightforward and totally worth it. Follow along for foolproof results!

Step 1: Prepare the Crust
Preheat your oven to 325°F (163°C). Line the bottom of your springform pan with parchment paper and grease the sides lightly with butter. Combine the crushed Oreo cookies and melted butter in a bowl until well mixed. Press this mixture firmly into the bottom of the pan to form an even crust. Bake for 10 minutes and set it aside to cool while you work on the filling.
Step 2: Mix the Cheesecake Filling
Set your oven to 300°F (148°C). Beat the cream cheese, sugar, and flour in a large bowl on low speed until smooth and creamy. Avoid overmixing, as excess air can cause cracks. Add the sour cream, peanut butter, and vanilla extract, continuing to mix on low. Finally, beat in the eggs one at a time, ensuring each is fully combined before adding the next. Gently fold in the chopped Butterfingers.
Step 3: Assemble the Cheesecake
Pour the creamy peanut butter filling onto the cooled crust. Prepare a water bath by placing the springform pan inside a larger pan, then filling the outer pan with warm water until it reaches halfway up the sides of the springform pan. This helps the cheesecake bake evenly and prevents cracking.
Step 4: Bake and Cool
Bake the cheesecake for 1 hour and 25 minutes. The center should be set but slightly jiggly. Once done, turn off the oven and leave the cheesecake inside with the door closed for 30 minutes. Gradually cool it further by cracking the oven door for another 30 minutes. Once cooled, refrigerate for at least 5 hours or overnight to allow it to firm up.
Step 5: Make the Ganache and Whipped Cream
Melt the chocolate chips with warm heavy cream, stirring until smooth. Spread the thick, shiny ganache evenly over the cooled cheesecake. Prepare the whipped cream by beating heavy cream, powdered sugar, peanut butter, and vanilla extract at high speed until stiff peaks form. Pipe or dollop the whipped cream around the edges and sprinkle with additional chopped Butterfingers.
Additional Tips for Making This Recipe Better
Here are some personal tips for ensuring your cheesecake comes out perfect every time:
- Wrap your springform pan tightly in 2-3 layers of aluminum foil to prevent water from leaking in during the water bath.
- Always use room-temperature ingredients to achieve the smoothest batter possible.
- Chill your mixing bowl and whisk attachment before whipping cream. It’ll come together faster and hold its shape better.
- Don’t skip the cooling process, as this ensures that your cheesecake won’t crack.
How to Serve Butterfinger Cheesecake?
Presentation is everything! Serve your Butterfinger Cheesecake on a cake stand for a professional touch. Add a few extra chopped Butterfingers around the edges for decoration.
You could also drizzle some caramel or extra ganache on the plate before plating a slice for an elegant look. And if you’re hosting a dessert table, pairing this with a lemon blueberry yogurt loaf will offer a delightful mix for your guests.

Nutritional Information
Here’s a quick breakdown of the approximate nutritional values (per slice):
- Calories: 583
- Protein: 12.3g
- Carbohydrates: 56.1g
- Fat: 36.4g
Make Ahead and Storage
- Make Ahead: This cheesecake tastes even better after resting overnight, so feel free to make it a day or two in advance.
- Storage: Store your cheesecake in an airtight container in the refrigerator for up to five days.
- Freezing: You can freeze individual slices or the entire cheesecake for up to 2 months. Wrap tightly in plastic wrap and then foil before freezing. Thaw overnight in the fridge.
Why You’ll Love This Recipe?
There’s so much to love about this Butterfinger Cheesecake:
- Foolproof process: Despite the steps, the recipe is easy to follow.
- Customizable: Adjust ingredients or toppings to suit your preferences.
- Crowd-pleaser: This cheesecake is always the highlight of any gathering.
- Rich flavor: With peanut butter, chocolate, and candy pieces, every bite bursts with indulgence.
- Textures galore: The crunch from Butterfingers paired with creamy cheesecake is irresistible.
This Butterfinger Cheesecake is the ultimate dessert dream come true, and I’m sure it will be a big hit in your home too! It’s right up there with classics when it comes to show-stopping dessert ideas. Happy baking!
Butterfinger Cheesecake Recipe
Ingredients
Method
- Preheat your oven to 325°F (163°C). Line the bottom of your springform pan with parchment paper and grease the sides lightly with butter. Combine the crushed Oreo cookies and melted butter in a bowl until well mixed. Press this mixture firmly into the bottom of the pan to form an even crust. Bake for 10 minutes and set it aside to cool while you work on the filling.
- Set your oven to 300°F (148°C). Beat the cream cheese, sugar, and flour in a large bowl on low speed until smooth and creamy. Avoid overmixing, as excess air can cause cracks. Add the sour cream, peanut butter, and vanilla extract, continuing to mix on low. Finally, beat in the eggs one at a time, ensuring each is fully combined before adding the next. Gently fold in the chopped Butterfingers.
- Pour the creamy peanut butter filling onto the cooled crust. Prepare a water bath by placing the springform pan inside a larger pan, then filling the outer pan with warm water until it reaches halfway up the sides of the springform pan. This helps the cheesecake bake evenly and prevents cracking.
- Bake the cheesecake for 1 hour and 25 minutes. The center should be set but slightly jiggly. Once done, turn off the oven and leave the cheesecake inside with the door closed for 30 minutes. Gradually cool it further by cracking the oven door for another 30 minutes. Once cooled, refrigerate for at least 5 hours or overnight to allow it to firm up.
- Melt the chocolate chips with warm heavy cream, stirring until smooth. Spread the thick, shiny ganache evenly over the cooled cheesecake. Prepare the whipped cream by beating heavy cream, powdered sugar, peanut butter, and vanilla extract at high speed until stiff peaks form. Pipe or dollop the whipped cream around the edges and sprinkle with additional chopped Butterfingers.
Notes
- Wrap your springform pan tightly in 2-3 layers of aluminum foil to prevent water from leaking in during the water bath.
- Always use room-temperature ingredients to achieve the smoothest batter possible.
- Chill your mixing bowl and whisk attachment before whipping cream. It’ll come together faster and hold its shape better.
- Don’t skip the cooling process, as this ensures that your cheesecake won’t crack.