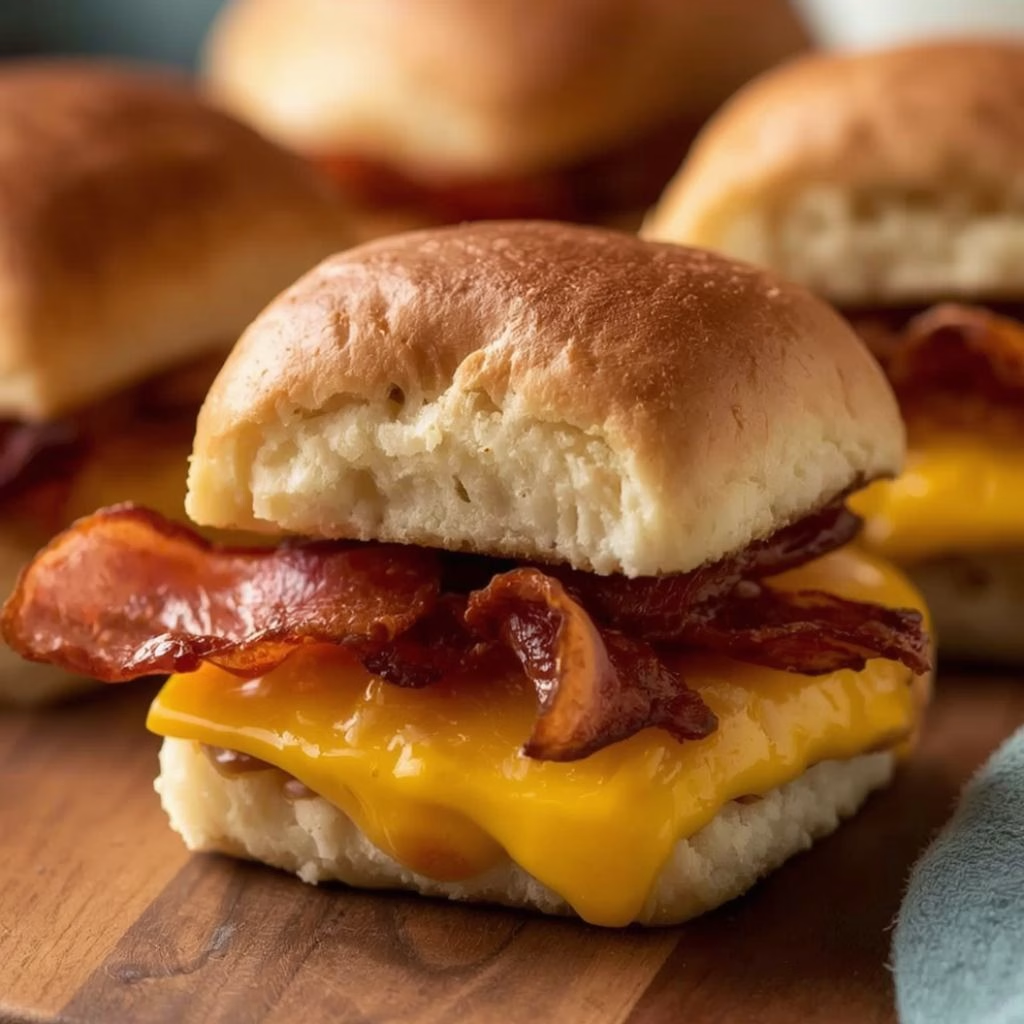
I make these Cheesy Brioche Breakfast Sliders Recipe almost every weekend now, and I honestly can’t imagine brunch without them anymore. The first time I pulled a tray out of the oven with all that cheese bubbling over the edges, I knew this recipe was a keeper.
They come together so fast that I never bother ordering breakfast delivery anymore. If you love a soft, buttery bun stuffed with eggs, cheese, and savory meat, you’re going to want to make a batch of these today. I promise you, one slider is never enough.

Ingredients
- 12 brioche slider buns – I always reach for brioche because it’s soft, slightly sweet, and holds up well once it’s baked with butter on top.
- 6 ounces sliced turkey breast (deli-style) – Any deli meat works here, but I like turkey because it keeps things light without losing flavor.
- 12 large eggs, lightly scrambled – I pull them off the heat while they’re still a little soft, since they finish cooking in the oven and I don’t want them to turn rubbery.
- 3 tablespoons fresh chives, chopped – I skip the dried version for this one, since fresh chives give a much sharper, brighter onion flavor.
- 6 slices pepperjack cheese – This adds a gentle kick, but you can swap it for cheddar or provolone if you prefer something milder.
- 2 tablespoons unsalted butter, melted – Brushing this over the tops is what gives the buns that golden, slightly crisp finish.
- 1 cup mozzarella cheese, freshly shredded – I always grate my own block of mozzarella instead of buying pre-shredded, because it melts so much smoother.
- 1/2 cup parmesan cheese, freshly shredded – A little sprinkle on top adds a salty, nutty finish that pre-grated parmesan just can’t match.
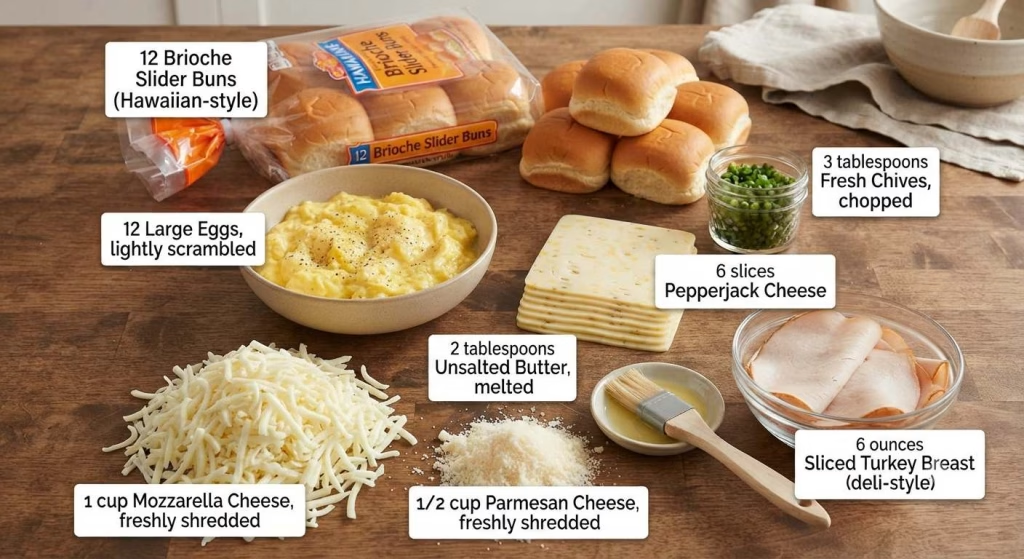
Note: These measurements make 12 full sliders, so plan on one per person for a light breakfast or two per person if you’re serving a hungrier crowd.
Variations
- Swap the turkey for turkey bacon or shredded leftover chicken if you want a different protein.
- Add sliced tomatoes or roasted peppers for a juicier, more colorful bite.
- Toss in sautéed mushrooms for an earthy flavor boost.
- Layer in avocado slices right before serving for extra creaminess.
- Use a dairy-free cheese blend and plant-based butter if you’re keeping things dairy-free.
- Skip the pepperjack and use a mild cheese if you’d rather avoid the spice.
Cooking Time
- Prep Time: 10 minutes
- Cook Time: 20 minutes
- Total Time: 30 minutes
Equipment You Need
- 9×13 baking dish – holds all the sliders together so they bake evenly as one tray.
- Nonstick skillet – for scrambling the eggs without them sticking or drying out.
- Whisk – helps get the eggs light and fluffy before they hit the pan.
- Pastry brush – makes it easy to spread melted butter evenly over the buns.
- Sharp knife – needed for slicing the slider buns in half cleanly.
How to Make Brioche Breakfast Sliders?
Making these sliders is a lot simpler than it looks once it’s baked and golden on top. You really just need a few minutes of prep before everything goes into the oven together. If you enjoy hearty homemade comfort food, the Rustic Ratatouille with Crusty Bread Recipe is another satisfying dish to add to your meal rotation.
Preheat the Oven
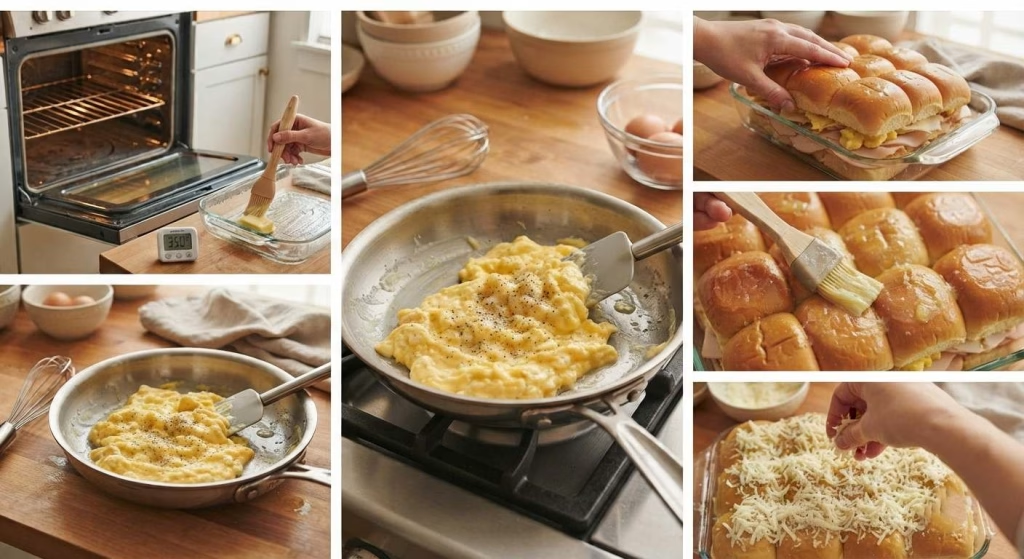
I always start by preheating my oven to 350°F so it’s fully heated by the time my sliders are assembled. This step matters more than people think, since sliding a cold tray into an oven that isn’t ready yet can lead to uneven baking. While it heats up, I get my baking dish greased and ready to go.
Scramble the Eggs
Next, I whisk my eggs with a pinch of salt and pepper, then cook them in a lightly buttered skillet over medium heat. I pull them off just before they look fully set, since they’ll keep cooking once they’re in the oven. Undercooking them slightly here keeps the eggs soft instead of dry.
Slice and Layer the Buns
I slice all my brioche buns in half and set the bottom halves right into my greased baking dish, keeping them connected as one slab if possible. Then I layer the turkey slices across the buns first, followed by the scrambled eggs, a sprinkle of chives, and finally the pepperjack cheese slices on top of that.
Add the Top Buns
Once everything is layered, I place the top halves of the buns back over the fillings. This step turns the whole tray into one big connected slider block, which makes it so much easier to serve later. I press down gently just to help everything settle together.
Brush With Butter
I brush the melted butter generously over the tops of the buns, making sure to get into every little crevice. This is what gives the sliders that golden, slightly crisp top once they come out of the oven. Skipping this step really does change the final texture.
Top With Cheese
After the butter, I sprinkle the shredded mozzarella and parmesan evenly across the top. I like a generous layer here since this is what creates that irresistible cheesy crust. Feel free to add a little extra if you’re a cheese lover like me.
Bake Until Golden
I slide the tray into the oven and bake for 15 to 20 minutes, until the cheese is fully melted and the tops are golden brown. I keep an eye on it toward the end since ovens vary and I don’t want the buns to over-brown.
Slice and Serve
Once it’s out of the oven, I let the tray rest for a couple of minutes before slicing the sliders apart. This little pause helps the cheese set slightly so it doesn’t slide everywhere when I cut them. Then I serve them warm, straight from the dish.
Additional Tips for Making This Recipe Better
I’ve made this recipe more times than I can count, and I’ve picked up a few tricks along the way that really make a difference.
- I always undercook my eggs slightly, since they keep cooking in the oven and I don’t want them turning rubbery by the time they’re done.
- I like to grate my own cheese instead of using pre-shredded bags, since it melts so much smoother and tastes fresher.
- I cover the dish loosely with foil for the first 10 minutes if my buns are browning too fast, then uncover for the last few minutes to let the cheese crisp up.
- I always use a serrated knife to slice through the baked sliders cleanly, since the melted cheese can make them stick together.
- I like to let the tray rest for a couple of minutes before cutting, so the eggs and cheese settle instead of oozing out everywhere.
How to Serve Brioche Breakfast Sliders?
I love serving these sliders straight from the baking dish while they’re still warm and the cheese is stretchy. For a bit of color, I’ll scatter a few extra chopped chives over the top right before bringing it to the table. A side of fresh fruit or a simple dressed salad balances out the richness nicely.
If I’m hosting brunch, I like to add a small bowl of hot sauce or ketchup on the side so everyone can customize their own bite. For a flavorful vegetarian option alongside these sliders, the Crispy Falafel Pita with Tahini & Pickles Recipe pairs surprisingly well.
Nutritional Information
Here’s a general breakdown of what you can expect per slider, though this can vary depending on the exact ingredients you use.
- Calories: 251
- Protein: 16g
- Carbohydrates: 17g
- Fat: 12g
Make Ahead and Storage
Make Ahead: I like to assemble the whole tray the night before, cover it tightly with foil, and keep it in the fridge for up to a day. In the morning, I just pop it straight into the oven and breakfast is ready in minutes.
Refrigerator: I wrap leftover sliders individually and store them in an airtight container in the fridge, where they stay fresh for up to 3 days.
Freezer: Once the sliders have cooled completely, I wrap each one in foil and freeze them in a sealed bag or container for up to 2 months.
Reheating: I reheat mine straight from frozen in the microwave, warming them in 30-second intervals until they’re heated all the way through.
Why You’ll Love This Recipe
There are so many reasons this recipe has become one of my go-to breakfasts, but here are the ones that matter most to me.
- It comes together in about 30 minutes, so it’s realistic even on a busy morning.
- It’s easy to make ahead of time, which makes hosting brunch so much less stressful.
- It’s endlessly customizable with whatever protein, cheese, or veggies I have on hand.
- The brioche buns give every bite a soft, slightly sweet contrast to the savory filling.
- It reheats beautifully, so leftovers taste just as good as the first batch.

Cheesy Brioche Breakfast Sliders Recipe
Ingredients
Method
- I always start by preheating my oven to 350°F so it’s fully heated by the time my sliders are assembled. This step matters more than people think, since sliding a cold tray into an oven that isn’t ready yet can lead to uneven baking. While it heats up, I get my baking dish greased and ready to go.
- Next, I whisk my eggs with a pinch of salt and pepper, then cook them in a lightly buttered skillet over medium heat. I pull them off just before they look fully set, since they’ll keep cooking once they’re in the oven. Undercooking them slightly here keeps the eggs soft instead of dry.
- I slice all my brioche buns in half and set the bottom halves right into my greased baking dish, keeping them connected as one slab if possible. Then I layer the turkey slices across the buns first, followed by the scrambled eggs, a sprinkle of chives, and finally the pepperjack cheese slices on top of that.
- Once everything is layered, I place the top halves of the buns back over the fillings. This step turns the whole tray into one big connected slider block, which makes it so much easier to serve later. I press down gently just to help everything settle together.
- I brush the melted butter generously over the tops of the buns, making sure to get into every little crevice. This is what gives the sliders that golden, slightly crisp top once they come out of the oven. Skipping this step really does change the final texture.
- After the butter, I sprinkle the shredded mozzarella and parmesan evenly across the top. I like a generous layer here since this is what creates that irresistible cheesy crust. Feel free to add a little extra if you’re a cheese lover like me.
- I slide the tray into the oven and bake for 15 to 20 minutes, until the cheese is fully melted and the tops are golden brown. I keep an eye on it toward the end since ovens vary and I don’t want the buns to over-brown.
- Once it’s out of the oven, I let the tray rest for a couple of minutes before slicing the sliders apart. This little pause helps the cheese set slightly so it doesn’t slide everywhere when I cut them. Then I serve them warm, straight from the dish.
Notes
- I always undercook my eggs slightly, since they keep cooking in the oven and I don’t want them turning rubbery by the time they’re done.
- I like to grate my own cheese instead of using pre-shredded bags, since it melts so much smoother and tastes fresher.
- I cover the dish loosely with foil for the first 10 minutes if my buns are browning too fast, then uncover for the last few minutes to let the cheese crisp up.
- I always use a serrated knife to slice through the baked sliders cleanly, since the melted cheese can make them stick together.
- I like to let the tray rest for a couple of minutes before cutting, so the eggs and cheese settle instead of oozing out everywhere.