I made a batch of this Garlic Butter Biscuits Recipe last weekend, and I swear the whole kitchen smelled like an Italian restaurant within minutes. I wasn’t planning on eating three straight off the pan, but here we are.
There’s something about warm, flaky layers with little pockets of garlicky butter that makes it impossible to stop at one. If you love garlic bread but want something heartier, this recipe is going to become your new favorite. I promise it’s easier than it looks, even if you’ve never made biscuits from scratch before.

Ingredients
- 2 ¼ cups all-purpose flour – spoon it into your measuring cup and level it off; scooping straight from the bag packs in too much flour and leaves you with dense biscuits
- 3 teaspoons baking powder – this is what gives the biscuits their lift, so check the expiration date before you start
- ½ teaspoon salt – balances the richness of the butter and sharpens the garlic flavor
- ½ cup unsalted butter, softened – go for real dairy butter here, not margarine, since it browns better and tastes far richer
- 3–4 cloves garlic, minced fresh – skip the jarred stuff if you can; fresh garlic has a rounder, sweeter flavor once it’s cooked gently in butter
- 1 cup buttermilk, cold – the acidity reacts with the baking powder for extra rise and gives the biscuits a slight tang
- 1 egg (optional, for egg wash) – brushed on top for that golden, bakery-style finish
- 1 tablespoon water (for egg wash)
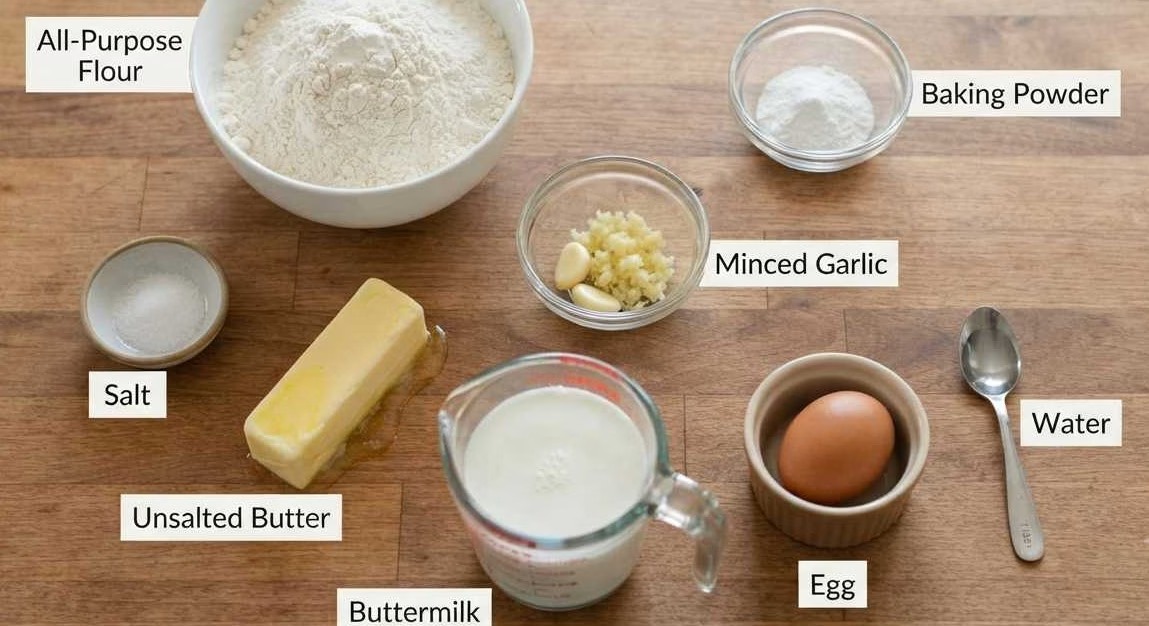
Note: These amounts make about 12 medium biscuits, so double everything if you’re feeding a crowd or want extras for the freezer.
Variations
- Swap the buttermilk for a dairy-free option like almond or oat milk mixed with a tablespoon of lemon juice
- Use plant-based butter for a fully dairy-free version
- Stir in shredded cheddar or parmesan for cheesy garlic biscuits
- Add a pinch of red chili flakes for a spicy kick
- Mix in chopped fresh parsley or chives for extra color and freshness
- Try roasted garlic instead of raw for a milder, sweeter flavor

Cooking Time
- Prep Time: 20 minutes
- Cook Time: 18–20 minutes
- Total Time: about 40 minutes
Equipment You Need
- Mixing bowls – one for dry ingredients, one for combining the dough
- Pastry cutter or fork – to cut cold butter into the flour without overworking it
- Baking sheet – for even heat distribution while baking
- Parchment paper – prevents sticking and helps with easy cleanup
- Biscuit cutter or round glass – to cut uniform biscuit shapes
- Pastry brush – for applying the egg wash smoothly
How to Make Garlic Butter Biscuits?
Making these biscuits comes down to a few simple stages: prepping the garlic butter, mixing the dough, shaping it, and baking. Each step is quick, and none of it requires special baking skills. Follow along and you’ll have warm biscuits ready in well under an hour.
Prepare the Garlic Butter
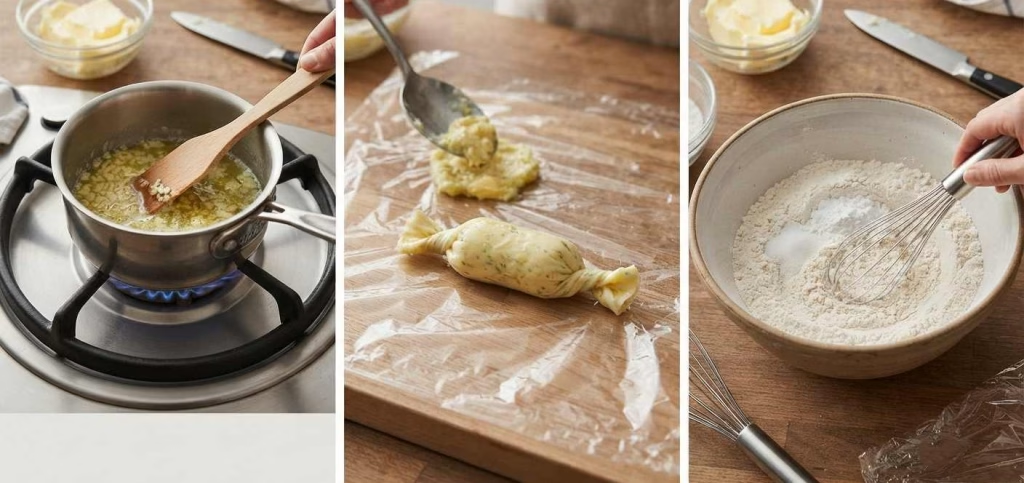
Melt a small portion of the butter in a pan over low heat and add the minced garlic. Cook it gently for about a minute, just until it turns fragrant and soft, being careful not to let it brown. Let it cool slightly before mixing it back into the rest of the softened butter.
Chill the Butter
Spoon the garlic butter onto plastic wrap and shape it into a small log. Refrigerate it until firm, which usually takes about 30 minutes. Chilled butter is key here, since it creates those flaky little pockets once it hits the oven.
Mix the Dry Ingredients
In a large bowl, whisk together the flour, baking powder, and salt until fully combined. This step ensures the leavening agent is spread evenly, so your biscuits rise consistently instead of unevenly in spots.
Cut in the Butter
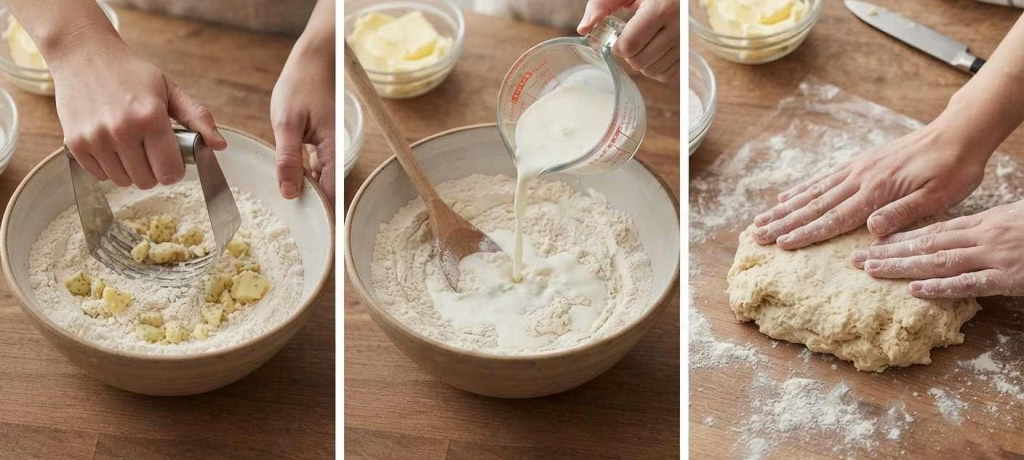
Chop the chilled garlic butter into small pieces and work it into the flour mixture using a pastry cutter or your fingertips. Stop as soon as the mixture looks like coarse crumbs with visible butter chunks, since overmixing melts the butter too soon.
Add the Buttermilk
Pour the cold buttermilk into the flour mixture and stir gently with a wooden spoon. Mix only until the dry streaks disappear, because overworking the dough at this stage makes the biscuits tough instead of tender.
Shape the Dough
Turn the sticky dough onto a floured surface and pat it down gently with floured hands to about 1.5 inches thick. Avoid using a rolling pin, since patting keeps the layers loose and flaky rather than compressed.
Cut the Biscuits
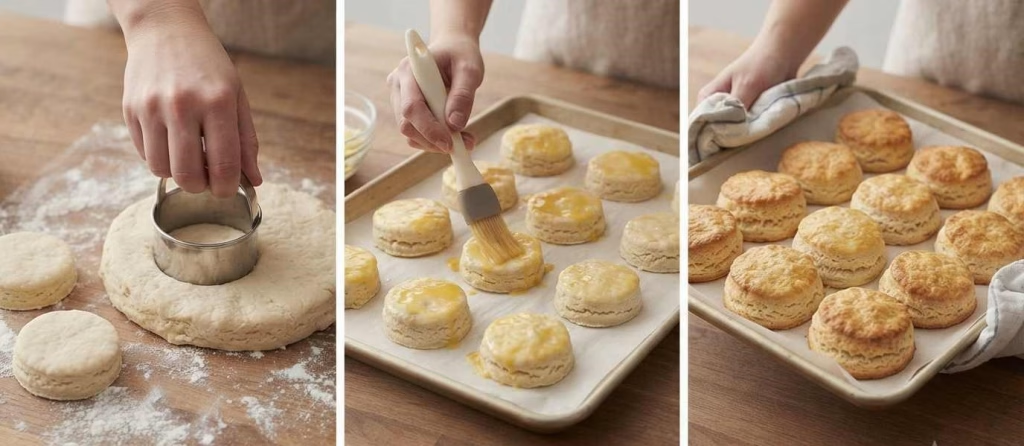
Use a sharp biscuit cutter to punch out rounds, pressing straight down without twisting. Twisting the cutter seals the edges and can prevent the biscuits from rising evenly in the oven.
Add the Egg Wash and Bake
Arrange the biscuits on a parchment-lined baking sheet and brush the tops with the egg wash for a golden finish. Bake at 375°F for 18 to 20 minutes, or until the tops turn a deep golden brown.
If you’re serving these alongside refreshing drinks, Pink Bunny Punch Recipe or Zesty Lime Sherbet Floats Recipe make excellent pairings for family meals and gatherings.
Additional Tips for Making This Recipe Better
I’ve made this recipe more times than I can count, and a few small tricks have made a real difference for me.
- I always keep my butter and buttermilk cold until the last second, since warm ingredients melt the butter too early and flatten the rise
- I never twist the biscuit cutter, because I learned the hard way that it seals the edges and stops the biscuits from puffing up nicely
- I like placing the cut biscuits close together on the pan, which helps them rise upward instead of spreading out
- I always test one biscuit from the batch first to check my oven’s true baking time, since ovens vary a lot
- I let the biscuits cool for just a few minutes before serving, so the garlic butter inside sets slightly and doesn’t ooze out too fast
How to Serve Garlic Butter Biscuits?
These biscuits shine best served warm, split open with a little extra butter melting into the layers. I love stacking them in a linen-lined basket for a cozy, rustic presentation at the dinner table.
They pair wonderfully with soups, stews, or a holiday roast, and they also make an excellent base for breakfast sandwiches with eggs and bacon. For a pretty finishing touch, sprinkle some fresh chopped parsley or a light dusting of flaky sea salt right before serving.
Nutritional Information
Here’s a general idea of what to expect per biscuit, though exact values can vary depending on your ingredients.
- Calories: around 160–180 per biscuit
- Protein: about 3–4 grams
- Carbohydrates: roughly 18–20 grams
- Fat: approximately 8–9 grams
Make Ahead and Storage
Make Ahead: You can prepare the garlic butter up to a week in advance and keep it refrigerated until you’re ready to bake. This actually deepens the garlic flavor, so making it ahead is a smart move rather than just a time-saver.
Storage: Once baked, store leftover biscuits in an airtight container at room temperature for up to two days. They stay soft and flavorful without drying out too quickly.
Freezing: Unbaked biscuit dough rounds freeze well for up to two months; just bake them straight from frozen, adding a few extra minutes to the cook time.
Reheating: Warm biscuits in a 300°F oven for about 8 minutes to restore their texture, since microwaving tends to make them chewy instead of flaky.
Why You’ll Love This Recipe?
This recipe checks every box for an easy, crowd-pleasing side dish that fits almost any meal.
- It’s incredibly easy to make, even for beginner bakers, since the steps are simple and forgiving
- It’s endlessly versatile, working well alongside soups, roasts, or as a breakfast sandwich base
- It offers flexible dietary swaps, from dairy-free butter to gluten-free flour blends
- It allows for fun flavor customization with cheese, herbs, or spice add-ins
- It delivers bakery-quality results without needing any fancy equipment or techniques

Garlic Butter Biscuits Recipe
Ingredients
Method
- Melt a small portion of the butter in a pan over low heat and add the minced garlic. Cook it gently for about a minute, just until it turns fragrant and soft, being careful not to let it brown. Let it cool slightly before mixing it back into the rest of the softened butter.
- Spoon the garlic butter onto plastic wrap and shape it into a small log. Refrigerate it until firm, which usually takes about 30 minutes. Chilled butter is key here, since it creates those flaky little pockets once it hits the oven.
- In a large bowl, whisk together the flour, baking powder, and salt until fully combined. This step ensures the leavening agent is spread evenly, so your biscuits rise consistently instead of unevenly in spots.
- Chop the chilled garlic butter into small pieces and work it into the flour mixture using a pastry cutter or your fingertips. Stop as soon as the mixture looks like coarse crumbs with visible butter chunks, since overmixing melts the butter too soon.
- Pour the cold buttermilk into the flour mixture and stir gently with a wooden spoon. Mix only until the dry streaks disappear, because overworking the dough at this stage makes the biscuits tough instead of tender.
- Turn the sticky dough onto a floured surface and pat it down gently with floured hands to about 1.5 inches thick. Avoid using a rolling pin, since patting keeps the layers loose and flaky rather than compressed.
- Use a sharp biscuit cutter to punch out rounds, pressing straight down without twisting. Twisting the cutter seals the edges and can prevent the biscuits from rising evenly in the oven.
- Arrange the biscuits on a parchment-lined baking sheet and brush the tops with the egg wash for a golden finish. Bake at 375°F for 18 to 20 minutes, or until the tops turn a deep golden brown.
Notes
- I always keep my butter and buttermilk cold until the last second, since warm ingredients melt the butter too early and flatten the rise
- I never twist the biscuit cutter, because I learned the hard way that it seals the edges and stops the biscuits from puffing up nicely
- I like placing the cut biscuits close together on the pan, which helps them rise upward instead of spreading out
- I always test one biscuit from the batch first to check my oven’s true baking time, since ovens vary a lot
- I let the biscuits cool for just a few minutes before serving, so the garlic butter inside sets slightly and doesn’t ooze out too fast