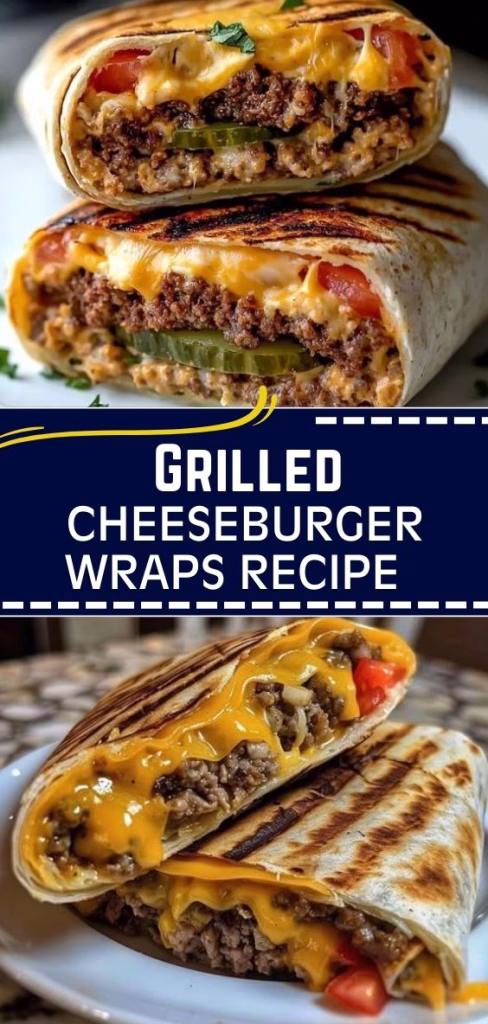
Grilled Cheeseburger Wraps Recipe | Juicy, Cheesy & Quick
I stumbled upon this idea for Grilled Cheeseburger Wraps Recipe and knew I had to try it. My family loves a good cheeseburger, but I wanted a fun change of pace from the usual bun. These wraps delivered all the savory, cheesy goodness we love, but bundled up in a perfectly grilled tortilla.
They were such a huge hit that I couldn’t wait to share how I made them. This recipe is everything you enjoy about a classic cheeseburger, made simple and perfect for a quick meal — and it reminded me a lot of bold flavors like the ones in the One Pot Spanish Chorizo Fried Rice Recipe.
Ingredients You’ll Need
Here are the simple ingredients required to bring these delicious cheeseburger wraps to life. Each component plays a key role in creating that authentic burger flavor.
- 1 pound lean ground beef – Using lean ground beef (90/10 or leaner) is a great choice because it provides fantastic flavor with less grease to drain.
- 1 Tablespoon Worcestershire sauce – This is the secret weapon for a deep, savory, umami flavor that really makes the beef taste like a burger patty.
- 2 Tablespoons ketchup – A little ketchup mixed into the beef adds that classic tangy sweetness you expect from a cheeseburger.
- 1 teaspoon dried minced onion – This provides a gentle onion flavor throughout the meat mixture without the hassle of chopping fresh onions.
- Pepper and salt to taste – Simple seasonings are all you need to enhance the natural flavors of the beef.
- 4 large flour tortillas – Look for burrito-sized tortillas (about 10 inches) as they are large enough to hold all the fillings without tearing.
- Shredded cheddar cheese – Grating your own cheese from a block will give you the best melt. Pre-shredded cheese often has anti-caking agents that prevent it from melting smoothly.
- Lettuce – Crisp iceberg or romaine lettuce adds a fresh crunch that contrasts beautifully with the warm, savory filling.
- Tomato slices – A few slices of ripe tomato bring a juicy, fresh element to the wrap.
- Sliced red onion – For a bit of sharp, zesty bite. You can slice it very thin to keep the flavor from being overpowering.
- Mustard – A classic burger condiment that adds a tangy kick. Drizzle as much or as little as you like.
Note: This recipe makes enough for 4 servings.
Delicious Variations to Try
One of the best things about this recipe is how easy it is to customize. You can tweak the ingredients to fit your dietary needs or simply to experiment with new flavors. Some people even enjoy similar bold, comforting dishes like the Mexican Birria Crockpot Recipe for another hearty meal idea.
- Go Low-Carb: Swap the flour tortillas for low-carb or keto-friendly tortillas to make this a lighter meal. You could also use large lettuce leaves for a true bunless experience.
- Add Some Spice: If you like a little heat, mix in some diced jalapeños with the ground beef or add a dash of hot sauce to the ketchup and Worcestershire mixture.
- Bring on the Bacon: For a bacon cheeseburger wrap, cook and crumble a few strips of bacon and add them to the beef mixture or sprinkle them over the cheese.
- Switch Up the Meat: Ground turkey or ground chicken are excellent leaner alternatives to ground beef. Just be sure to season them well.
- Cheese Please: Feel free to experiment with different cheeses. Pepper Jack would add a spicy kick, while Swiss would give it a nutty, complex flavor.
- Extra Toppings: Don’t forget the pickles! Add some dill pickle slices for that classic cheeseburger tang. Sautéed mushrooms or caramelized onions would also be fantastic additions.

Cooking Time
This is a fast recipe, making it perfect for a busy weeknight. From start to finish, you can have these wraps on the table in about 20 minutes.
- Prep Time: 10 minutes
- Cook Time: 10 minutes
- Total Time: 20 minutes
Equipment You Need
You don’t need any fancy kitchen gadgets for this recipe. A few basic tools are all it takes to get the job done.
- Large Non-Stick Skillet: This is for browning the ground beef and simmering the sauce mixture. A non-stick surface makes cleanup much easier.
- Indoor or Outdoor Grill: Used to get those beautiful grill marks and toast the tortillas. A George Foreman grill, panini press, or even a grill pan on the stovetop works perfectly.
- Spatula: For breaking up and stirring the ground beef as it cooks.
- Knife and Cutting Board: For slicing the tomatoes, onions, and lettuce.
How to Make Grilled Cheeseburger Wraps Recipe
This recipe is incredibly straightforward. Just cook the filling, assemble the wraps, and give them a quick grill for a crispy finish.
Prepare the Cheeseburger Filling
First, you’ll prepare the heart of the wrap: the seasoned beef. Place your large non-stick skillet over medium-high heat. Add the lean ground beef and use a spatula to break it apart as it browns. Once it’s fully cooked, carefully drain off any excess grease from the skillet.
Season the Beef
With the heat reduced to low, it’s time to transform the ground beef into a cheeseburger-flavored filling. Add the Worcestershire sauce, ketchup, dried minced onion, salt, and pepper directly to the beef. Stir everything together until the meat is evenly coated. Let this mixture simmer for about 5 minutes, allowing the flavors to meld together.
Assemble the Wraps
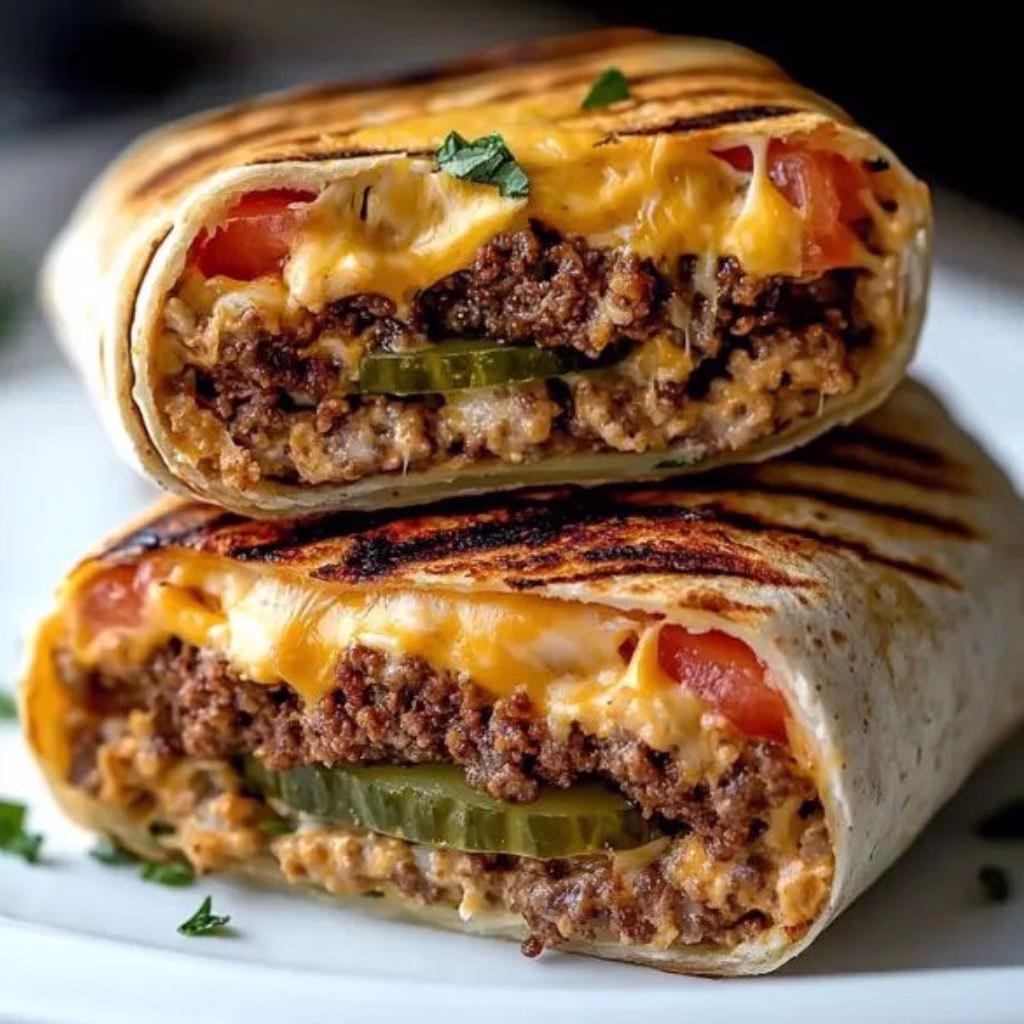
Lay your four large flour tortillas on a flat surface. Sprinkle a generous amount of shredded cheddar cheese down the center of each one. Placing the cheese down first ensures it gets nice and melty from the heat of the beef. Evenly divide the warm beef mixture among the four tortillas, spooning it right on top of the cheese.
Add Toppings and Roll
Now for the classic burger toppings. Drizzle a little mustard over the beef mixture, and add more ketchup if you desire. Place a couple of tomato slices on top. To roll, fold in the sides of the tortilla first, then tightly roll it up from the bottom, burrito-style. This will keep all the delicious fillings contained while grilling.
Grill the Wraps
Preheat your indoor or outdoor grill. Carefully place two wraps at a time onto the hot grill, seam-side down. Grill for 3 to 5 minutes, or until you see distinct grill marks and the tortilla is golden brown and crispy. The heat will also ensure the cheese inside is perfectly melted.
Final Touches and Serving
Gently remove the finished wraps from the grill. At this point, you can carefully unroll the top portion to add your fresh ingredients like shredded lettuce and sliced red onion. Adding these last keeps them crisp and fresh. Re-roll the wrap, slice it diagonally in the middle, and serve immediately while it’s hot and melty.
Additional Tips for Making This Recipe Better
After making these wraps a few times, I’ve picked up a few tricks that take them from great to absolutely perfect.
- Warm the Tortillas: I find that microwaving the tortillas for about 15-20 seconds makes them softer and more pliable. This small step helps prevent them from tearing when you roll them up, especially if they’re packed with fillings.
- Don’t Overstuff: As tempting as it is, try not to overfill the wraps. If you put too much inside, they become difficult to roll and are more likely to burst open on the grill.
- Add Lettuce Last: I learned this the hard way. If you add the lettuce before grilling, it gets warm and wilted. For the best texture, I always add the crisp lettuce and fresh red onion just before serving. It makes a world of difference.
- Press Gently on the Grill: When using an indoor grill or panini press, don’t press down too hard. A gentle press is all you need to get the grill marks and heat the wrap through. Pressing too firmly can cause the filling to squeeze out the sides.
- Try a Special Sauce: Sometimes I mix up a “special sauce” by combining a little mayonnaise, ketchup, and pickle relish. A drizzle of this inside the wrap adds another layer of classic burger flavor.
How to Serve Grilled Cheeseburger Wraps
These wraps are a meal in themselves, but they also pair wonderfully with classic burger side dishes. For a complete and satisfying meal, try serving them with a side of crispy French fries, tater tots, or onion rings.
A simple side salad or a scoop of coleslaw also provides a refreshing contrast to the rich, savory wrap. When serving, cutting them on a diagonal makes for a beautiful presentation that shows off all the colorful layers inside.
Nutritional Information
Here is an approximate nutritional breakdown for one Grilled Cheeseburger Wrap. Please note that these values can vary based on the specific ingredients you use, such as the type of ground beef and tortilla.
- Calories: Approximately 450-550 kcal
- Protein: Around 30g
- Carbohydrates: Roughly 35g
- Fat: About 25g
Make Ahead and Storage
These wraps are great for meal prepping. Here’s how you can prepare them ahead of time and store them for later.
You can cook the ground beef mixture in advance and store it in an airtight container in the refrigerator for up to 3 days. When you’re ready to eat, simply reheat the meat, assemble the wraps with fresh toppings, and grill them.
To store leftovers, wrap the grilled wraps tightly in foil or place them in an airtight container. They will stay fresh in the refrigerator for up to 2 days. Keep in mind that the lettuce and tomato may become a bit soft upon reheating.
For reheating, you can use a microwave, but the tortilla will lose its crispness. For best results, reheat the wraps in an air fryer at 350°F for 3-5 minutes, on a skillet over medium heat, or in a toaster oven until warmed through and crispy again. I don’t recommend freezing the assembled wraps, as the fresh vegetables will become soggy upon thawing.
Why You’ll Love This Recipe
There are so many reasons to add these Grilled Cheeseburger Wraps to your regular meal rotation. Here are just a few:
- Quick and Easy: This meal comes together in just 20 minutes, making it the perfect solution for hectic weeknights when you need something delicious and fast. The simple steps mean even beginner cooks can make it with confidence.
- Packed with Flavor: It has all the satisfying flavors of a classic cheeseburger—savory beef, melted cheese, and tangy condiments—all wrapped in a convenient package. Every bite is a burst of familiar comfort food goodness.
- Fun for the Whole Family: It’s a creative and fun twist on a family favorite that both kids and adults will love. It’s less messy to eat than a traditional burger, which is always a bonus for parents.
- Highly Customizable: You can easily adapt this recipe to suit different tastes and dietary needs. From adding bacon to swapping the meat or going low-carb, the possibilities are endless for making it your own.
- Great for Any Meal: While perfect for dinner, these wraps also make a fantastic and hearty lunch. They are portable and hold up well, making them a great option to pack for work or school.
Grilled Cheeseburger Wraps Recipe
Ingredients
Method
- First, you’ll prepare the heart of the wrap: the seasoned beef. Place your large non-stick skillet over medium-high heat. Add the lean ground beef and use a spatula to break it apart as it browns. Once it’s fully cooked, carefully drain off any excess grease from the skillet.
- With the heat reduced to low, it’s time to transform the ground beef into a cheeseburger-flavored filling. Add the Worcestershire sauce, ketchup, dried minced onion, salt, and pepper directly to the beef. Stir everything together until the meat is evenly coated. Let this mixture simmer for about 5 minutes, allowing the flavors to meld together.
- Lay your four large flour tortillas on a flat surface. Sprinkle a generous amount of shredded cheddar cheese down the center of each one. Placing the cheese down first ensures it gets nice and melty from the heat of the beef. Evenly divide the warm beef mixture among the four tortillas, spooning it right on top of the cheese.
- Now for the classic burger toppings. Drizzle a little mustard over the beef mixture, and add more ketchup if you desire. Place a couple of tomato slices on top. To roll, fold in the sides of the tortilla first, then tightly roll it up from the bottom, burrito-style. This will keep all the delicious fillings contained while grilling.
- Preheat your indoor or outdoor grill. Carefully place two wraps at a time onto the hot grill, seam-side down. Grill for 3 to 5 minutes, or until you see distinct grill marks and the tortilla is golden brown and crispy. The heat will also ensure the cheese inside is perfectly melted.
- Gently remove the finished wraps from the grill. At this point, you can carefully unroll the top portion to add your fresh ingredients like shredded lettuce and sliced red onion. Adding these last keeps them crisp and fresh. Re-roll the wrap, slice it diagonally in the middle, and serve immediately while it’s hot and melty.
Notes
- Warm the Tortillas: I find that microwaving the tortillas for about 15-20 seconds makes them softer and more pliable. This small step helps prevent them from tearing when you roll them up, especially if they’re packed with fillings.
- Don’t Overstuff: As tempting as it is, try not to overfill the wraps. If you put too much inside, they become difficult to roll and are more likely to burst open on the grill.
- Add Lettuce Last: I learned this the hard way. If you add the lettuce before grilling, it gets warm and wilted. For the best texture, I always add the crisp lettuce and fresh red onion just before serving. It makes a world of difference.
- Press Gently on the Grill: When using an indoor grill or panini press, don’t press down too hard. A gentle press is all you need to get the grill marks and heat the wrap through. Pressing too firmly can cause the filling to squeeze out the sides.
- Try a Special Sauce: Sometimes I mix up a “special sauce” by combining a little mayonnaise, ketchup, and pickle relish. A drizzle of this inside the wrap adds another layer of classic burger flavor.