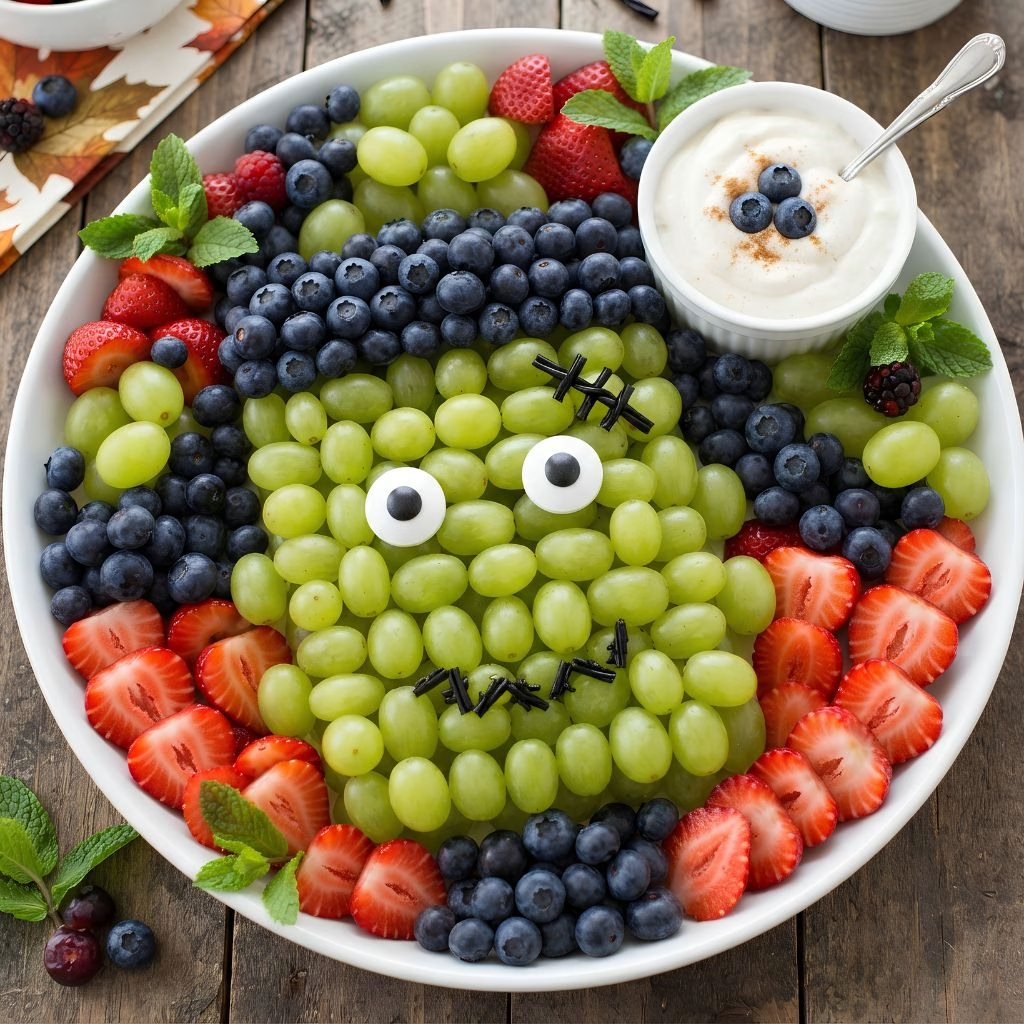
I put this Frankenstein Fruit Tray Recipe together for my daughter’s class party last October, and it ended up being the only platter that came back completely empty. I’m not a fancy party planner by any means, but this one tricked everyone into thinking I’d spent hours on it.
In reality, it’s just green grapes, blueberries, a few candy eyes, and a creamy dip that comes together in minutes. If you’re searching for a Halloween fruit tray recipe that looks impressive but takes almost no real effort, I think you’re going to love this one as much as my family did.
Cooking Time
- Prep Time: 20 minutes
- Cooking Time: 0 minutes (no-bake)
- Total Time: 20 minutes
Ingredients
- 3 cups green seedless grapes — forms Frankenstein’s face and body, so pick ones that are firm and unblemished
- 1 cup blueberries — lines the top of the face to create his signature spiky hair
- 2 tablespoons black licorice laces, cut into small strips — shapes the stitched scar and the flat-top hairline
- 24 candy eyes — gives him that classic wide-eyed monster stare, and they press right into the grapes
- 1 cup fresh strawberries, sliced — adds pops of red around the tray for contrast and a bit of extra sweetness
- 2 cups vanilla Greek yogurt — the creamy base for the dip, and fat-free works just as well here
- 1 package instant cheesecake-flavor pudding mix — thickens the dip and gives it that rich, tangy-sweet flavor
- ⅓ cup skim milk — loosens the dip to a smooth, scoopable consistency, add more if you like it thinner
- 2 cups assorted extra fruit, such as pineapple, cantaloupe, or kiwi — fills out the rest of the tray around Frankenstein
Note: this recipe serves 10, with about ¼ cup of dip per serving.
Equipment You Need
- Large rectangular serving tray or cutting board — gives you a flat base to shape Frankenstein’s face
- Cutting board and paring knife — for slicing strawberries, kiwi, and any extra fruit
- Mixing bowl — for combining the yogurt, pudding mix, and milk
- Whisk or spoon — to stir the dip until it’s smooth and lump-free
- Small bowl for the dip — keeps the dip tidy and separate in the center or corner of the tray
- Toothpicks (optional) — handy for pressing candy eyes into place without squishing the grapes
How to Make Frankenstein Fruit Tray Recipe?
This fruit tray really comes together in two simple parts: the dip and the face. I always make the dip first so it has a few minutes to chill while I’m busy arranging the fruit, and the whole process rarely takes more than 20 minutes from start to finish.
Mix the Dessert Dip
In a mixing bowl, combine the vanilla Greek yogurt, instant cheesecake pudding mix, and skim milk. Stir everything together until it’s completely smooth with no lumps of pudding mix left behind. Set it in the fridge while you prep the fruit, since a slightly chilled dip holds its shape better on the tray.
Shape the Grape Base
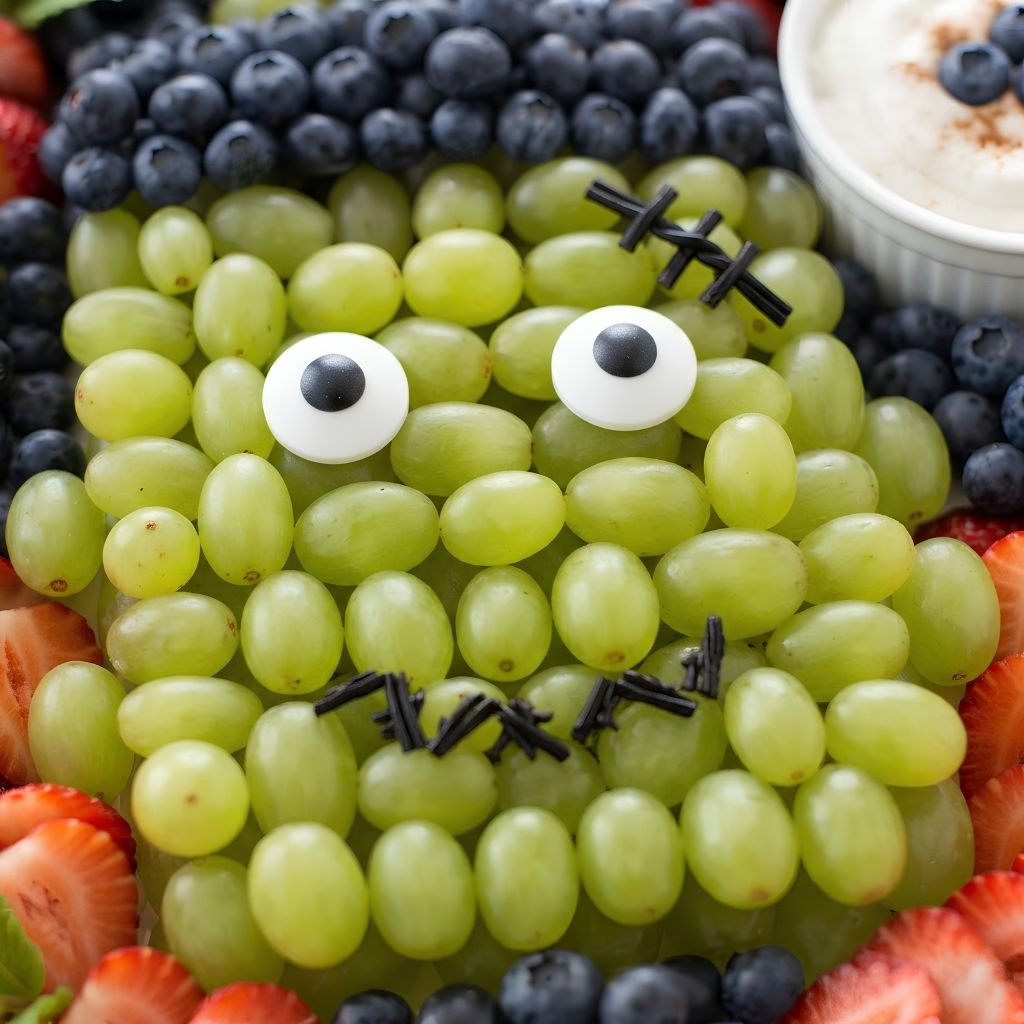
On your serving tray, arrange the green grapes into a rectangular block shape, close together so there are no visible gaps between them. This forms Frankenstein’s head and gives you a solid canvas to build his face on top of.
Add the Blueberry Hair
Line a row of blueberries along the top edge of the grape rectangle to create his short, spiky hairline. Keep the blueberries tightly packed so the “hair” reads clearly from a few feet away.
Place the Candy Eyes and Scar
Press two candy eyes gently into the grapes toward the upper half of the face, leaving space between them. Add a small strip of black licorice across the forehead or along one side as his signature stitched scar.
Fill In the Rest of the Tray
Arrange the sliced strawberries and your extra fruit around the edges of the tray, filling in any open space. Place your bowl of dessert dip either beside the face or in an open corner, then it’s ready to serve.
Additional Tips for Making This Recipe Better
I’ve made this tray more times than I can count at this point, and here’s what I’ve learned actually makes a difference.
- I always buy my grapes a day ahead and rinse them early so they’re fully dry before I build the face, since wet grapes make the candy eyes slide right off.
- I like using a rectangular cutting board instead of a round platter, because Frankenstein’s face reads much more clearly on straight edges.
- I press the candy eyes in at a slight angle instead of flat, which somehow makes his expression look a little more alert and fun.
- I prep my dip the night before and just give it a quick stir before serving, which saves me time on the day of the party.
- I keep a few extra grapes on hand in case any crack or roll away while I’m shaping the face.
Common Mistakes to Avoid
- I once skipped drying my grapes fully, and the candy eyes slid right off within minutes of setting the tray out.
- I packed the grapes too loosely the first time I tried this, and the face lost its shape the moment someone grabbed a handful.
- I added the dip ingredients without tasting first, and it turned out too sweet for my taste, so now I always taste before adding extra sugar.
- I placed the tray in direct sunlight once, and the chocolate and candy pieces started to melt and smear before the party even started.
- I didn’t account for food allergies the first time, so now I always double check my candy eyes and licorice for nut-free or allergy-friendly options.
How to Serve a Frankenstein Fruit Tray?
I like setting this tray out as the centerpiece of the snack table, since the Frankenstein face naturally draws people in before they even notice the rest of the spread. A black or dark green tablecloth underneath makes the colors pop even more.
If you want to dress it up further, scatter a few extra candy eyes around the edges of the tray so it feels playfully spooky rather than overly serious.
Keep the dessert dip close by in a small bowl with a spoon, so guests can easily scoop some up alongside their fruit. If your Halloween spread includes other breakfast or brunch items, this tray pairs surprisingly well next to something like fluffy banana oat pancakes for a daytime party.
Variations
- Swap the grapes for green apple slices or kiwi rounds if you want a different texture for the base
- Turn this into a frankenstein veggie tray by using green bell pepper slices, broccoli florets, and cucumber rounds instead of fruit
- Use sugar-free pudding mix and a sugar-free yogurt to lighten up the dip without losing the creamy texture
- Make it dairy-free by using a coconut or almond milk yogurt along with a dairy-free pudding alternative
- Add a few drops of green food coloring to plain Greek yogurt if you want a tinted, extra-spooky dip
- Try mini chocolate chips instead of candy eyes for a slightly different monster-face look
Nutritional Information
Here’s a rough estimate per serving, including a portion of fruit and dip together, though actual values will vary based on your brands.
- Calories: 95 kcal
- Protein: 4 g
- Carbohydrates: 18 g
- Fat: 1 g
Make Ahead and Storage
You can make the dessert dip up to two days in advance and keep it tightly covered in the refrigerator until you’re ready to serve.
For the fruit tray itself, it’s best assembled no more than a few hours before your party, since cut fruit and candy eyes hold up better with less time sitting out.
Leftover fruit and dip can be stored separately in airtight containers in the fridge for up to three days, though I’d recommend removing the candy eyes before storing any leftover grapes.
Why You’ll Love This Recipe?
This tray has become one of my go-to Halloween party ideas, and I think once you try it, it’ll earn a permanent spot in your rotation too.
- It’s genuinely easy: There’s no cooking involved, and the whole tray comes together in about 20 minutes from start to finish.
- It’s a healthier party option: Compared to candy-heavy Halloween spreads, this fruit tray recipe gives guests something fresh and naturally sweet to snack on.
- It’s endlessly customizable: Whether you want a classic frankenstein fruit platter or a frankenstein vegetable tray version, the base concept adapts easily.
- It’s a crowd-pleaser for all ages: Kids love the fun face, and adults appreciate having a lighter option on the snack table.
- It travels well: This tray holds its shape nicely for potlucks, school parties, or any gathering where you need to transport food.
FAQs
How do I prepare fruit for a fruit tray so it doesn’t turn brown?
Toss any apple or pear slices in a little lemon juice right after cutting, and try to cut fruits like bananas as close to serving time as possible.
Can I make a frankenstein veggie platter instead of a fruit version?
Yes, you can easily swap the grapes and berries for green vegetables like broccoli, cucumber, and bell peppers to create a savory take on this same idea.
What can I use instead of candy eyes?
Mini marshmallows with a dot of chocolate, or even small dollops of white chocolate with a chocolate chip pressed in, both work as easy substitutes.
How far in advance can I assemble this Frankenstein fruit tray?
I recommend assembling it no more than two to three hours before your event, since the fruit stays freshest and the candy eyes are less likely to slide.
Is this recipe easy to double for a bigger party?
Absolutely, just double the grape base and extend the blueberry hairline, and you can easily feed a much larger crowd with the same simple method.
If you’re planning out a whole Halloween dessert table, this tray pairs nicely with something a bit more indulgent too, like a spooky spider web cake for guests who want something a little sweeter alongside the fresh fruit.

Frankenstein Fruit Tray Recipe
Ingredients
Method
- In a mixing bowl, combine the vanilla Greek yogurt, instant cheesecake pudding mix, and skim milk. Stir everything together until it’s completely smooth with no lumps of pudding mix left behind. Set it in the fridge while you prep the fruit, since a slightly chilled dip holds its shape better on the tray.
- On your serving tray, arrange the green grapes into a rectangular block shape, close together so there are no visible gaps between them. This forms Frankenstein’s head and gives you a solid canvas to build his face on top of.
- Line a row of blueberries along the top edge of the grape rectangle to create his short, spiky hairline. Keep the blueberries tightly packed so the “hair” reads clearly from a few feet away.
- Press two candy eyes gently into the grapes toward the upper half of the face, leaving space between them. Add a small strip of black licorice across the forehead or along one side as his signature stitched scar.
- Arrange the sliced strawberries and your extra fruit around the edges of the tray, filling in any open space. Place your bowl of dessert dip either beside the face or in an open corner, then it’s ready to serve.
Notes
- I always buy my grapes a day ahead and rinse them early so they’re fully dry before I build the face, since wet grapes make the candy eyes slide right off.
- I like using a rectangular cutting board instead of a round platter, because Frankenstein’s face reads much more clearly on straight edges.
- I press the candy eyes in at a slight angle instead of flat, which somehow makes his expression look a little more alert and fun.
- I prep my dip the night before and just give it a quick stir before serving, which saves me time on the day of the party.
- I keep a few extra grapes on hand in case any crack or roll away while I’m shaping the face