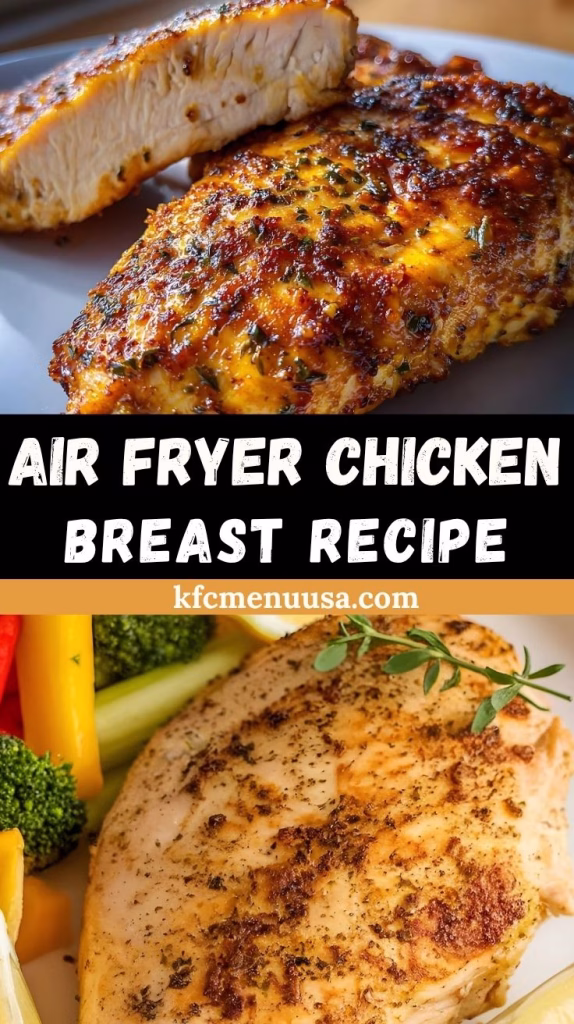
Air Fryer Chicken Breast Recipe: Juicy & Tender Dish
I have to tell you, this air fryer chicken breast recipe has completely stolen my heart! I made it last week on a whim, and now it’s showing up in my kitchen at least twice a week.
The outside gets that perfect smoky, savory crust, and the inside stays unbelievably juicy. It’s so easy that I can make it without stressing, even on my busiest days.
Whether I toss it into salads, pile it into wraps, or snack on it straight from the plate, it never disappoints.
Ingredients
Here’s what you’ll need to make this juicy chicken, along with a few pro tips from my own cooking experience.
- 1 teaspoon paprika – for a warm, earthy flavor.
- 1 teaspoon smoked paprika – adds a subtle smoky depth that makes the chicken irresistible.
- 1 teaspoon garlic powder – fresh garlic burns easily in the air fryer, so powder works better.
- 1 teaspoon onion powder – enhances the savory flavor without overpowering.
- ¾ teaspoon salt – I prefer fine sea salt for even seasoning.
- 1 teaspoon brown sugar – helps the chicken caramelize slightly.
- 1 teaspoon cornstarch – keeps the outside crisp without drying the meat.
- 1 tablespoon avocado oil – great for high heat cooking without a greasy feel.
- 2 boneless, skinless chicken breasts (about 1 pound total) – fresh chicken works best; avoid frozen for optimal texture.
Note: This recipe makes about 3–4 servings based on the quantities above.
Variations
Sometimes I like to switch things up, and this recipe makes it easy to do so.
- Dairy-Free: It’s already dairy-free, so no changes needed.
- Sugar-Free: Swap brown sugar for a sugar-free sweetener like monk fruit or erythritol.
- Extra Spicy: Add ½ teaspoon cayenne pepper or chili powder.
- Herby Twist: Sprinkle in dried thyme, oregano, or rosemary for an earthy aroma.
Cooking Time
- Prep Time: 10 minutes
- Cooking Time: 10 minutes
- Total Time: 20 minutes
Equipment You Need
- Air fryer – cooks the chicken evenly with a crispy exterior.
- Cutting board & sharp knife – for slicing the chicken into even pieces.
- Mixing bowl – to toss the chicken with spices and oil.
- Tongs – makes flipping and removing the chicken easy without burning fingers
How to Make Air Fryer Chicken Breast?
Step 1: Prepare the Chicken
I start by slicing each chicken breast into thin, even pieces. This helps them cook quickly and stay juicy. I always pat them dry with paper towels because moisture can prevent the seasonings from sticking well.
Step 2: Coat in Spices
In a mixing bowl, I combine paprika, smoked paprika, garlic powder, onion powder, salt, brown sugar, and cornstarch. Then, I drizzle in avocado oil and toss the chicken until every piece is evenly coated. The oil not only helps the spices stick but also encourages crispiness.

Step 3: Air Fry the Chicken
I preheat my air fryer to 415°F (or 400°F if that’s the max setting). The chicken goes in a single layer with space between each piece so air can circulate. Cooking takes about 10 minutes, flipping halfway through. I always check with a meat thermometer to ensure the thickest piece hits 165°F.

Step 4: Serve and Enjoy
Once done, the chicken is golden and bursting with flavor. I like to slice it into strips and serve it right away. Sometimes I put out a few dipping sauces so everyone can enjoy it their way.

Additional Tips for Making this Recipe Better
Here are some tricks I’ve learned after making this chicken multiple times:
- Slice the chicken thinly for even cooking and better flavor absorption.
- Rub the seasoning into the meat so it sticks well.
- Don’t overcrowd the basket—cook in batches if necessary.
- Let the chicken rest for 2 minutes before slicing to keep juices in.
How to Serve Air Fryer Chicken Breast?
This chicken is one of my go-to “anytime” proteins. I love serving it over fresh greens for a quick salad, with roasted vegetables for a healthy dinner, or in tacos for a fun twist. Garnishing with fresh parsley or cilantro gives it that fresh, vibrant look.

Nutritional Information
This recipe isn’t just tasty—it’s also a great healthy option.
- Calories: ~250
- Protein: 26g
- Carbohydrates: 3g
- Fat: 5g
Make Ahead and Storage
Refrigeration
Once cooked, I store the chicken in an airtight container in the fridge for up to 4 days.
Freezing
I freeze portions in a single layer before sealing them in freezer bags. They keep well for up to 2 months.
Reheating
To bring back the crispiness, I pop them back in the air fryer for a few minutes instead of microwaving.
Why You’ll Love This Recipe?
If you’re wondering whether to try it, here’s why I think you’ll love it as much as I do:
- Quick and Easy – Done in just 20 minutes from start to finish.
- Perfectly Juicy – The air fryer locks in moisture so every bite is tender.
- Full of Flavor – Smoky, savory, and slightly sweet in every mouthful.
- Versatile – Works in salads, wraps, grain bowls, or on its own.
- Low Mess – Minimal cleanup compared to pan-frying or baking.
Air Fryer Chicken Breast Recipe
Ingredients
Method
- I start by slicing each chicken breast into thin, even pieces. This helps them cook quickly and stay juicy. I always pat them dry with paper towels because moisture can prevent the seasonings from sticking well.
- In a mixing bowl, I combine paprika, smoked paprika, garlic powder, onion powder, salt, brown sugar, and cornstarch. Then, I drizzle in avocado oil and toss the chicken until every piece is evenly coated. The oil not only helps the spices stick but also encourages crispiness.
- I preheat my air fryer to 415°F (or 400°F if that’s the max setting). The chicken goes in a single layer with space between each piece so air can circulate. Cooking takes about 10 minutes, flipping halfway through. I always check with a meat thermometer to ensure the thickest piece hits 165°F.
- Once done, the chicken is golden and bursting with flavor. I like to slice it into strips and serve it right away. Sometimes I put out a few dipping sauces so everyone can enjoy it their way.
Notes
- Slice the chicken thinly for even cooking and better flavor absorption.
- Rub the seasoning into the meat so it sticks well.
- Don’t overcrowd the basket—cook in batches if necessary.
- Let the chicken rest for 2 minutes before slicing to keep juices in.