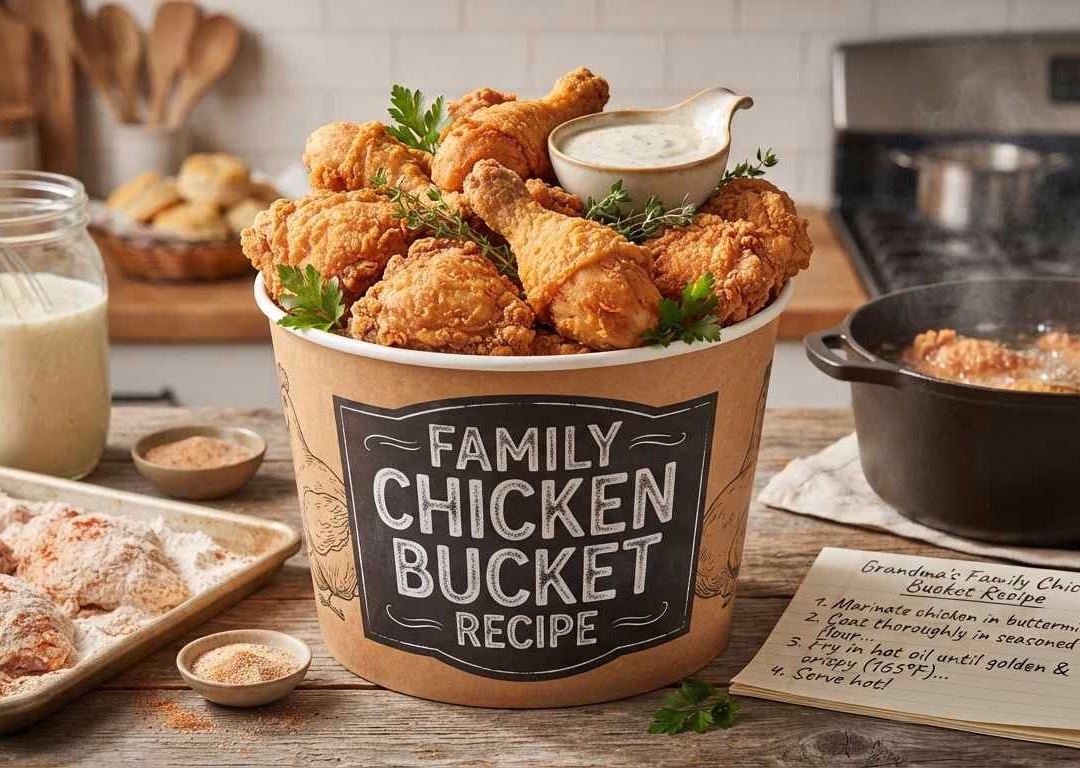
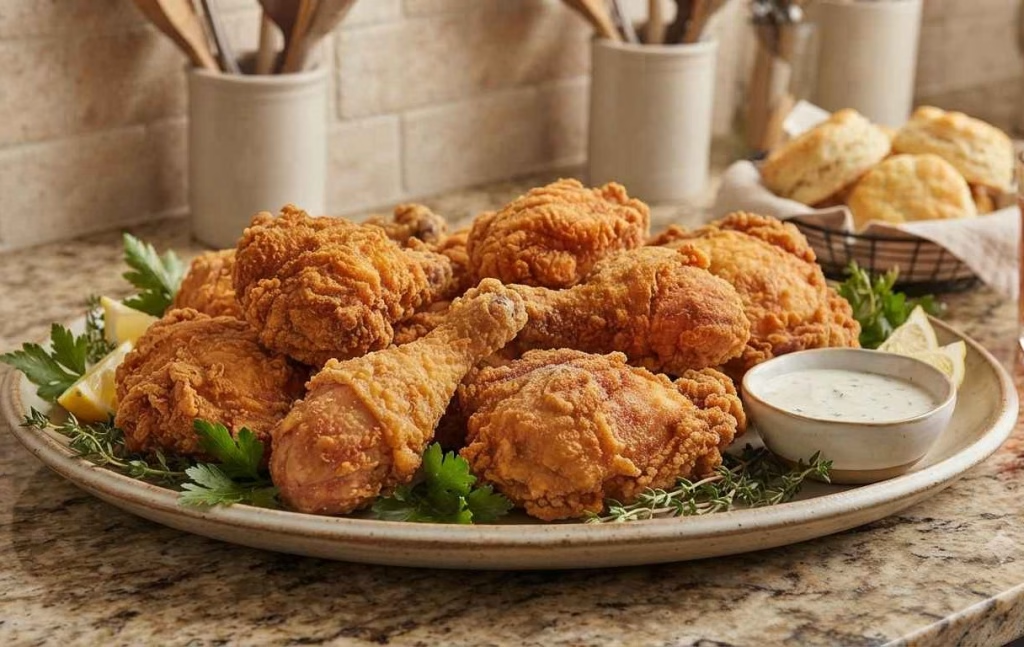
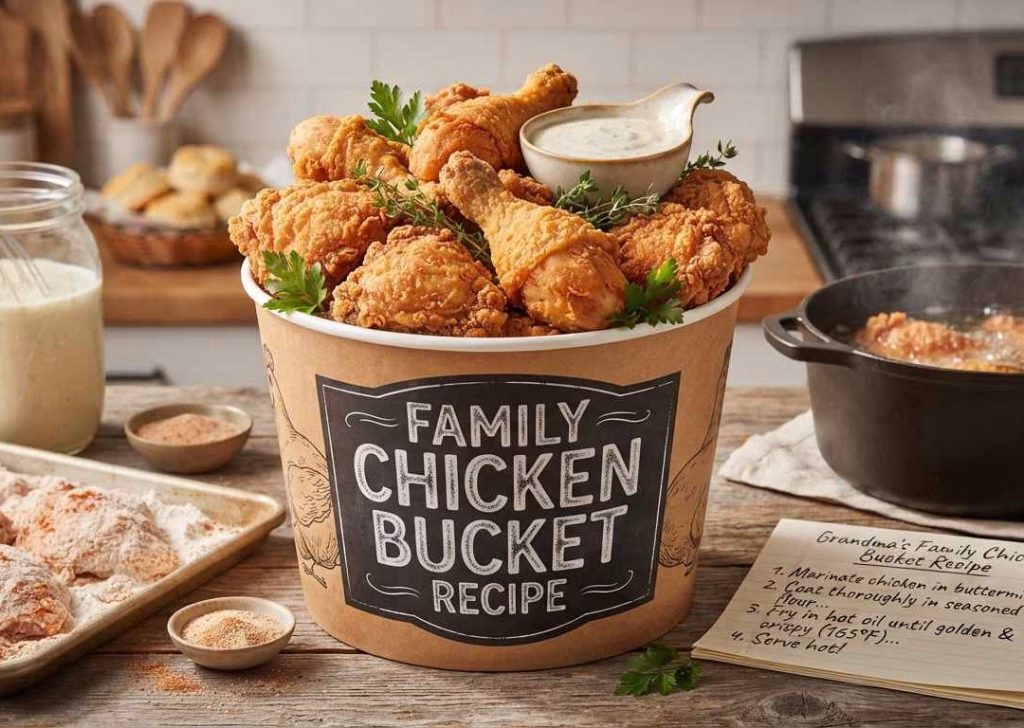
I still remember the first time I made this family chicken bucket recipe for a Sunday get-together, and it disappeared before I even sat down to eat. There’s something about that golden, crackly crust and juicy meat underneath that makes everyone reach for a second piece.
I brine the chicken overnight, dredge it twice, and finish it hot and fast so the coating stays shatteringly crisp. Once I nailed the process, I never bought bucket chicken from a takeout counter again. Let me walk you through exactly how I make it at home, step by step.

Ingredients
For the brine:
- 1 gallon water
- 1 ½ cups kosher salt – this is what pulls moisture deep into the meat, so don’t swap it for table salt without adjusting the amount
- ½ cup brown sugar
- 4 sprigs fresh rosemary
- 4 sprigs fresh thyme
- 6 bay leaves
- 4 tablespoons black peppercorns
- 1 head garlic, halved
- Zest of 1 orange – fresh zest only, since the bottled kind loses its fragrant oils
For finishing the brine:
- ½ gallon ice water – keeps the brine cold enough to stop bacteria growth while it dissolves
For the chicken:
- 2 whole chickens (about 3 ½ lbs each), cut into 10 pieces each
- 4 cups all-purpose flour
- ¼ cup granulated garlic
- ¼ cup onion powder
- 4 tablespoons kosher salt
- 1 tablespoon black pepper
- 1 tablespoon paprika
- 2 tablespoons cayenne pepper – adjust down if you’re feeding little ones who don’t love heat
- 1 quart buttermilk – full-fat works best for a rich, tangy coating that helps the flour cling
- Cooking spray, for greasing
- Canola oil, for frying – a neutral oil with a high smoke point holds up better than olive oil here
Note: These amounts serve about 8 people generously, so if you’re cooking for a smaller family, halve everything except the brine, which needs enough liquid to fully submerge the chicken.
Variations
- Swap buttermilk for a dairy-free version using plant milk mixed with a tablespoon of lemon juice
- Use a sugar-free brine by leaving out the brown sugar and adding a bit more salt for balance
- Add smoked paprika instead of regular paprika for a deeper, smokier flavor
- Toss in a tablespoon of hot sauce into the buttermilk for extra tang and heat, similar to the flavors in Spicy Firecracker Beef Recipe.
- Swap chicken pieces for boneless thighs if you want faster cooking and easier serving
- Try honey drizzled over the finished pieces for a sweet-and-spicy twist
Cooking Time
- Prep Time: 30 minutes (plus overnight brining)
- Cooking Time: 50 minutes
- Total Time: About 1 hour 20 minutes active time, plus overnight rest
Equipment You Need
- Large stockpot – for boiling and dissolving the brine ingredients
- Large container or bucket – to hold the chicken while it brines in the fridge
- Sheet trays with cooling racks – to air-dry the chicken and drain fried pieces
- Two medium mixing bowls – one for buttermilk, one for the seasoned flour
- Cast-iron skillet or deep pot – for frying the chicken to crispy perfection
- Meat thermometer – to check the chicken hits a safe internal temperature
- Oven – to bake the chicken through before the final fry
How to Make Family Chicken Bucket Recipe?
Making this recipe is really a three-part process: brining, coating, and cooking. Each stage builds on the last, so the chicken ends up juicy inside and crackly outside. I promise it’s easier than it looks once you get going.
Step 1: Prepare the Brine
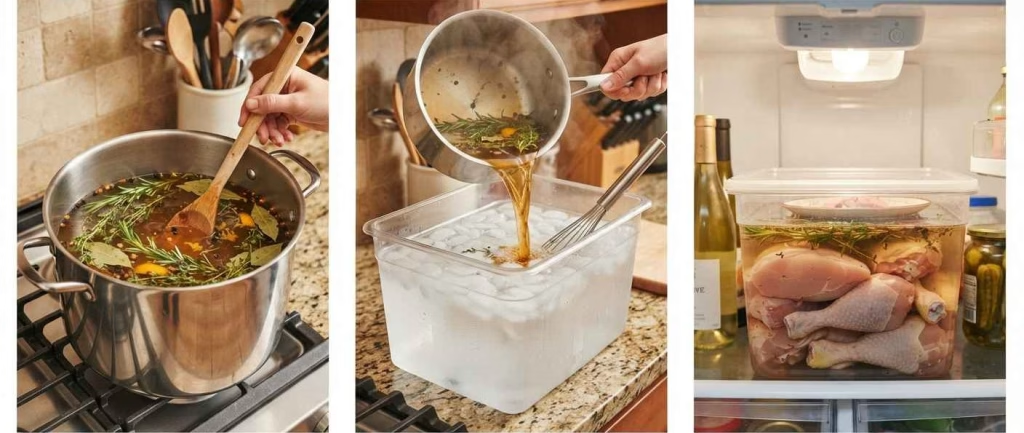
I bring the water, salt, brown sugar, rosemary, thyme, bay leaves, peppercorns, garlic, and orange zest to a boil in a big pot. I let it simmer just until the salt and sugar fully dissolve. This infuses the liquid with flavor before it ever touches the chicken.
Step 2: Cool the Brine
Next, I pour the hot brine over the ice water in a large container. Stirring it helps the ice melt fast and brings the temperature down quickly. I never add warm brine directly to raw chicken, since that’s not food-safe.
Step 3: Brine the Chicken Overnight
I submerge all the chicken pieces in the cooled brine, weighing them down with a plate if they float. Then I cover the container and let it sit in the fridge overnight. This step is what makes the chicken so juicy later.
Step 4: Rinse and Dry
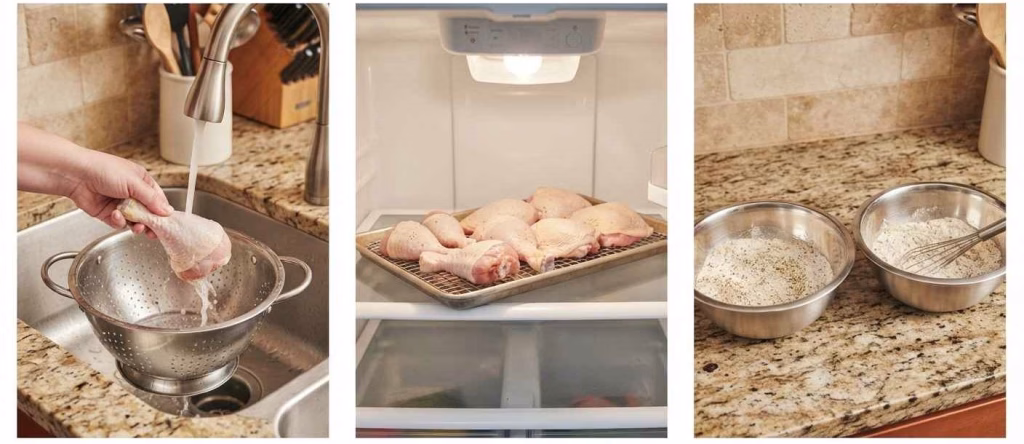
The next day, I remove the chicken and rinse it under cold water to wash off excess salt. Then I lay the pieces on a rack over a sheet tray and pat them dry. A dry surface is essential for that crispy skin.
Step 5: Air-Dry in the Fridge
I let the chicken sit uncovered in the fridge for about an hour so the skin fully dries out. Skipping this step usually means a soggier coating later. It’s a small wait that pays off big.
Step 6: Mix the Seasoned Flour
While the chicken dries, I combine the flour with granulated garlic, onion powder, salt, pepper, paprika, and cayenne in a bowl. I split this mixture between two bowls, since the chicken goes through it twice. This double coating is the secret to that thick, craggy crust.
Step 7: Season the Buttermilk
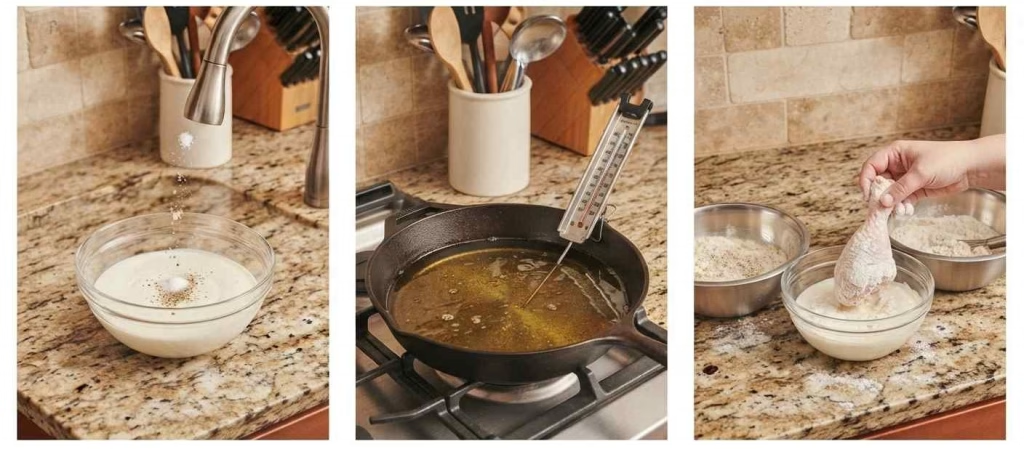
I pour the buttermilk into its own bowl and season it with a pinch of salt and pepper. The tangy buttermilk helps tenderize the meat further and gives the flour something to stick to.
Step 8: Preheat and Prep the Oil
I preheat my oven to 450°F and set a cast-iron pan with about 1 ½ inches of canola oil to heat alongside it. Getting the oil hot before the chicken goes anywhere near it is key for a crisp finish. I use a thermometer to keep an eye on both.
Step 9: Double Dredge the Chicken
Each piece gets dredged in the first bowl of flour, dipped in buttermilk, then coated again in the second bowl of flour. I shake off the extra flour each time so it doesn’t clump. This is the step that really builds the crunch.
Step 10: Bake Until Nearly Done
I place the coated chicken on a greased rack over a sheet tray and bake it until the internal temperature hits about 150°F, roughly 30 to 40 minutes. Baking first means less time frying later, which keeps things a little lighter.
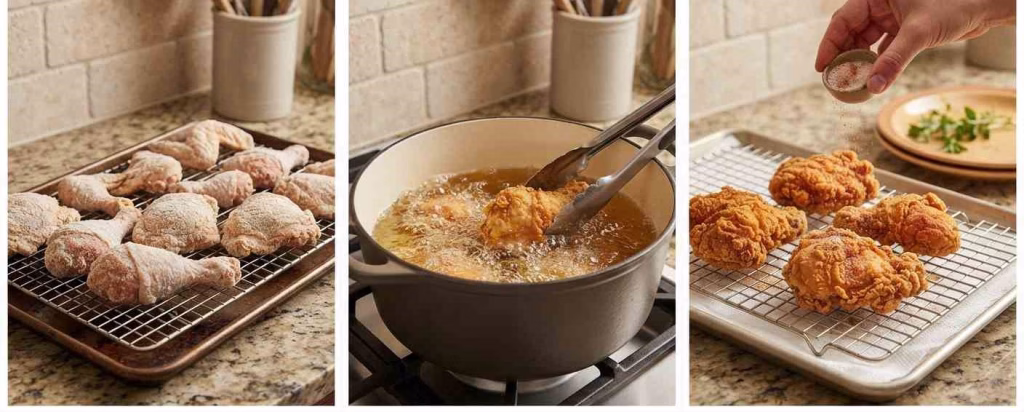
Step 11: Fry to Finish
I transfer a few pieces at a time into the hot oil to crisp up the coating and finish cooking until they reach 165°F internally. This quick fry is what gives the chicken that iconic golden crunch. I never crowd the pan, since that drops the oil temperature.
Step 12: Season and Serve
As soon as each piece comes out of the oil, I season it with a pinch more salt or a favorite chicken rub while it’s still hot. I let the pieces rest on a rack so excess oil drips away and the crust stays crisp.
Additional Tips for Making This Recipe Better
- I always pat the chicken completely dry before coating it, since any leftover moisture ruins the crunch
- I never skip the double dredge, because one pass through the flour just doesn’t build enough crust
- I keep my oil temperature steady around 350°F while frying, checking it often with a thermometer
- I fry in small batches so the oil doesn’t cool down too fast
- I let the chicken rest for a few minutes after frying so the juices settle before serving
How to Serve Family Chicken Bucket Recipe?
I love piling the pieces high in a big bucket or basket lined with parchment paper for that classic family-style presentation. A sprinkle of fresh parsley or chives on top adds a pop of color against the golden crust.
I usually serve it alongside Cranberry Apple Coleslaw Recipe, buttery cornbread, and mashed potatoes for a complete spread. For dipping, honey mustard, ranch, or a spicy mayo all work beautifully. If I’m setting it out for a party, I add lemon wedges around the platter for a bright finishing touch.
Nutritional Information
Here’s a rough idea of what one serving of this crispy chicken looks like nutritionally:
- Calories: 480 per serving
- Protein: 34g
- Carbohydrates: 22g
- Fat: 27g
Make Ahead and Storage
Refrigerating: I store leftover pieces in an airtight container in the fridge, where they stay fresh for up to 3 to 4 days. I let them cool completely before sealing to avoid trapping steam and softening the crust.
Freezing: I wrap each piece individually in foil or plastic before placing them in a freezer bag, and they’ll keep well for up to 3 months. Labeling the bag with the date helps me keep track of freshness.
Reheating: I reheat leftovers in a 375°F oven for about 15 to 20 minutes to bring back the crunch, since microwaving tends to make the coating go soggy. A quick pass under the broiler at the end crisps it up even more.
Why You’ll Love This Recipe
This family chicken bucket recipe has earned a permanent spot in my rotation, and here’s why I think you’ll feel the same way:
- It’s endlessly customizable, so I can adjust the spice level or swap ingredients to fit whoever I’m cooking for
- The double dredge technique gives a bakery-level crunch without needing any fancy equipment
- It feeds a crowd easily, making it perfect for family dinners, potlucks, or game day
- The overnight brine means the chicken stays juicy even after reheating leftovers
- It works with dietary tweaks like dairy-free buttermilk or a milder spice blend for kids
Family Chicken Bucket Recipe
Ingredients
Method
- I bring the water, salt, brown sugar, rosemary, thyme, bay leaves, peppercorns, garlic, and orange zest to a boil in a big pot. I let it simmer just until the salt and sugar fully dissolve. This infuses the liquid with flavor before it ever touches the chicken.
- Next, I pour the hot brine over the ice water in a large container. Stirring it helps the ice melt fast and brings the temperature down quickly. I never add warm brine directly to raw chicken, since that’s not food-safe.
- I submerge all the chicken pieces in the cooled brine, weighing them down with a plate if they float. Then I cover the container and let it sit in the fridge overnight. This step is what makes the chicken so juicy later.
- The next day, I remove the chicken and rinse it under cold water to wash off excess salt. Then I lay the pieces on a rack over a sheet tray and pat them dry. A dry surface is essential for that crispy skin.
- I let the chicken sit uncovered in the fridge for about an hour so the skin fully dries out. Skipping this step usually means a soggier coating later. It’s a small wait that pays off big.
- While the chicken dries, I combine the flour with granulated garlic, onion powder, salt, pepper, paprika, and cayenne in a bowl. I split this mixture between two bowls, since the chicken goes through it twice. This double coating is the secret to that thick, craggy crust.
- I pour the buttermilk into its own bowl and season it with a pinch of salt and pepper. The tangy buttermilk helps tenderize the meat further and gives the flour something to stick to.
- I preheat my oven to 450°F and set a cast-iron pan with about 1 ½ inches of canola oil to heat alongside it. Getting the oil hot before the chicken goes anywhere near it is key for a crisp finish. I use a thermometer to keep an eye on both.
- Each piece gets dredged in the first bowl of flour, dipped in buttermilk, then coated again in the second bowl of flour. I shake off the extra flour each time so it doesn’t clump. This is the step that really builds the crunch.
- I place the coated chicken on a greased rack over a sheet tray and bake it until the internal temperature hits about 150°F, roughly 30 to 40 minutes. Baking first means less time frying later, which keeps things a little lighter.
- I transfer a few pieces at a time into the hot oil to crisp up the coating and finish cooking until they reach 165°F internally. This quick fry is what gives the chicken that iconic golden crunch. I never crowd the pan, since that drops the oil temperature.
- As soon as each piece comes out of the oil, I season it with a pinch more salt or a favorite chicken rub while it’s still hot. I let the pieces rest on a rack so excess oil drips away and the crust stays crisp.
Notes
- I always pat the chicken completely dry before coating it, since any leftover moisture ruins the crunch
- I never skip the double dredge, because one pass through the flour just doesn’t build enough crust
- I keep my oil temperature steady around 350°F while frying, checking it often with a thermometer
- I fry in small batches so the oil doesn’t cool down too fast
- I let the chicken rest for a few minutes after frying so the juices settle before serving