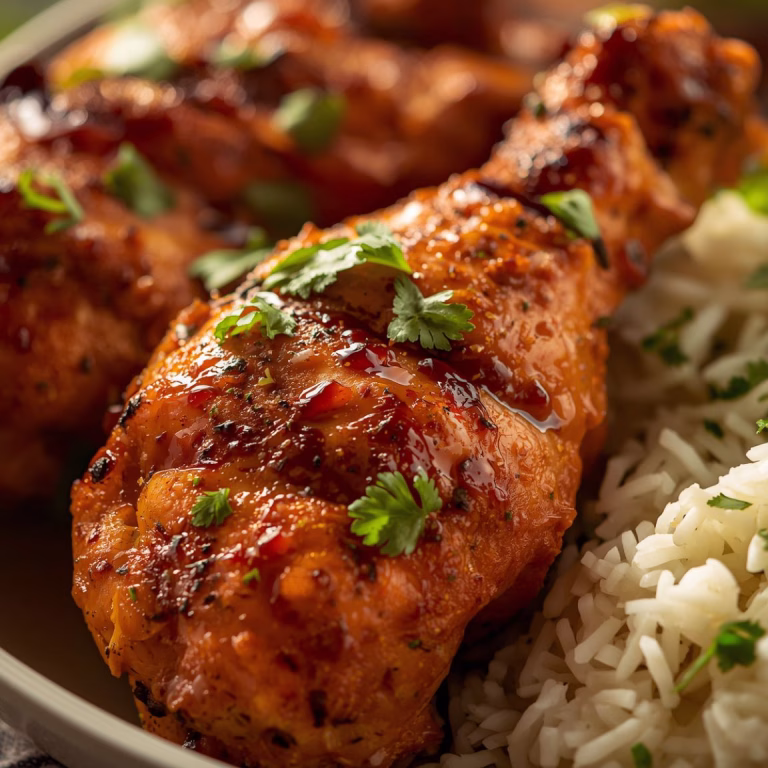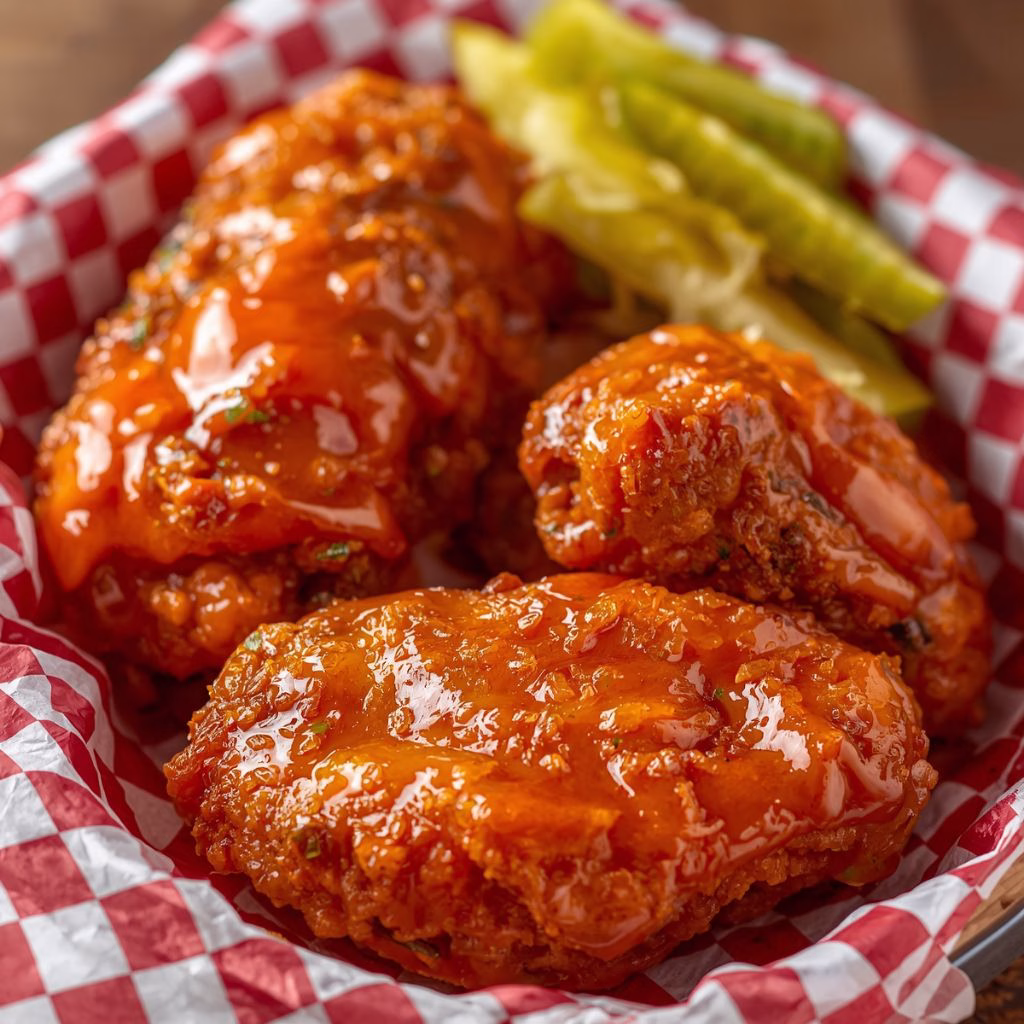
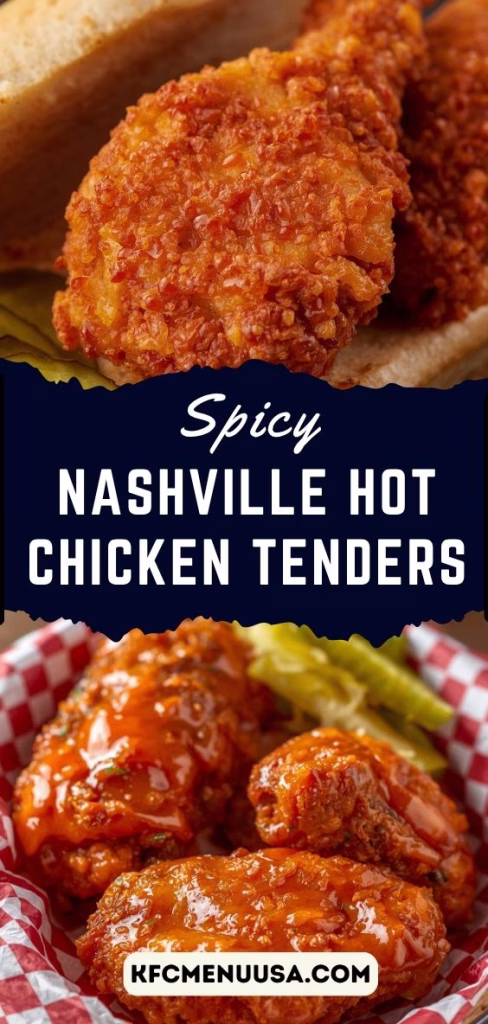
The first time I made these Nashville Hot Chicken Tenders, I honestly couldn’t stop sneaking bites straight from the cooling rack. The crispy coating, juicy chicken, and spicy buttery glaze created the perfect balance of heat and flavor. I loved how every tender stayed crunchy on the outside while remaining tender inside.
The sweet and smoky spice blend made my kitchen smell incredible from start to finish. After trying this recipe, I completely understood why Nashville hot chicken has become such a famous Southern comfort dish.
Ingredients
These ingredients work together to create crispy, flavorful chicken with that signature spicy Nashville-style coating.
For the Chicken Tenders
- 2 pounds chicken tenders – Fresh chicken works best because it stays juicy and cooks evenly.
- 2 cups buttermilk – Helps tenderize the chicken and adds rich flavor.
- ⅓ cup hot sauce – Adds tangy heat to the marinade.
- 2½ cups all-purpose flour – Creates the crispy outer coating.
- 3 tablespoons cornstarch – Gives the breading extra crunch.
- 1 tablespoon onion powder – Adds savory depth to the coating.
- 1 tablespoon paprika – Gives color and mild smoky flavor.
- 2 teaspoons cayenne pepper – Essential for authentic Nashville heat.
- 2 teaspoons black pepper – Adds bold seasoning.
- ½ teaspoon garlic powder – Enhances the savory flavor.
- 3 tablespoons seasoned salt – Helps season every layer properly.
- Vegetable oil for frying – Use neutral oils like canola or peanut oil for best frying results.
For the Nashville Hot Sauce
- ⅓ cup cayenne pepper – The main spicy ingredient for the signature heat.
- 1½ tablespoons dark brown sugar – Balances the spice with sweetness.
- 1 teaspoon chili powder – Adds earthy warmth.
- 1 teaspoon garlic powder – Boosts flavor in the sauce.
- 1 teaspoon smoked paprika – Gives a smoky Southern-style taste.
- 1 cup reserved frying oil – Helps create the traditional spicy glaze.
For Serving
- White bread slices – Classic Nashville hot chicken pairing.
- Pickle slices – Cool down the heat and add crunch.
Note: This recipe makes about 6 servings depending on the size of the chicken tenders.
Variations
You can easily customize these spicy chicken tenders based on your taste preferences.
- Use boneless chicken thighs instead of tenders for extra juicy chicken.
- Replace buttermilk with dairy-free milk mixed with lemon juice for a dairy-free version.
- Reduce cayenne pepper for a milder heat level.
- Add honey to the hot glaze if you enjoy sweet and spicy flavors together.
- Use gluten-free flour and cornstarch for a gluten-free option.
- Add crushed red pepper flakes for even more heat.
- Mix a little pickle juice into the marinade for extra Southern flavor.
For a lighter seafood-inspired meal idea, try pairing similar spice profiles with Coconut Fish Stew With Ginger Greens Recipe for a different but equally flavorful experience.
Cooking Time
This recipe comes together surprisingly fast once everything is prepared.
- Prep Time: 20 minutes
- Cooking Time: 15 minutes
- Total Time: 35 minutes
Equipment You Need
Having the right tools makes frying easier and safer.
- Large mixing bowls – Used for marinating and coating the chicken.
- Whisk – Helps combine spices and wet ingredients evenly.
- Heavy-bottom skillet or Dutch oven – Maintains steady oil temperature for frying.
- Tongs – Makes flipping and removing chicken easier.
- Wire rack – Keeps fried chicken crispy while draining excess oil.
- Baking sheet – Holds the coated chicken before frying.
- Meat thermometer – Helps ensure chicken is fully cooked.
How to Make Nashville Hot Chicken Tenders Recipe?
These crispy chicken tenders are easier to make than they look. The secret is layering flavors in every step, from the marinade to the spicy glaze. Once everything is ready, the tenders fry quickly and turn beautifully golden brown.
Prepare the Marinade
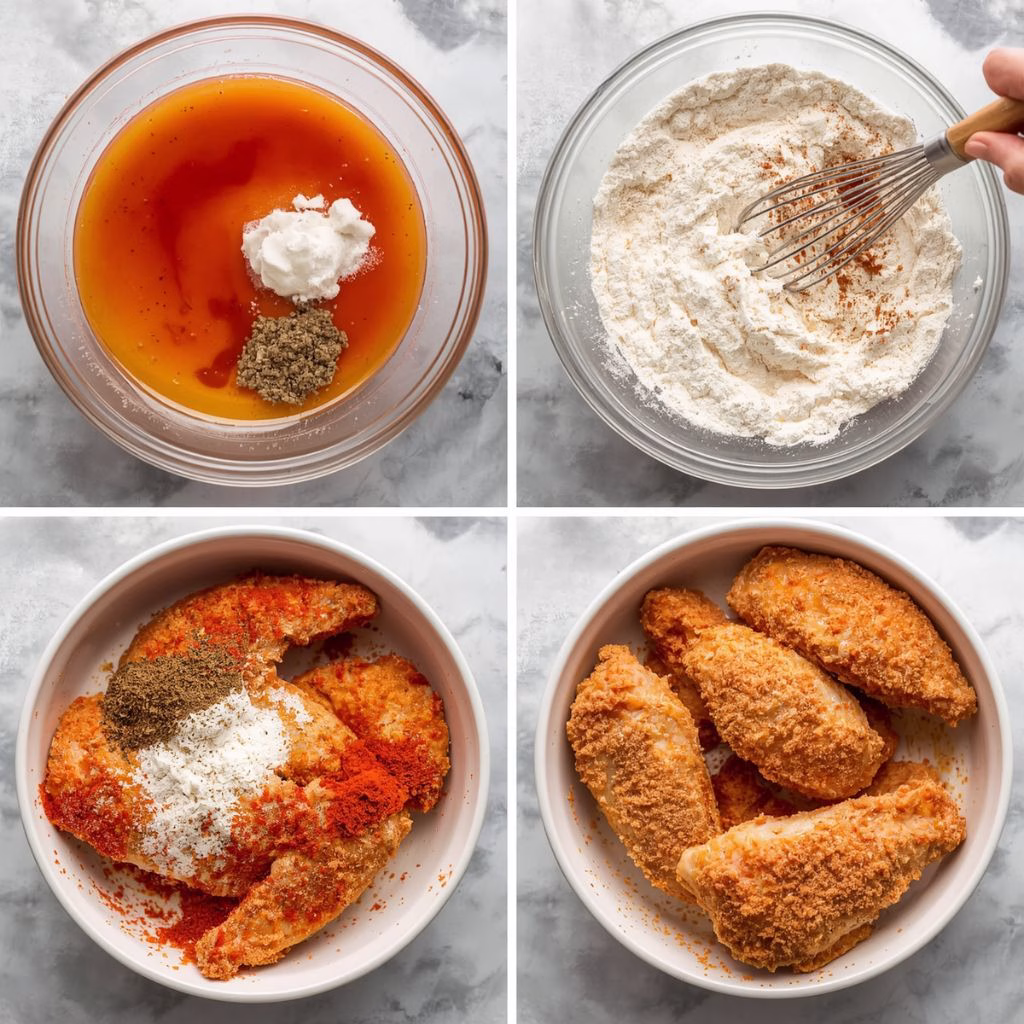
Start by combining the buttermilk and hot sauce in a large bowl. This mixture helps tenderize the chicken while adding flavor to every bite. Add the chicken tenders and let them soak for at least 30 minutes for the best texture.
Mix the Seasoned Flour
In another large bowl, whisk together flour, cornstarch, seasoned salt, paprika, cayenne pepper, onion powder, garlic powder, and black pepper. The cornstarch helps create an extra crispy crust that stays crunchy longer. Make sure the spices are evenly mixed throughout the flour.
Coat the Chicken
Remove each chicken tender from the marinade and dredge it in the seasoned flour. Dip it back into the buttermilk mixture, then coat it again in the flour mixture. This double coating creates the thick, crunchy crust Nashville chicken is famous for.
Let the Coating Rest
Place the coated chicken tenders on a baking sheet or wire rack. Let them rest for about 15 to 20 minutes before frying. I noticed this step really helps the breading stick better during frying.
Heat the Oil
Pour vegetable oil into a heavy skillet or Dutch oven until it’s about 2 inches deep. Heat the oil over medium-high heat until it reaches around 350°F. If a small pinch of flour sizzles immediately, the oil is ready for frying.
Fry the Chicken Tenders
Carefully place a few chicken tenders into the hot oil without overcrowding the pan. Fry each side for about 2 to 3 minutes until golden brown and crispy. Transfer the cooked chicken to a wire rack so it stays crunchy.
Make the Nashville Hot Glaze
In a heat-safe bowl, whisk together cayenne pepper, brown sugar, chili powder, garlic powder, and smoked paprika. Carefully add one cup of the hot frying oil and stir until smooth. The warm oil helps bloom the spices and create that classic fiery glaze.
Coat the Chicken
Brush the spicy glaze generously over the hot fried chicken tenders. Make sure every piece gets coated evenly for maximum flavor. The sauce should soak slightly into the crispy crust while still keeping the chicken crunchy.
Serve and Enjoy
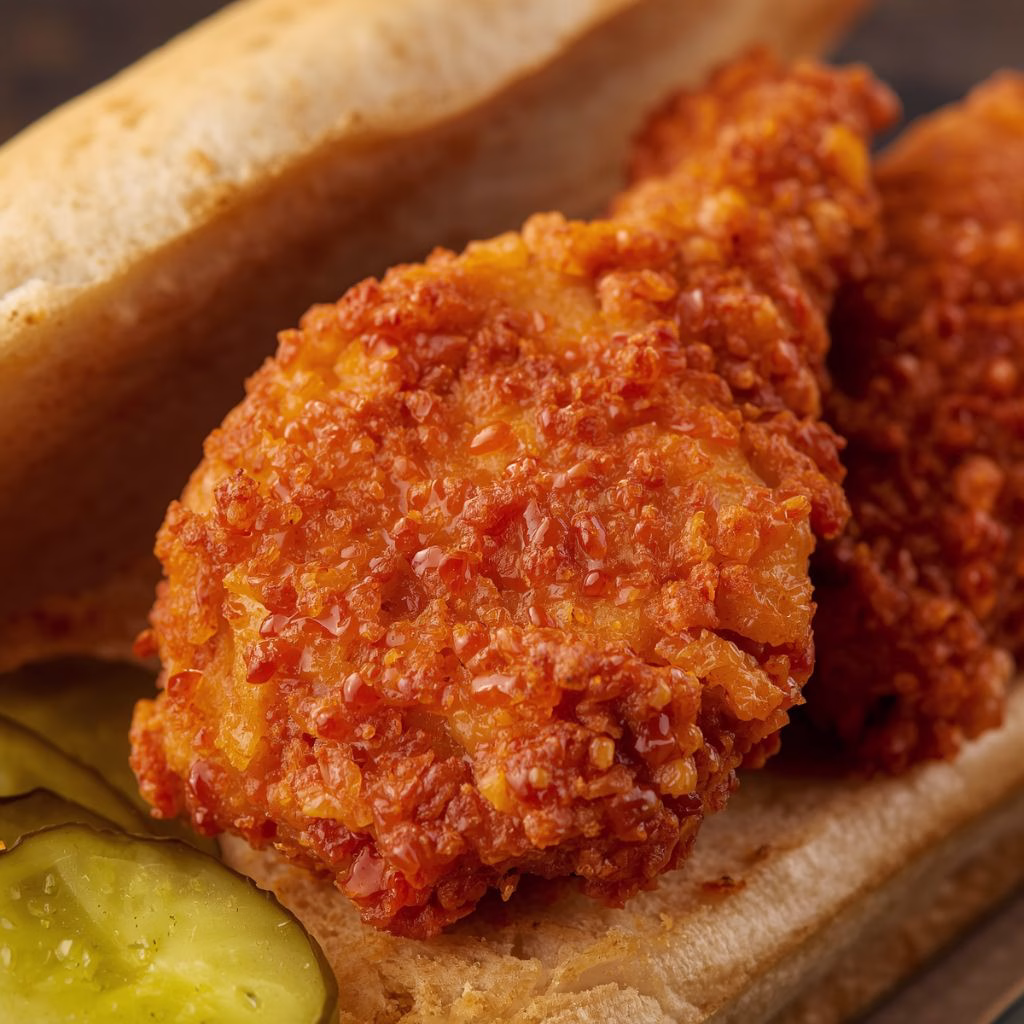
Place the chicken tenders on slices of soft white bread and top with pickles. The bread absorbs some of the spicy oil while the pickles add freshness and crunch. Serve immediately while the chicken is hot and crispy. If you want a different comforting side option, you might also enjoy Green Olive Pasta With Toasted Lemon Breadcrumbs Recipe alongside spicy dishes like this.
Additional Tips for Making this Recipe Better
After making these tenders several times, I found a few tricks that make them even more delicious.
- I always let the coated chicken rest before frying because it helps the crust stay attached.
- I like using peanut oil since it gives the chicken a crispier texture.
- I never overcrowd the frying pan because it lowers the oil temperature quickly.
- I keep cooked tenders warm in a low-temperature oven while frying the remaining batches.
- I sometimes add a drizzle of honey to the glaze when I want sweet heat.
- I use a wire rack instead of paper towels so the crust stays crispy underneath too.
How to Serve Nashville Hot Chicken Tenders Recipe?
These spicy chicken tenders pair wonderfully with classic Southern side dishes. I love serving them on soft white bread with crunchy pickle slices for the traditional Nashville-style presentation. The bread helps balance the heat while soaking up the flavorful spicy oil.
For a complete meal, serve them with creamy mac and cheese, coleslaw, potato salad, or crispy fries. You can also slice the tenders and use them in sandwiches, wraps, or salads for a delicious spicy twist. Garnish with chopped parsley or extra pickles for a more appealing presentation.
Nutritional Information
These values are approximate and may vary depending on portion size and frying oil used.
- Calories: Approximately 520 calories per serving
- Protein: Around 32g protein
- Carbohydrates: About 28g carbohydrates
- Fat: Approximately 30g fat
Make Ahead and Storage
These chicken tenders can easily be prepared ahead for busy days. Proper storage also helps maintain their flavor and texture.
Make Ahead
You can marinate the chicken up to 24 hours in advance for even more flavor. The flour coating can also be mixed ahead and stored in an airtight container. I sometimes prep everything the night before to save time.
Storing
Store leftover chicken tenders in an airtight container in the refrigerator for up to 4 days. Let the chicken cool completely before storing to prevent sogginess. Keep the tenders and pickles separate for best texture.
Freezing
Freeze cooked chicken tenders in a freezer-safe container for up to 2 months. I like placing parchment paper between layers so they don’t stick together. Thaw overnight in the refrigerator before reheating.
Reheating
Reheat the tenders in an oven or air fryer at 375°F until hot and crispy again. Avoid microwaving because it softens the crunchy coating. A few minutes in the air fryer makes them taste freshly made.
Why You’ll Love This Recipe?
There are so many reasons these Nashville Hot Chicken Tenders quickly become a favorite meal.
- Ultra Crispy Texture
The double-dredging technique and cornstarch create an incredibly crunchy crust. Every bite has the perfect crispy texture without feeling greasy. - Bold Southern Flavor
The spicy cayenne glaze combined with smoky paprika and brown sugar creates the classic Nashville hot chicken taste. It’s spicy, slightly sweet, and deeply flavorful. - Easy to Customize
You can easily adjust the heat level depending on your preference. Add more cayenne for extra spice or reduce it for a milder version. - Perfect for Any Occasion
These tenders work well for family dinners, parties, game nights, or weekend comfort food cravings. They also make amazing sandwiches and wraps. - Restaurant-Quality at Home
I was surprised how close these tasted to authentic Nashville hot chicken from restaurants. Making them at home is easier and more affordable than expected.
This Nashville Hot Chicken Tenders recipe delivers crispy texture, juicy chicken, and fiery Southern flavor in every bite. Whether you enjoy extra spicy food or just love comfort food with a kick, this recipe is guaranteed to become a repeat favorite in your kitchen.
Nashville Hot Chicken Tenders Recipe
Ingredients
Method
- Start by combining the buttermilk and hot sauce in a large bowl. This mixture helps tenderize the chicken while adding flavor to every bite. Add the chicken tenders and let them soak for at least 30 minutes for the best texture.
- In another large bowl, whisk together flour, cornstarch, seasoned salt, paprika, cayenne pepper, onion powder, garlic powder, and black pepper. The cornstarch helps create an extra crispy crust that stays crunchy longer. Make sure the spices are evenly mixed throughout the flour.
- Remove each chicken tender from the marinade and dredge it in the seasoned flour. Dip it back into the buttermilk mixture, then coat it again in the flour mixture. This double coating creates the thick, crunchy crust Nashville chicken is famous for.
- Place the coated chicken tenders on a baking sheet or wire rack. Let them rest for about 15 to 20 minutes before frying. I noticed this step really helps the breading stick better during frying.
- Pour vegetable oil into a heavy skillet or Dutch oven until it’s about 2 inches deep. Heat the oil over medium-high heat until it reaches around 350°F. If a small pinch of flour sizzles immediately, the oil is ready for frying.
- Carefully place a few chicken tenders into the hot oil without overcrowding the pan. Fry each side for about 2 to 3 minutes until golden brown and crispy. Transfer the cooked chicken to a wire rack so it stays crunchy.
- In a heat-safe bowl, whisk together cayenne pepper, brown sugar, chili powder, garlic powder, and smoked paprika. Carefully add one cup of the hot frying oil and stir until smooth. The warm oil helps bloom the spices and create that classic fiery glaze.
- Brush the spicy glaze generously over the hot fried chicken tenders. Make sure every piece gets coated evenly for maximum flavor. The sauce should soak slightly into the crispy crust while still keeping the chicken crunchy.
- Place the chicken tenders on slices of soft white bread and top with pickles. The bread absorbs some of the spicy oil while the pickles add freshness and crunch. Serve immediately while the chicken is hot and crispy.
Notes
- I always let the coated chicken rest before frying because it helps the crust stay attached.
- I like using peanut oil since it gives the chicken a crispier texture.
- I never overcrowd the frying pan because it lowers the oil temperature quickly.
- I keep cooked tenders warm in a low-temperature oven while frying the remaining batches.
- I sometimes add a drizzle of honey to the glaze when I want sweet heat.
- I use a wire rack instead of paper towels so the crust stays crispy underneath too.