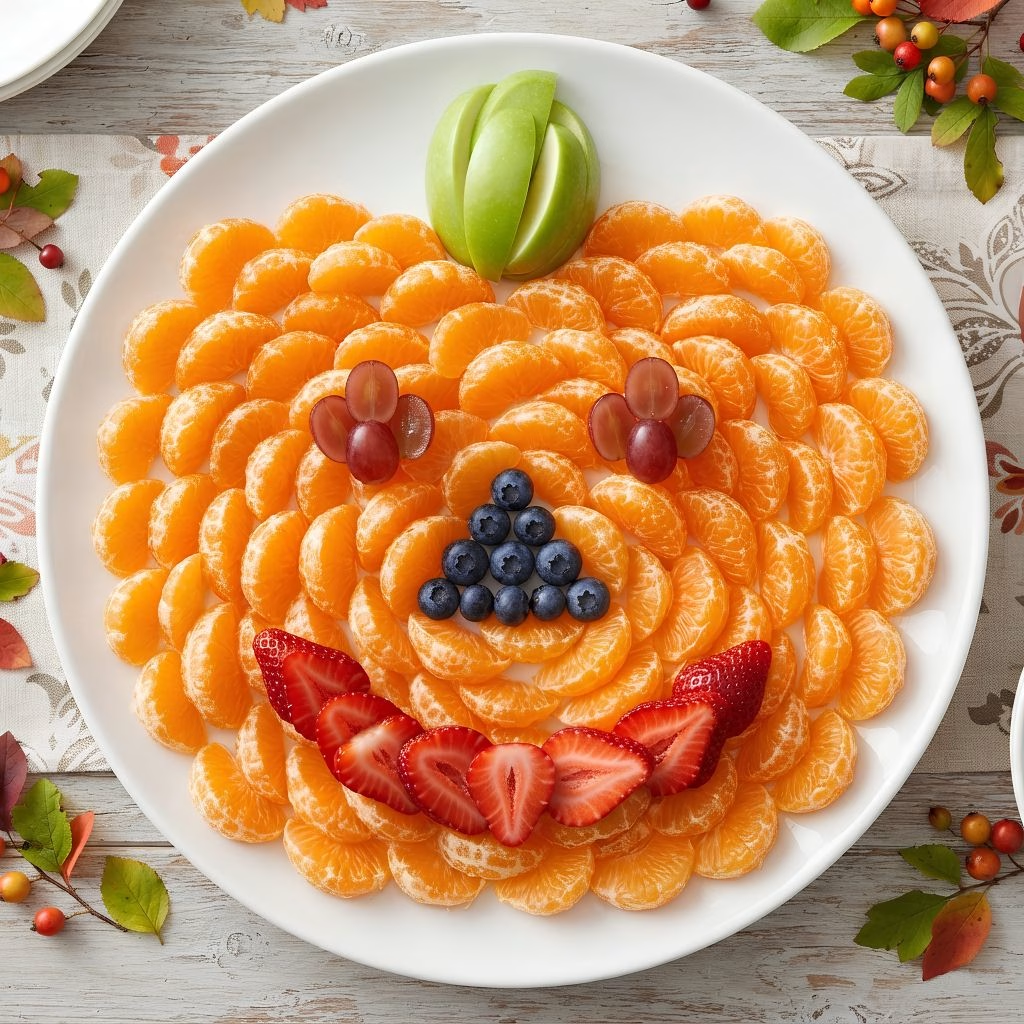
I made this pumpkin shaped fruit tray for a Halloween get-together last year, and it disappeared faster than the candy bowl. I piled bright mandarin orange pumpkin wedges onto a platter and gave it a silly, smiling face.
The kids giggled, and the grown-ups kept sneaking one more handful. It takes about ten minutes, needs no oven, and looks like you worked on it all afternoon. If you want a pumpkin fruit platter that feels festive and fresh, I think this Pumpkin Shaped Fruit Tray Recipe will become your go-to.
Cooking Time
This is a no-cook recipe, so the clock barely moves. Here is how the time breaks down.
- Prep Time: 10 minutes
- Cooking Time: 0 minutes
- Total Time: 10 minutes
Ingredients
Every ingredient here has a job to do. Pick fresh, ripe fruit, and the tray will look as good as it tastes.
- 12 clementines, peeled and separated into wedges: they build the bright orange pumpkin body.
- 1 cup red grapes, washed and picked off the vine: they become the round eyes, so choose plump, even ones.
- ¼ cup blueberries, washed: they shape the nose, so pat them dry first.
- 4 strawberries, halved: they curve into a happy smile, so pick firm, ripe berries.
- 4 slices Granny Smith apple: they make the green stem, so slice them last.
Note: serves several
Equipment You Need
You probably have everything in your kitchen already. Keep the tools simple.
- Large round tray or platter: gives the pumpkin a roomy, flat canvas.
- Paring knife: slices strawberries and apples cleanly.
- Cutting board: keeps your knife work tidy and safe.
- Colander: rinses grapes and berries in one go.
- Paper towels: dry the fruit so the wedges don’t slide around.
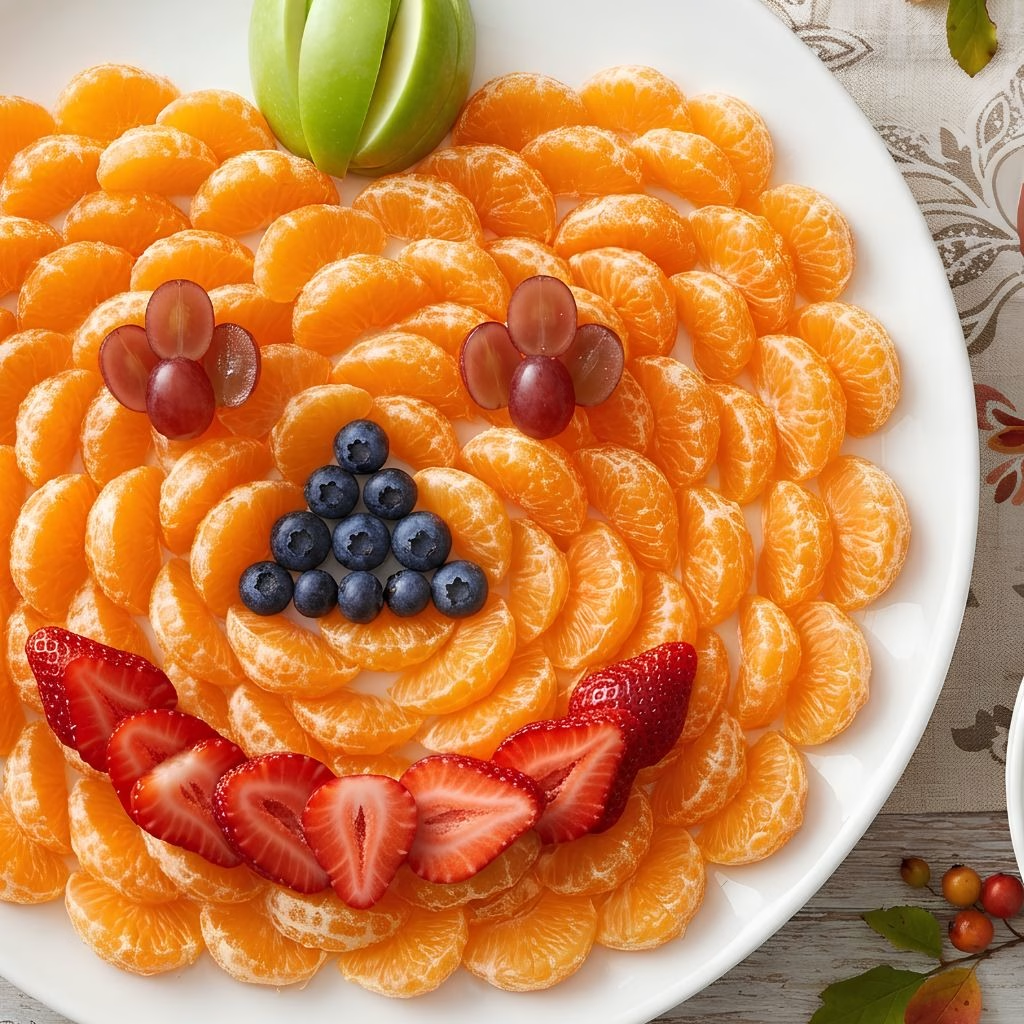
How to Make a Pumpkin Shaped Fruit Tray Recipe?
This tray comes together like a puzzle. You cover the platter with orange, then add the face and stem on top. Follow the steps in order, and you will have a smiling pumpkin in minutes.
Step 1: Wash and Prep the Fruit
Rinse the grapes, blueberries, and strawberries under cool water. Let them drain well, then pat them dry with paper towels. Dry fruit sticks to the tray better and keeps your design neat.
Step 2: Peel and Separate the Clementines
Peel all 12 clementines and pull off any stringy white pith. Split each one into wedges with your fingers. I like to set them in a bowl first so I can grab them quickly.
Step 3: Cover the Tray with Orange
Start at the outer edge of the platter and lay the wedges in tight rows. Work inward until no tray shows through. This orange layer is your pumpkin, so fill every gap.
Step 4: Slice the Strawberries and Make the Smile
Cut the strawberries in half from top to bottom. Lay the halves in a curved line near the bottom of the pumpkin. Tilt the curve upward at the ends for a big, happy grin.
Step 5: Add the Blueberry Nose
Place the blueberries in the center of the orange wedges. You can shape them into a small circle or a triangle. I prefer the triangle because it looks like a classic jack-o’-lantern nose.
Step 6: Set the Grape Eyes
Arrange the red grapes into two equal circles above the nose. Keep both circles the same size so the face looks balanced. Stand back and check that the eyes sit evenly.
Step 7: Finish with the Apple Stem
Slice the Granny Smith apple into wedges. Tuck them at the top of the tray so they form a stem. Serve right away, or chill the tray until the party starts.
Additional Tips for Making This Recipe Better
I have made this tray a few times now, and these small habits make a big difference.
- I always dry the fruit before building, because wet fruit slides and smudges the face.
- I keep extra apple slices, strawberries, blueberries, and grapes on the side to refill the tray as guests snack.
- I wash and prep everything ahead of time, so assembly takes only a few minutes.
- I choose clementines with loose, easy-to-peel skin. They save time and keep my hands from getting sticky.
- I let kids place the grapes and blueberries. It makes the tray feel like their own creation.
- I use a flat tray with a slight rim, so the wedges stay in place when someone bumps the table.
Common Mistakes to Avoid
A few small slips can turn a cute pumpkin into a messy pile. Here are the ones I have run into myself.
- Leaving gaps in the orange base: I now pack the wedges tightly so the pumpkin shape looks full.
- Using soggy, wet fruit: I always pat everything dry, or the face slides around.
- Slicing the apple too early: I cut it last so it stays crisp and green.
- Making the eyes uneven: I place the two grape circles side by side and compare them before moving on.
- Running out of fruit midway through the party: I keep spare fruit nearby to refill the tray all night.
How to Serve Pumpkin Shaped Fruit Tray Recipe?
This tray steals the spotlight, so let it sit in the middle of your snack table. A few simple touches make it look even better. Here are my favorite ways to serve it.
- Place the tray at the center of your fruit plate for halloween party tables, with smaller snacks around it.
- Set a small bowl of dairy-free yogurt dip on the side. It pairs well with the sweet, juicy fruit.
- Use a little pumpkin planter or a mini pumpkin bowl to hold the dip for extra Halloween charm.
- Add a candy corn veggie tray next to it, so guests get both fruit and crunchy veggies.
- Offer toothpicks or small tongs, so little hands can grab wedges without wrecking the face.
- Round out the spread with a crunchy side. My German cucumber salad recipe is a cool, creamy match.
Variations
You can change the fruit to match your crowd. These swaps keep the pumpkin look and add new flavor.
- Different fruit: swap in other fruits to build the face, such as raspberries, kiwi slices, or green grapes.
- Dairy-free dip: serve a creamy dairy-free yogurt dip for dunking.
- Sugar-free option: stick with fresh fruit only and skip any sweet dip or sugary toppings.
- Flavor boost: mix a little citrus zest into your dip for a bright, zesty finish.
- Halloween fruit platter ideas: turn the same fruit into a ghost, a spider web, or a monster face.
Nutritional Information
Each serving is light, fresh, and full of natural sweetness. These numbers are approximate for one serving.
- Calories: 65 kcal
- Protein: 1 g
- Carbohydrates: 17 g
- Fat: 1 g
Make Ahead and Storage
This tray is easy to plan around, which makes the party day much calmer. Here is how I handle the fruit before and after.
Make Ahead
I wash, dry, and cut the fruit a day ahead and keep it in separate containers. On party day, I only need to assemble the face. While the fruit chills, I like to prepare a no-mayo side such as my easy German coleslaw so the whole spread is ready.
Storage
Store leftover fruit in airtight containers in the refrigerator. It stays fresh for 2 to 3 days. Keep the pieces separate so the berries don’t soften the apples.
Freezing
I don’t recommend freezing this tray. Fresh clementines, grapes, and berries turn mushy once thawed. Enjoy it fresh for the best texture.
Reheating
There is no reheating needed here, because this tray is meant to be served cold. Just take the fruit out of the fridge and rebuild the pumpkin face. It looks and tastes brand new.
Why You’ll Love This Recipe?
This pumpkin tray ticks every box for a stress-free party snack. Here is why I keep making it.
- Super easy to make: There is no cooking and no complicated steps. I can finish the whole tray in about ten minutes, even on a busy day.
- Kid-friendly fun: Children love building the face with grapes and blueberries. It turns snack prep into a little Halloween activity.
- Naturally gluten-free: The tray uses only fresh fruit, so it works as one of my favorite gf halloween recipes. Guests with dietary needs can enjoy it too.
- Healthy and sweet: It gives you real fruit sweetness without any candy. Parents are always happy to see it on the table.
- Easy to customize: I can swap in whatever fruit I have on hand. The pumpkin face still looks great every time.
FAQs
Can I use mandarin oranges instead of clementines?
Yes, you can. Mandarin oranges are just as bright and easy to peel. Either one makes a great mandarin orange pumpkin base.
Can I make the tray the night before?
I would prep the fruit ahead but assemble it on the day. This keeps the face neat and the apple fresh.
How long does leftover fruit last?
Store it in airtight containers in the fridge for 2 to 3 days. Keep each fruit separate for the best texture.
What dip goes well with this tray?
A creamy dairy-free yogurt dip works nicely. It adds a cool, smooth contrast to the juicy fruit.
Can I change the fruit for the face?
Absolutely. Use any small, round fruit for the eyes and nose. Just keep the orange base so it still looks like a pumpkin.

Pumpkin Shaped Fruit Tray Recipe
Ingredients
Method
- Rinse the grapes, blueberries, and strawberries under cool water. Let them drain well, then pat them dry with paper towels. Dry fruit sticks to the tray better and keeps your design neat.
- Peel all 12 clementines and pull off any stringy white pith. Split each one into wedges with your fingers. I like to set them in a bowl first so I can grab them quickly.
- Start at the outer edge of the platter and lay the wedges in tight rows. Work inward until no tray shows through. This orange layer is your pumpkin, so fill every gap.
- Cut the strawberries in half from top to bottom. Lay the halves in a curved line near the bottom of the pumpkin. Tilt the curve upward at the ends for a big, happy grin.
- Place the blueberries in the center of the orange wedges. You can shape them into a small circle or a triangle. I prefer the triangle because it looks like a classic jack-o’-lantern nose.
- Arrange the red grapes into two equal circles above the nose. Keep both circles the same size so the face looks balanced. Stand back and check that the eyes sit evenly.
- Slice the Granny Smith apple into wedges. Tuck them at the top of the tray so they form a stem. Serve right away, or chill the tray until the party starts.
Notes
- I always dry the fruit before building, because wet fruit slides and smudges the face.
- I keep extra apple slices, strawberries, blueberries, and grapes on the side to refill the tray as guests snack.
- I wash and prep everything ahead of time, so assembly takes only a few minutes.
- I choose clementines with loose, easy-to-peel skin. They save time and keep my hands from getting sticky.
- I let kids place the grapes and blueberries. It makes the tray feel like their own creation.
- I use a flat tray with a slight rim, so the wedges stay in place when someone bumps the table.