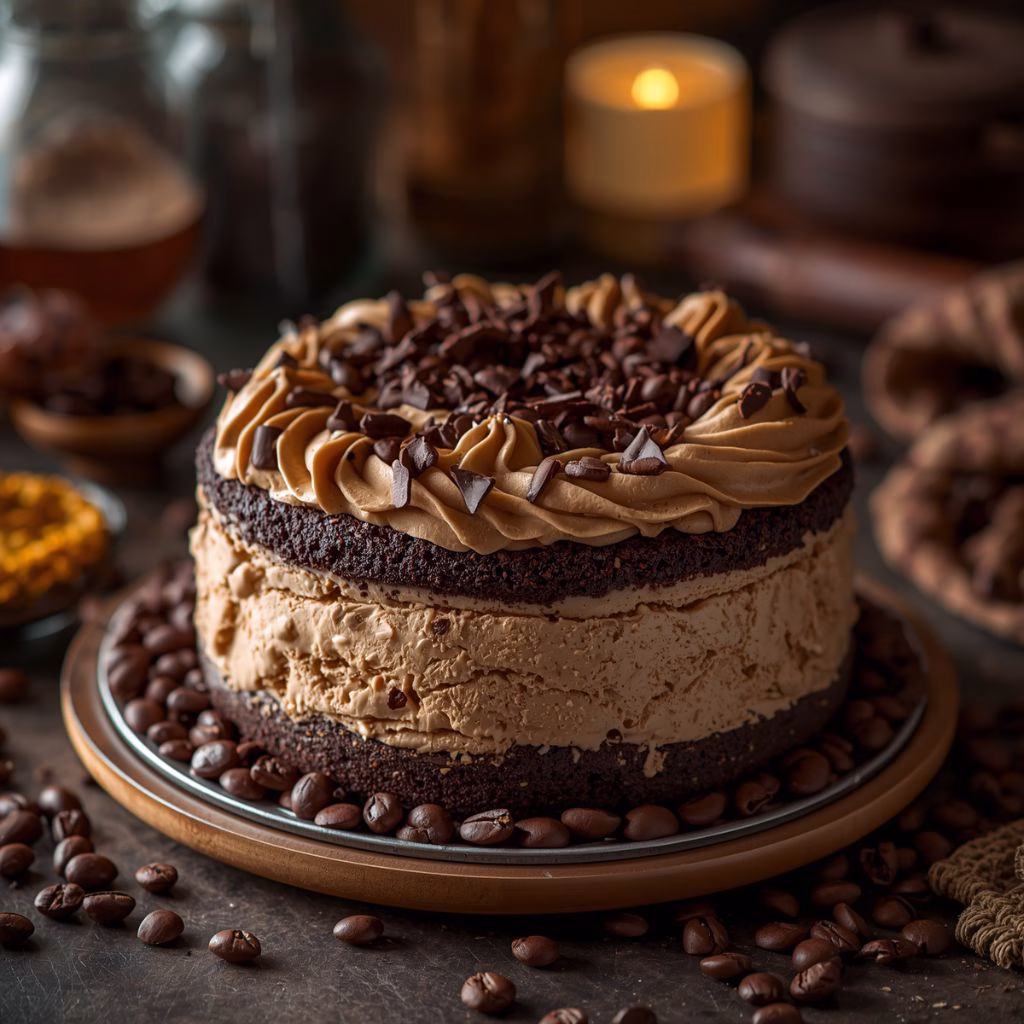
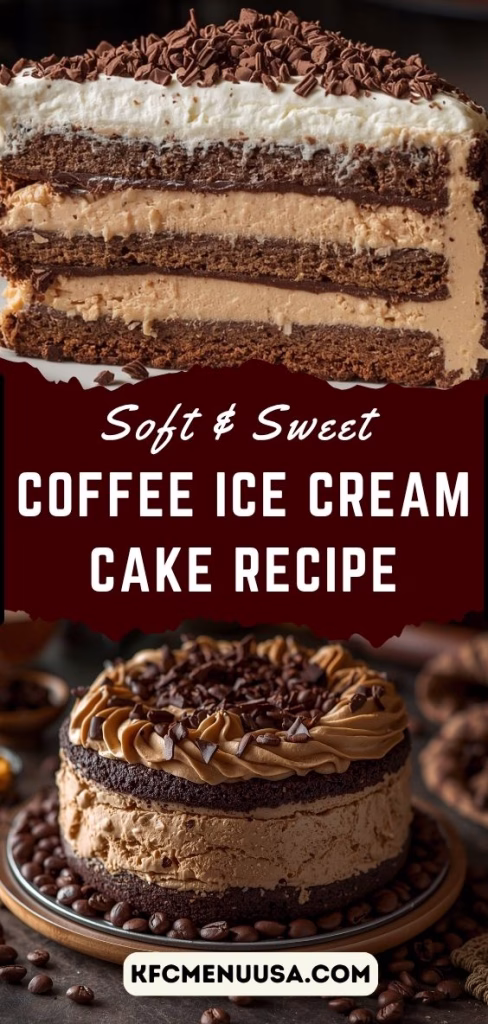
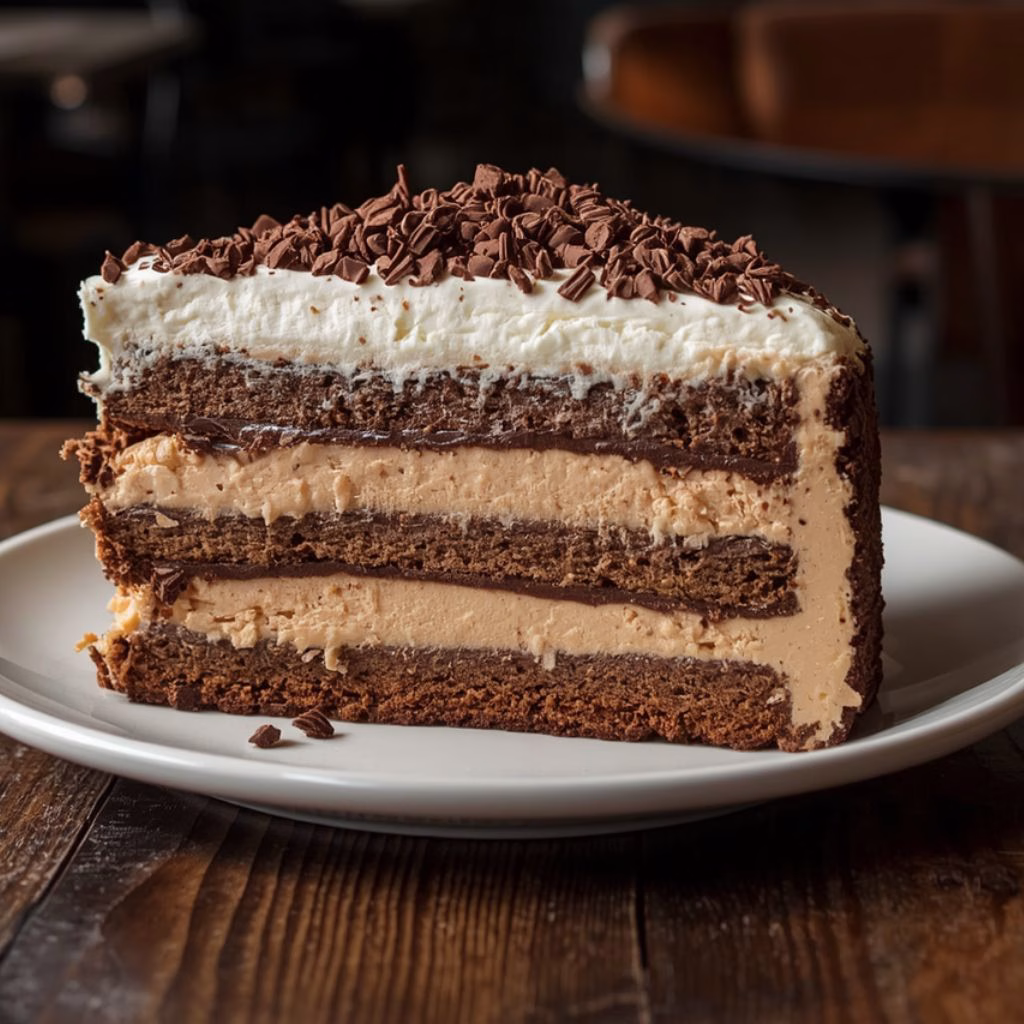
I recently made this Coffee Ice Cream Cake Recipe for a family gathering, and it disappeared much faster than I expected. The combination of rich brownie, creamy coffee ice cream, crunchy chocolate crumbs, and silky espresso fudge creates an unforgettable dessert experience.
I love how every bite offers a balance of coffee flavor, chocolate richness, and smooth vanilla sweetness. It feels like a bakery-style frozen dessert, yet it’s surprisingly simple to prepare at home. If you’re a coffee lover looking for a show-stopping dessert, this recipe is one you’ll want to make again and again.
Ingredients
This layered frozen dessert uses simple ingredients that work together beautifully to create the perfect texture and flavor.
Brownie Layer
- 1 box brownie mix (plus ingredients listed on the package) – A convenient option that creates a rich, fudgy foundation. Slightly underbaking helps keep it soft after freezing.
- OR 1 batch homemade brownies – Ideal if you prefer a completely homemade dessert.
Ice Cream Layers
- 2 pints coffee ice cream – Choose a premium-quality brand for a deeper coffee flavor and creamier texture.
- 2 pints vanilla ice cream – Adds balance and prevents the coffee flavor from becoming overwhelming.
Chocolate Crunch Crumbs
- ⅔ cup all-purpose flour – Helps create crisp, cookie-like crumbs.
- 1 teaspoon cornstarch – Provides a lighter, crunchier texture.
- ½ cup granulated sugar – Adds sweetness and caramelized crunch.
- ⅔ cup unsweetened cocoa powder – Use high-quality cocoa for intense chocolate flavor.
- 1 teaspoon kosher salt – Enhances the chocolate notes and balances sweetness.
- 6 tablespoons unsalted butter, melted – Binds the crumb mixture together and creates a rich flavor.
Espresso Fudge Topping
- 1 cup semi-sweet chocolate chips – Creates a smooth and glossy fudge texture.
- 4 ounces dark chocolate, finely chopped – Adds depth and richness.
- 1 tablespoon corn syrup – Keeps the fudge silky and shiny.
- ½ cup heavy cream – Produces a luscious ganache-like consistency.
- 2 tablespoons instant espresso powder – Intensifies the coffee flavor throughout the cake.
Note: The ingredient quantities make approximately 10 servings of Coffee Ice Cream Cake.
Variations
Want to customize the recipe? Try these delicious alternatives:
- Use chocolate ice cream instead of vanilla for an extra-rich dessert.
- Replace coffee ice cream with mocha ice cream for stronger chocolate notes.
- Choose dairy-free ice cream and plant-based butter for a vegan-friendly version.
- Substitute sugar-free ice cream and sugar alternatives for a lower-sugar dessert.
- Add crushed chocolate-covered espresso beans for extra crunch.
- Mix caramel sauce between layers for a sweet coffeehouse-inspired twist.
- Sprinkle mini chocolate chips into the ice cream layers.
- Add chopped toasted hazelnuts or almonds for texture and nutty flavor.
- Flavor the fudge with a teaspoon of vanilla extract for extra warmth.
- Some readers also enjoy exploring savory inspirations alongside sweet desserts, such as this flavorful idea: chicken-tagine-with-preserved-lemon-and-olives-recipe.
Cooking Time
This dessert requires mostly chilling and freezing time rather than active cooking.
- Prep Time: 1 hour
- Cooking Time: 20 minutes
- Freezing Time: About 4 hours 10 minutes
- Total Time: Approximately 5 hours 30 minutes
Equipment You Need
- 9-inch springform pan – Creates perfectly shaped cake layers.
- Parchment paper – Prevents sticking and makes removal easier.
- Mixing bowls – For preparing crumbs and fudge.
- Offset spatula – Helps spread ice cream and toppings evenly.
- Baking sheet – Used for baking the chocolate crumb layer.
- Measuring cups and spoons – Ensures accurate ingredient measurements.
- Whisk or spoon – For mixing fudge ingredients smoothly.
- Acetate cake collar (optional) – Creates clean, professional-looking sides.
- Freezer-safe container space – Necessary for setting the cake properly.
How to Make Coffee Ice Cream Cake?
This recipe comes together in layers, creating an impressive frozen dessert with contrasting textures and flavors. Take your time with each stage and allow proper freezing between layers for the best results.
Prepare the Brownie Base
Line a springform pan with parchment paper and lightly grease the sides. Prepare the brownie batter according to package directions or use your favorite homemade recipe. Bake until almost done but slightly underbaked in the center.
This keeps the brownie soft and chewy even after freezing. Allow the brownie layer to cool completely before moving on. Warm brownies can melt the ice cream and affect the final texture.
Make the Chocolate Crunch Crumbs
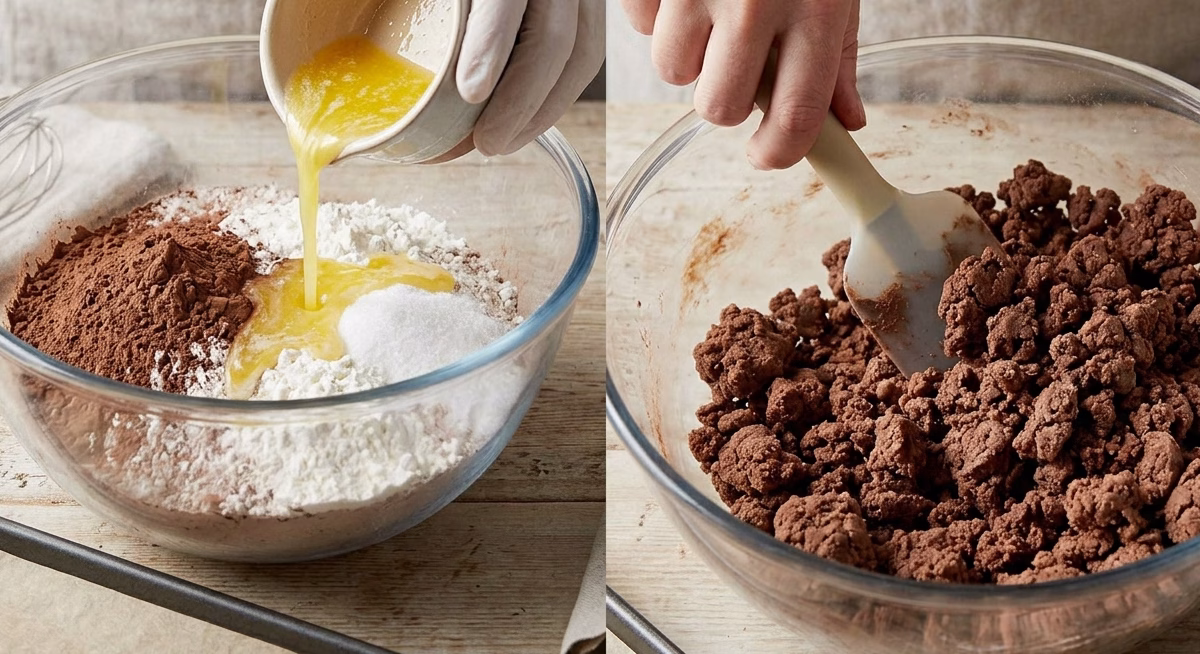
Preheat the oven to 300°F (150°C) and line a baking sheet with parchment paper. Combine flour, cocoa powder, sugar, cornstarch, and salt in a large bowl. Pour in the melted butter and stir until large crumb clusters begin to form.
The mixture should resemble coarse chocolate cookie dough. Spread the crumbs evenly on the baking sheet and bake until crisp. Let them cool completely so they become crunchy.
Prepare the Espresso Fudge
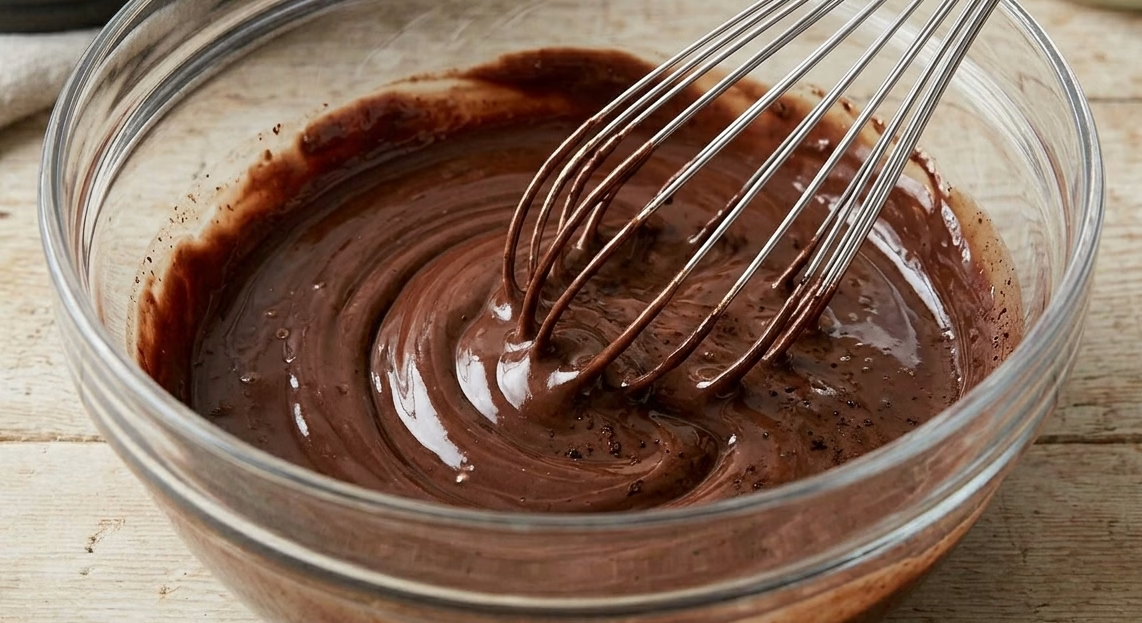
Place the chocolate chips, chopped dark chocolate, and corn syrup into a heatproof bowl. Warm the heavy cream until it begins to simmer. Stir the espresso powder into the hot cream until dissolved. Pour the mixture over the chocolate and allow it to sit briefly. Whisk until smooth, glossy, and fully combined. Set aside and let it cool before assembling the cake.
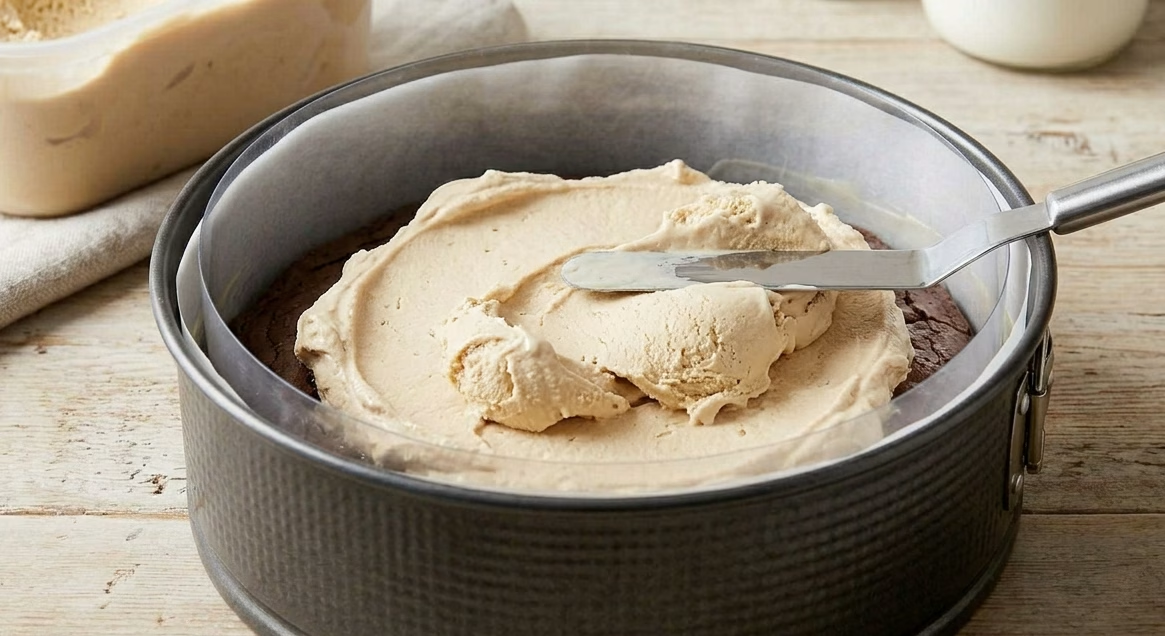
Create the Coffee Ice Cream Layer
If using acetate, line the inside edge of the springform pan. Ensure the brownie base is fully cooled before adding ice cream. Allow the coffee ice cream to soften slightly at room temperature.
Spread it evenly over the brownie layer using an offset spatula. Smooth the surface carefully to create an even layer. A flat layer makes the finished cake look professional.
Add the Crunch Layer
Sprinkle approximately three-quarters of the chocolate crumbs over the coffee ice cream layer. Spread them evenly across the surface.
Press very gently so the crumbs adhere without sinking deeply into the ice cream. This layer provides the signature crunchy texture that makes every bite more interesting.
Add the Vanilla Ice Cream Layer
Soften the vanilla ice cream slightly for easy spreading. Carefully layer it over the chocolate crumbs. Use a spatula to smooth the top evenly.
Try not to disturb the crumb layer underneath. Place the partially assembled cake in the freezer for about 40 minutes until the ice cream firms up.
Finish with Espresso Fudge
Remove the chilled cake from the freezer once the top layer is firm. Spread the cooled espresso fudge evenly over the vanilla ice cream.
Use gentle strokes to create a smooth finish. Top with the remaining chocolate crumbs if desired. The fudge layer adds rich coffee-chocolate flavor and creates a beautiful presentation.
Freeze and Serve
Return the completed cake to the freezer for at least 4 hours. This allows all layers to fully set and hold their shape. Before serving, remove the springform ring and acetate collar carefully.
Let the cake sit at room temperature for a few minutes. Slice with a warm knife for clean, attractive servings and enjoy immediately.
Additional Tips for Making This Recipe Better
After making this cake several times, I discovered a few tricks that consistently improve the results:
- I always use premium coffee ice cream because the coffee flavor is noticeably richer.
- I slightly underbake the brownie base so it stays soft instead of becoming hard in the freezer.
- I chill the fudge completely before adding it to prevent melting the ice cream layers.
- I use an offset spatula to create perfectly smooth and even layers.
- I freeze each layer thoroughly before adding the next one for cleaner slices.
- I warm my knife under hot water before cutting to achieve bakery-style slices.
- I like adding crushed espresso beans on top for an extra coffee kick.
How to Serve Coffee Ice Cream Cake?
The presentation can make this dessert even more impressive.
Serve each slice on a chilled dessert plate to help maintain its shape longer. Drizzle extra espresso fudge or chocolate sauce around the plate for a restaurant-style appearance.
Garnish with whipped cream, chocolate curls, cocoa powder, or chocolate-covered espresso beans. Fresh berries also add a beautiful color contrast.
For special occasions, pair each slice with a shot of espresso, iced coffee, cappuccino, or cold brew coffee for the ultimate coffee-lover’s dessert experience. A refreshing cocktail pairing like this also works beautifully alongside it: prickly-pear-margarita-recipe.
Nutritional Information
Approximate values per serving:
- Calories: About 550–650 calories
- Protein: 7–9g
- Carbohydrates: 60–70g
- Fat: 30–38g
Nutritional values may vary depending on the brands of ice cream, brownie mix, and chocolate used.
Make Ahead and Storage
Make Ahead
This dessert is perfect for advance preparation. I often make it one or two days before serving because the flavors develop beautifully as it freezes.
Keeping the cake frozen overnight also ensures cleaner slices and a firmer texture when served.
Storage
Store the cake tightly wrapped in plastic wrap or inside an airtight cake container. This prevents freezer odors from affecting the flavor.
The cake stays fresh in the freezer for up to 1 week while maintaining excellent texture and taste.
Freezing
For longer storage, wrap individual slices in plastic wrap and place them in freezer-safe containers. This makes serving easier whenever a dessert craving strikes.
Properly wrapped slices can remain frozen for up to 2 months without significant loss of quality.
Restoring Before Serving
Remove the cake from the freezer about 5 to 10 minutes before serving. This softens the ice cream slightly and improves the texture.
Use a warm knife for neat slices and return leftovers to the freezer immediately after serving.
Why You’ll Love This Recipe?
This Coffee Ice Cream Cake is the kind of dessert that impresses guests while remaining surprisingly simple to prepare.
- Rich Coffeehouse Flavor
Every layer delivers delicious coffee and chocolate notes that taste like your favorite café dessert. The espresso fudge makes the flavor even more intense. - Amazing Texture Contrast
Creamy ice cream, fudgy brownie, crunchy chocolate crumbs, and silky fudge create an irresistible combination in every bite. - Perfect Make-Ahead Dessert
You can prepare it well before a party or celebration. Having dessert ready in advance reduces stress and saves time. - Easy to Customize
Different ice cream flavors, toppings, and mix-ins allow endless creativity. You can adapt it to suit any preference or occasion. - Beautiful Special-Occasion Presentation
The layered appearance looks elegant and professional. It’s perfect for birthdays, holidays, summer gatherings, and coffee-themed celebrations.
This homemade Coffee Ice Cream Cake combines fudgy brownie, creamy coffee ice cream, crunchy chocolate crumbs, smooth vanilla ice cream, and decadent espresso fudge into one unforgettable frozen dessert that coffee lovers will absolutely adore.
Based on the original layered concept and ingredient structure from Lily P Crumbs, this version has been completely rewritten and adapted for originality and readability.
Coffee Ice Cream Cake Recipe
Ingredients
Method
- Line a springform pan with parchment paper and lightly grease the sides. Prepare the brownie batter according to package directions or use your favorite homemade recipe. Bake until almost done but slightly underbaked in the center. This keeps the brownie soft and chewy even after freezing. Allow the brownie layer to cool completely before moving on. Warm brownies can melt the ice cream and affect the final texture.
- Preheat the oven to 300°F (150°C) and line a baking sheet with parchment paper. Combine flour, cocoa powder, sugar, cornstarch, and salt in a large bowl. Pour in the melted butter and stir until large crumb clusters begin to form. The mixture should resemble coarse chocolate cookie dough. Spread the crumbs evenly on the baking sheet and bake until crisp. Let them cool completely so they become crunchy.
- Place the chocolate chips, chopped dark chocolate, and corn syrup into a heatproof bowl. Warm the heavy cream until it begins to simmer. Stir the espresso powder into the hot cream until dissolved. Pour the mixture over the chocolate and allow it to sit briefly. Whisk until smooth, glossy, and fully combined. Set aside and let it cool before assembling the cake.
- If using acetate, line the inside edge of the springform pan. Ensure the brownie base is fully cooled before adding ice cream. Allow the coffee ice cream to soften slightly at room temperature. Spread it evenly over the brownie layer using an offset spatula. Smooth the surface carefully to create an even layer. A flat layer makes the finished cake look professional.
- Sprinkle approximately three-quarters of the chocolate crumbs over the coffee ice cream layer. Spread them evenly across the surface. Press very gently so the crumbs adhere without sinking deeply into the ice cream. This layer provides the signature crunchy texture that makes every bite more interesting.
- Soften the vanilla ice cream slightly for easy spreading. Carefully layer it over the chocolate crumbs. Use a spatula to smooth the top evenly. Try not to disturb the crumb layer underneath. Place the partially assembled cake in the freezer for about 40 minutes until the ice cream firms up.
- Remove the chilled cake from the freezer once the top layer is firm. Spread the cooled espresso fudge evenly over the vanilla ice cream. Use gentle strokes to create a smooth finish. Top with the remaining chocolate crumbs if desired. The fudge layer adds rich coffee-chocolate flavor and creates a beautiful presentation.
- Return the completed cake to the freezer for at least 4 hours. This allows all layers to fully set and hold their shape. Before serving, remove the springform ring and acetate collar carefully. Let the cake sit at room temperature for a few minutes. Slice with a warm knife for clean, attractive servings and enjoy immediately.
Notes
- I always use premium coffee ice cream because the coffee flavor is noticeably richer.
- I slightly underbake the brownie base so it stays soft instead of becoming hard in the freezer.
- I chill the fudge completely before adding it to prevent melting the ice cream layers.
- I use an offset spatula to create perfectly smooth and even layers.
- I freeze each layer thoroughly before adding the next one for cleaner slices.
- I warm my knife under hot water before cutting to achieve bakery-style slices.
- I like adding crushed espresso beans on top for an extra coffee kick.