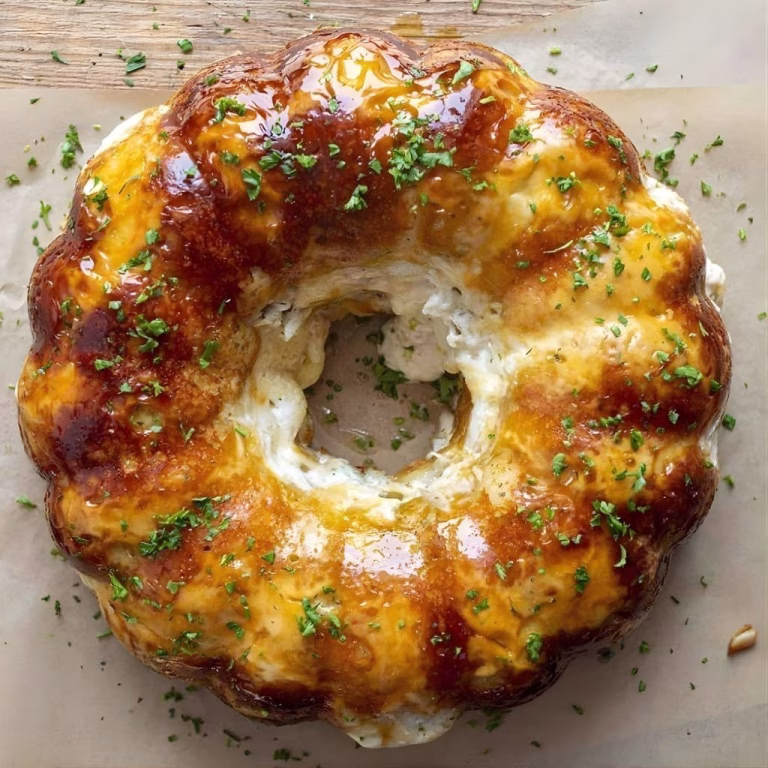
I still remember the first time I got Hash Browns Recipe truly crispy at home — golden on the outside, soft in the middle, just like a diner plate. It took a few soggy, sad attempts before I figured out the trick: getting rid of extra moisture.
Once I nailed that step, everything changed. Now I make these almost every weekend, and I promise once you try my method, you’ll never go back to the frozen bag again. Let me walk you through exactly how I do it.
Ingredients
- 2 large russet potatoes (about 1.5 lbs) – russets have less water and more starch, which is exactly what gives hash browns that crispy shell
- 2 tablespoons unsalted butter – adds rich flavor and helps with browning; salted butter works too, just cut back on added salt
- 1 tablespoon neutral oil (vegetable or avocado oil) – raises the smoke point so the butter doesn’t burn before the potatoes crisp up
- 3/4 teaspoon fine sea salt – seasons the potatoes evenly; add more to taste once cooked
- 1/4 teaspoon black pepper – a small touch of warmth that balances the richness of the butter
- 1/4 teaspoon garlic powder (optional) – not traditional, but I love the extra layer of flavor it brings
- Fresh cheese, if using, should be grated right before cooking – pre-shredded cheese has anti-caking starch that can make hash browns gummy instead of crisp, similar to the technique used in High Protein Chicken Pesto Parmesan Meatball Subs when working with freshly grated cheese.
Note: These measurements make about 2 to 3 servings, depending on how generous your portions are. Simply double or triple the ingredients if you’re cooking for a larger group.
Variations
- Dairy-free option: swap the butter for olive oil or a plant-based butter alternative
- Cheesy hash browns: fold in freshly grated cheddar or parmesan during the last minute of cooking
- Veggie boost: mix in finely diced onion, bell pepper, or shredded zucchini (squeeze out extra water first)
- Spicy kick: add a pinch of smoked paprika or cayenne pepper to the seasoning mix
- Herb-forward: stir in fresh chopped chives or parsley right before serving
- Low-sodium version: cut the salt in half and season with herbs and lemon zest instead
Cooking Time
- Prep Time: 15 minutes
- Cooking Time: 15 minutes
- Total Time: 30 minutes
Equipment You Need
- Box grater – shreds the potatoes into thin strands that crisp up evenly
- Clean kitchen towel or cheesecloth – used to squeeze out excess starch and water from the potatoes
- Large nonstick or cast iron skillet – gives even heat distribution for that golden crust
- Spatula – for pressing down the potatoes and flipping them without breaking them apart
- Mixing bowl – for tossing the shredded potatoes with seasoning before cooking
How to Make Crispy Hash Brown Recipe?
Making hash browns from scratch is simpler than it looks once you understand the moisture problem. The whole trick is getting the potatoes as dry as possible before they hit the pan. Follow these steps and you’ll get restaurant-quality results every time.
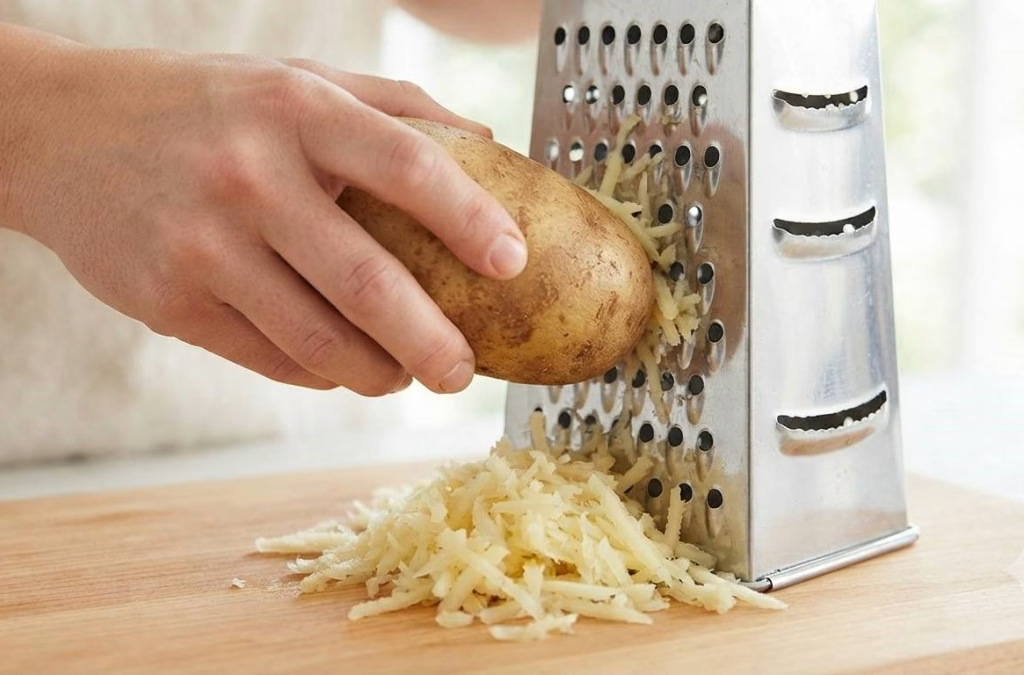
Step 1: Shred the Potatoes
Wash the potatoes well, but there’s no need to peel them since the skin adds texture and nutrients. Using the large holes of a box grater, shred the potatoes into long strands. Work quickly here so the potatoes don’t start to brown from air exposure.
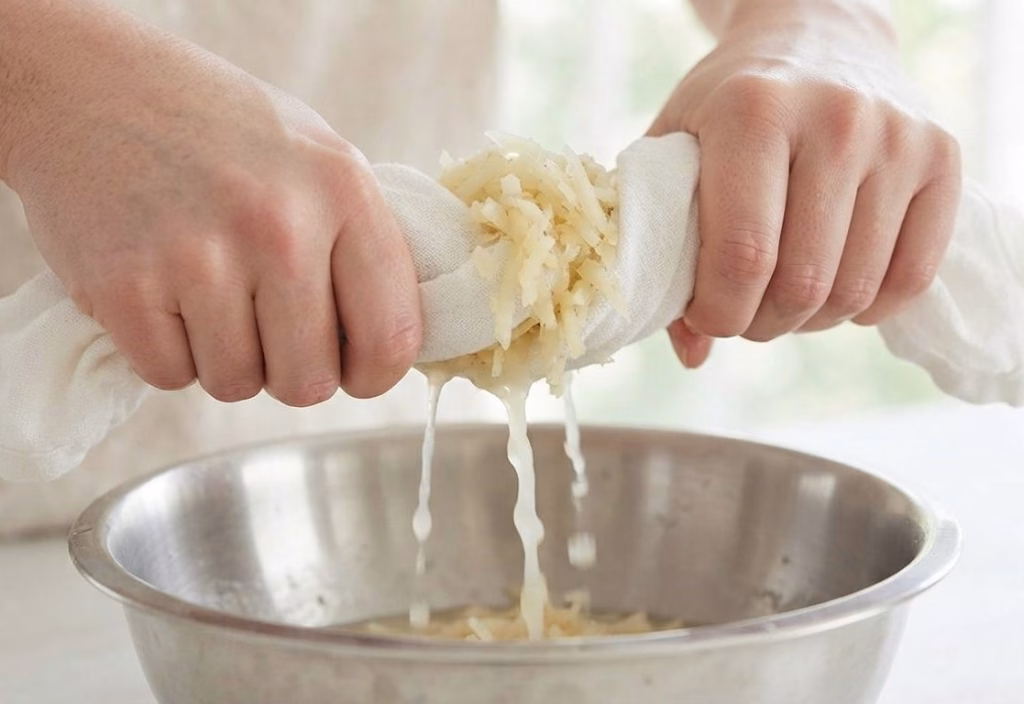
Step 2: Remove Excess Moisture
Place the shredded potatoes in the center of a clean kitchen towel and gather up the edges. Twist tightly over a sink or bowl to squeeze out as much liquid as possible. This step is the single biggest reason hash browns turn out crispy instead of mushy.
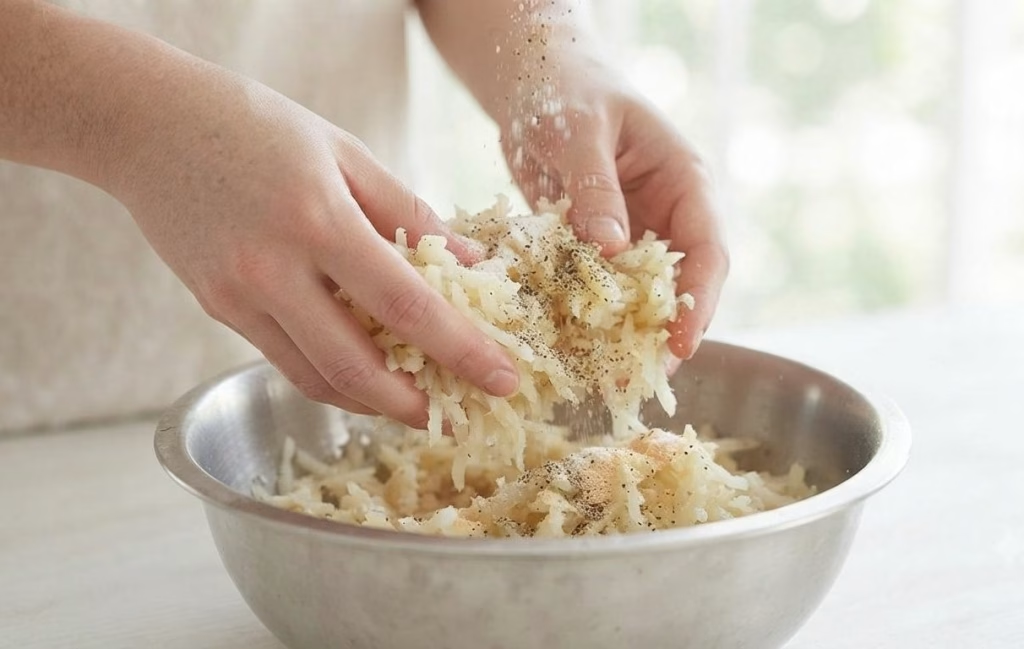
Step 3: Season the Potatoes
Transfer the dried shreds into a mixing bowl. Add the salt, pepper, and garlic powder if using, then toss everything together with your hands. Make sure the seasoning is distributed evenly so every bite has flavor.
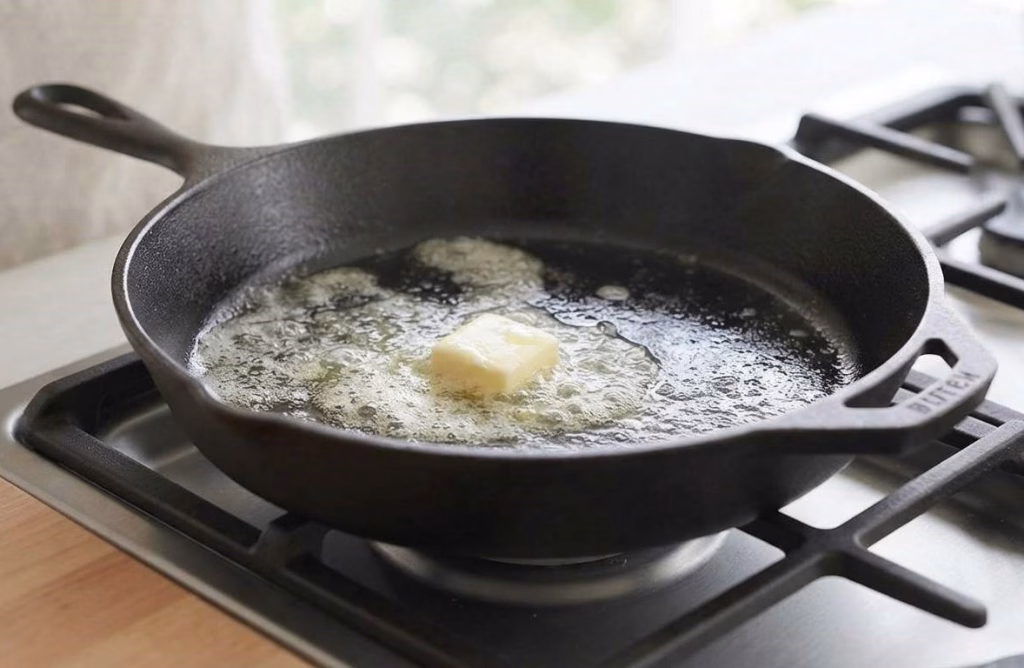
Step 4: Heat the Pan
Set a large skillet over medium-high heat and add the butter and oil together. Let the mixture heat until the butter stops foaming, which usually takes about a minute. This tells you the pan is hot enough to start crisping right away.
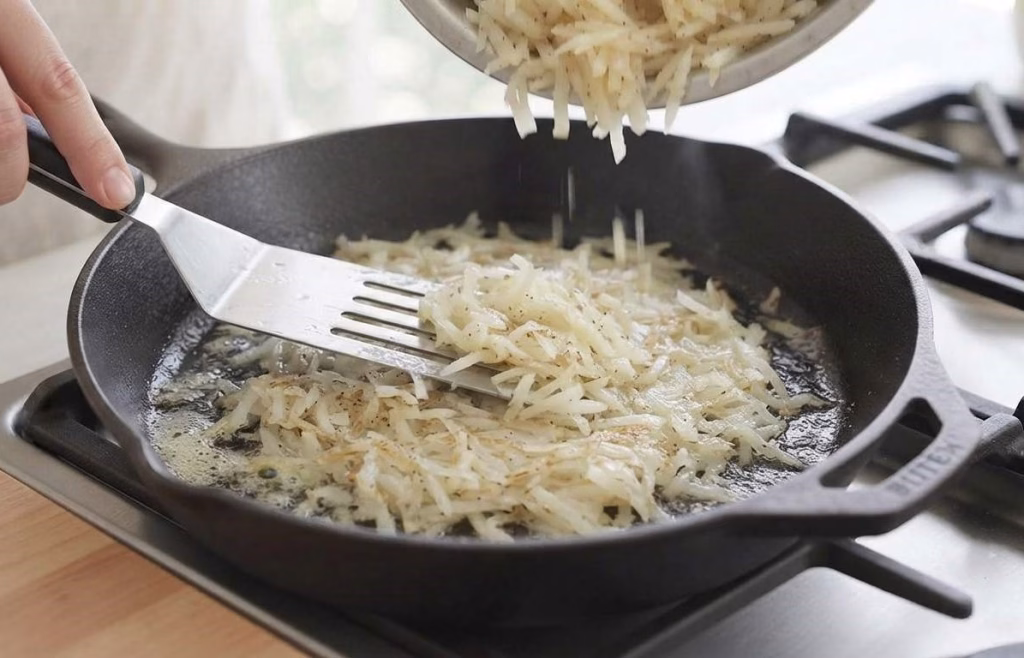
Step 5: Add the Potatoes
Spread the shredded potatoes evenly across the skillet in a thin, even layer. Avoid piling them too high in the center, since thick spots won’t cook through properly. Press down firmly with your spatula to help everything make contact with the hot pan.
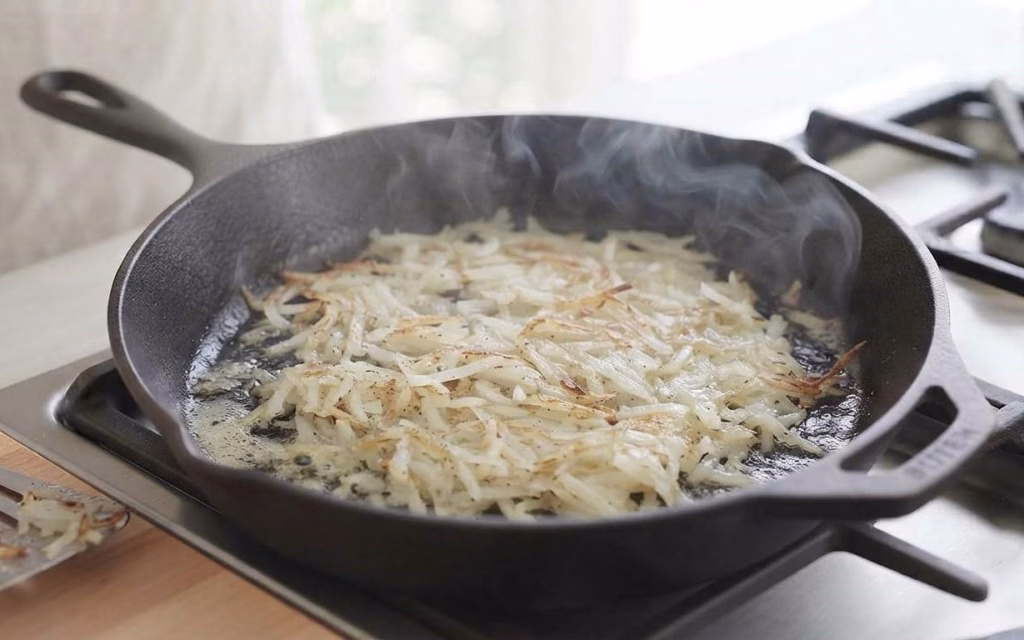
Step 6: Let Them Crisp Undisturbed
Resist the urge to stir or flip too soon. Let the potatoes cook untouched for about 5 to 6 minutes so a deep golden crust can form on the bottom. Moving them too early is the most common mistake that ruins the crispiness.
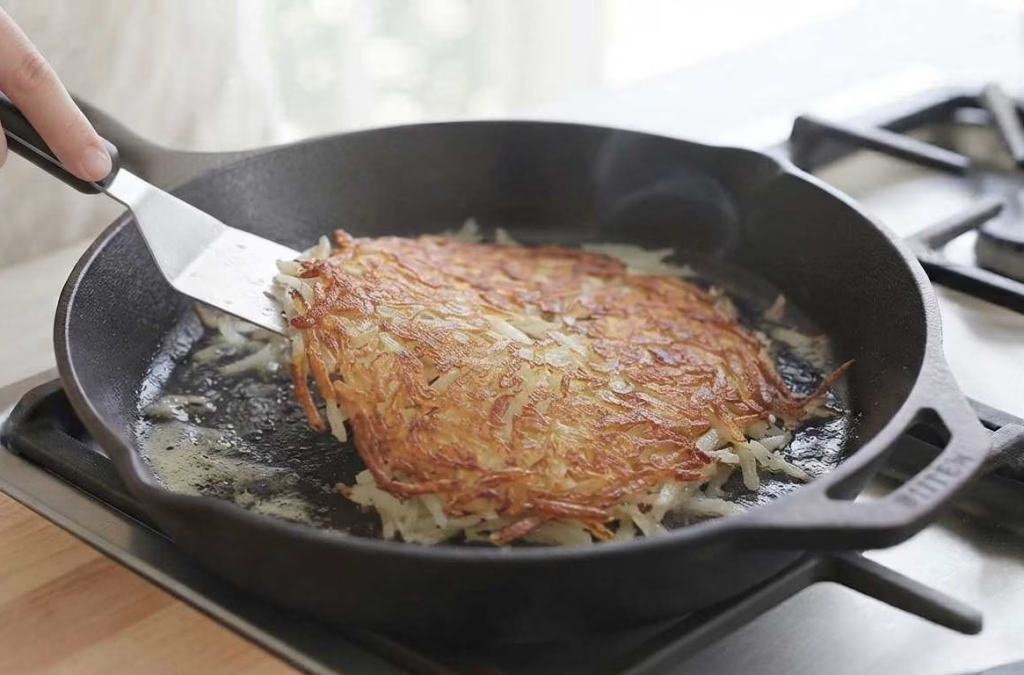
Step 7: Flip and Repeat
Once the bottom is golden brown, slide the hash browns onto a plate, then flip them back into the skillet uncooked-side down. Press down again with the spatula and cook for another 5 to 6 minutes until both sides are crispy and golden.
Step 8: Serve Immediately
Slide the finished hash browns onto a plate or cutting board and slice into portions. Hash browns taste best straight out of the pan while they’re still hot and crunchy, so serve them right away for the best texture.
Additional Tips for Making This Recipe Better
I’ve made this recipe more times than I can count, and here’s what I’ve learned along the way:
- I always squeeze the potatoes twice if they still feel wet, because even a little extra moisture keeps them from crisping properly
- I use a cast iron skillet whenever I can, since it holds heat better and gives a deeper golden color
- I never overcrowd the pan; cooking in batches gives much better results than cramming everything in at once
- I let the pan get properly hot before adding the potatoes, otherwise they steam instead of fry
- I season a little more generously than feels natural, since potatoes really soak up salt and pepper
How to Serve Crispy Hash Brown Recipe?
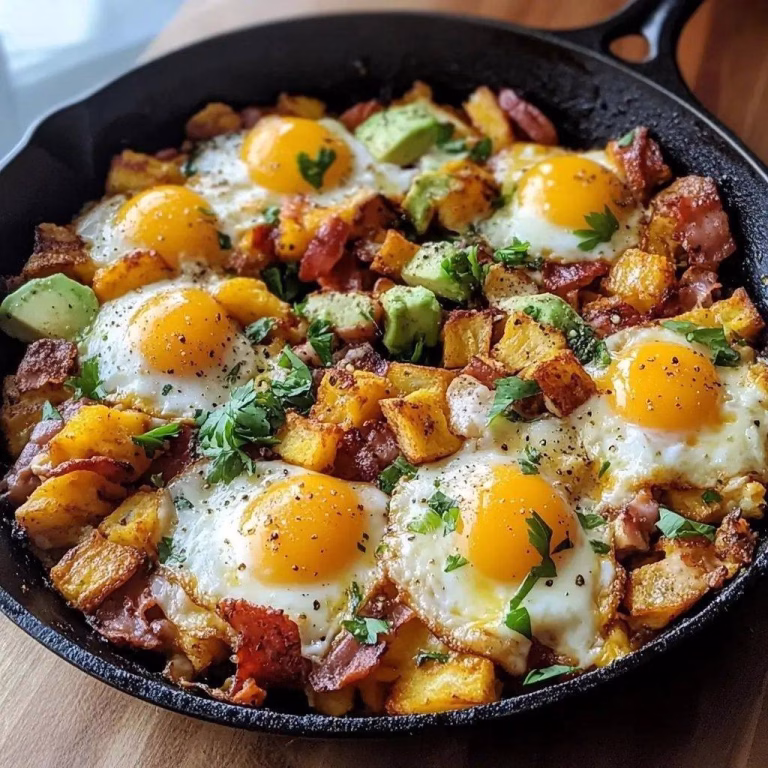
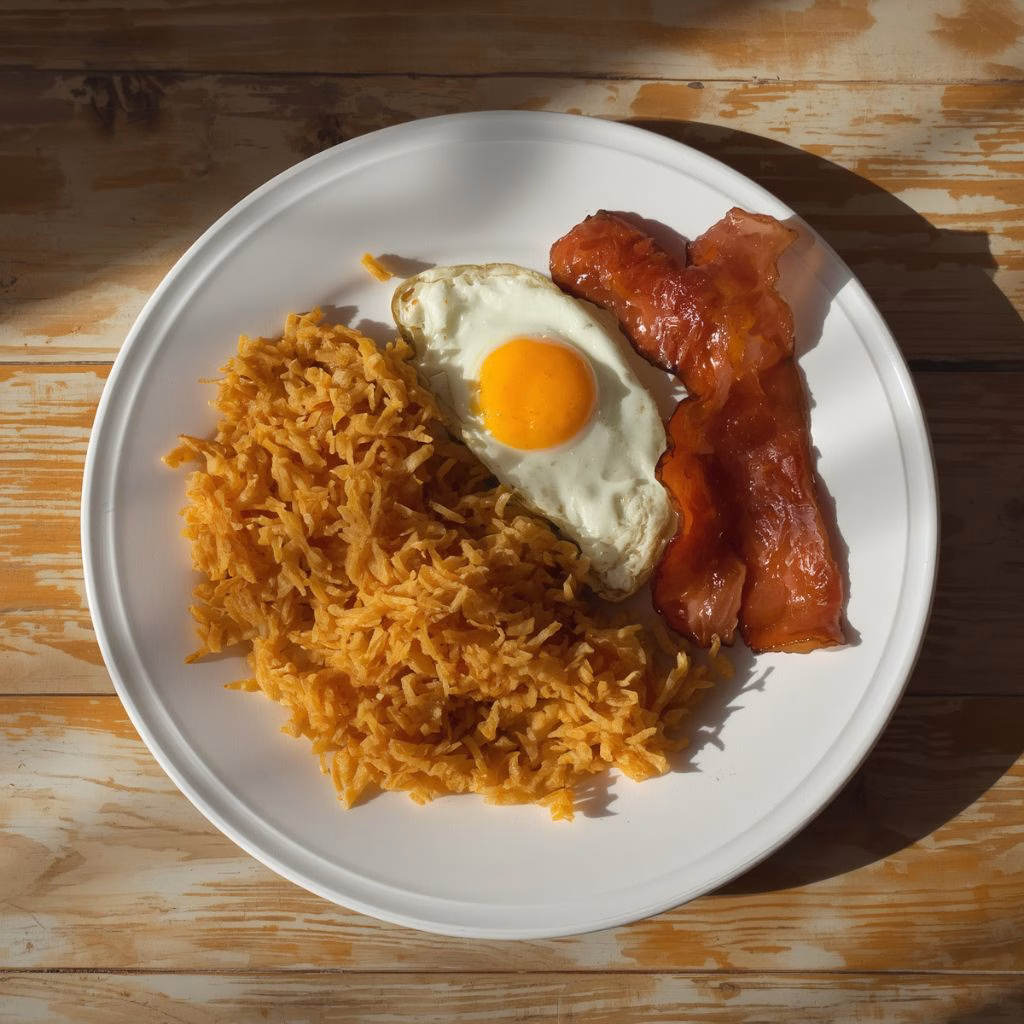
Hash browns are wonderfully versatile and fit into almost any meal of the day. I like piling them next to sunny-side-up eggs and crispy bacon for a classic breakfast plate. For a heartier brunch, top them with avocado slices, a poached egg, and a sprinkle of chives for a beautiful presentation.
They also make a fantastic base for a loaded breakfast bowl with sautéed vegetables and melted cheese on top. If you’re serving a crowd, you can pair them with Hibachi Burger Bowls with Yum Yum Sauce for a satisfying lunch or dinner spread.
If you’re serving a crowd, arrange them on a large platter with small bowls of ketchup, hot sauce, and sour cream on the side so everyone can customize their own plate.
Nutritional Information
Here’s a general breakdown per serving so you can plan your meal accordingly:
- Calories: approximately 220 kcal
- Protein: 3 grams
- Carbohydrates: 28 grams
- Fat: 11 grams
Make Ahead and Storage
Refrigerating: Once the hash browns have cooled completely, place them in an airtight container and store in the fridge. They’ll stay fresh for up to 3 days without losing too much of their texture.
Freezing: I don’t recommend freezing already-cooked hash browns, since they tend to turn soggy once thawed. Instead, freeze the raw seasoned shreds in a flat layer, then transfer to a freezer bag for up to 2 months.
Reheating: For the best texture, reheat leftovers in a hot skillet with a small amount of butter until crisp again. An oven or air fryer at 400°F also works well and helps restore that crunchy exterior in just a few minutes.
Why You’ll Love This Recipe?
This hash brown recipe has quickly become a weekend staple in my kitchen, and here’s why I think you’ll love it too:
- It’s incredibly easy to make with just a handful of pantry staple ingredients and basic kitchen tools
- It’s endlessly customizable, so you can add cheese, herbs, or spices to match whatever you’re craving
- It works for breakfast, brunch, or even as a savory side dish alongside dinner
- It fits multiple dietary needs, since it’s naturally gluten-free and easy to make dairy-free
- It delivers that perfect crispy-on-the-outside, tender-on-the-inside texture every single time
Hash Browns Recipe
Ingredients
Method
- Wash the potatoes well, but there’s no need to peel them since the skin adds texture and nutrients. Using the large holes of a box grater, shred the potatoes into long strands. Work quickly here so the potatoes don’t start to brown from air exposure.
- Place the shredded potatoes in the center of a clean kitchen towel and gather up the edges. Twist tightly over a sink or bowl to squeeze out as much liquid as possible. This step is the single biggest reason hash browns turn out crispy instead of mushy.
- Transfer the dried shreds into a mixing bowl. Add the salt, pepper, and garlic powder if using, then toss everything together with your hands. Make sure the seasoning is distributed evenly so every bite has flavor.
- Set a large skillet over medium-high heat and add the butter and oil together. Let the mixture heat until the butter stops foaming, which usually takes about a minute. This tells you the pan is hot enough to start crisping right away.
- Spread the shredded potatoes evenly across the skillet in a thin, even layer. Avoid piling them too high in the center, since thick spots won’t cook through properly. Press down firmly with your spatula to help everything make contact with the hot pan.
- Resist the urge to stir or flip too soon. Let the potatoes cook untouched for about 5 to 6 minutes so a deep golden crust can form on the bottom. Moving them too early is the most common mistake that ruins the crispiness.
- Once the bottom is golden brown, slide the hash browns onto a plate, then flip them back into the skillet uncooked-side down. Press down again with the spatula and cook for another 5 to 6 minutes until both sides are crispy and golden.
- Slide the finished hash browns onto a plate or cutting board and slice into portions. Hash browns taste best straight out of the pan while they’re still hot and crunchy, so serve them right away for the best texture.
Notes
- I always squeeze the potatoes twice if they still feel wet, because even a little extra moisture keeps them from crisping properly
- I use a cast iron skillet whenever I can, since it holds heat better and gives a deeper golden color
- I never overcrowd the pan; cooking in batches gives much better results than cramming everything in at once
- I let the pan get properly hot before adding the potatoes, otherwise they steam instead of fry
- I season a little more generously than feels natural, since potatoes really soak up salt and pepper