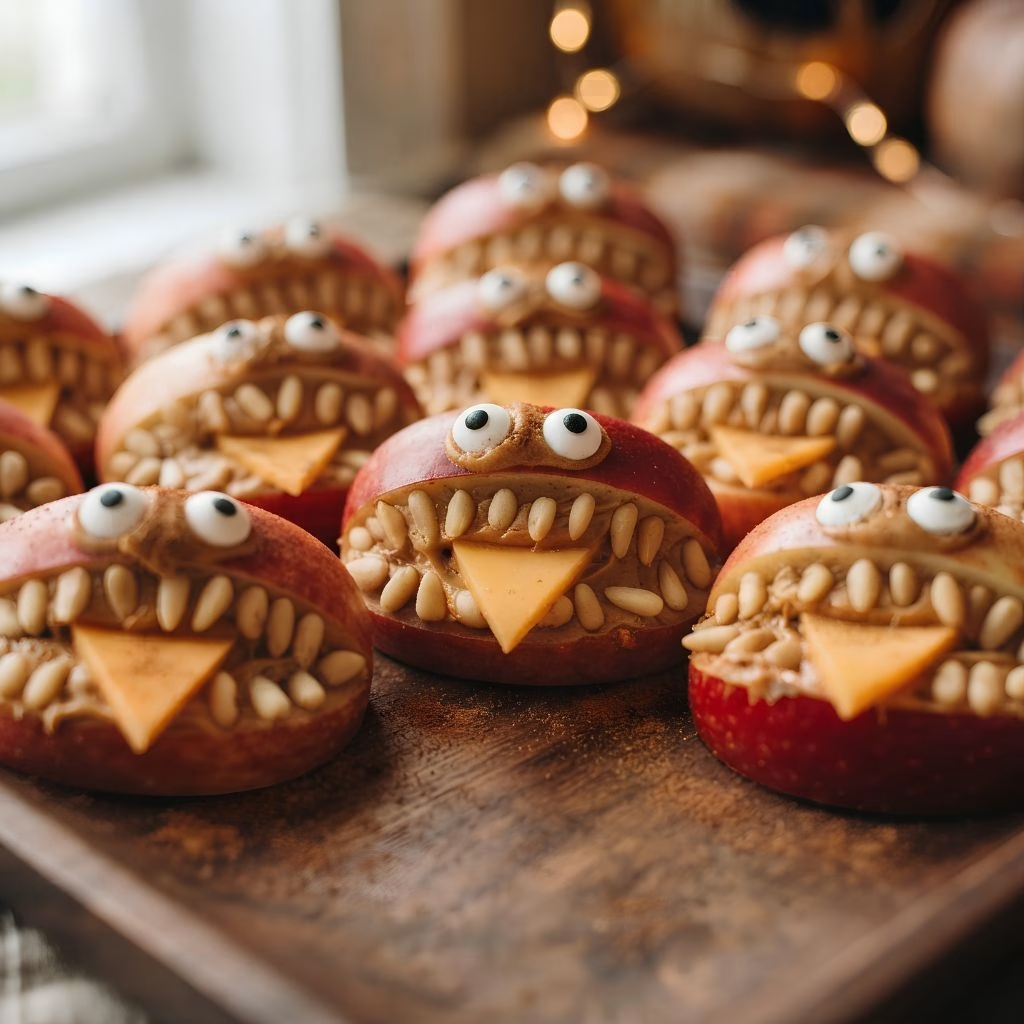
I first whipped these up when I had about twenty minutes before my daughter’s Halloween class party and zero patience left for anything complicated. I needed something that looked fun, didn’t need an oven, and wouldn’t turn into a soggy mess on the drive over.
That’s exactly what I got, and I’ve been making them every October since. If you’re hunting for easy halloween appetizer recipes that actually survive a car ride and a buffet table, this is the one I keep coming back to. Let me walk you through exactly how I make it work every single time.
Cooking Time
- Prep Time: 15 minutes
- Cook Time: 0 minutes (no-cook recipe)
- Total Time: 25 minutes (includes a quick anti-browning soak)
Ingredients
- 2 Granny Smith apples, quartered – I always pick Granny Smith because the tartness balances the sweet peanut butter and the flesh stays firm instead of turning mushy.
- ¼ cup peanut butter – go for a thick, standard jarred kind like Jif or Skippy; natural peanut butter is too loose and the “teeth” slide right off.
- 40 pine nuts – these are your teeth, and their small size makes them easy to press in without tearing the apple.
- 1 ounce cheddar cheese or ¼ mango, cut into small triangles – cheese gives a savory tongue, mango gives a sweet one, so pick based on your crowd.
- 8 to 16 candy eyeballs – purely decorative, but they’re what makes this recipe read as one of those creepy halloween food ideas adults still get a kick out of.
- 2 teaspoons citric acid (or juice of 1 lemon) stirred into 1 quart cold water – this is my make-ahead trick for keeping the apples from browning before serving.
Note: this recipe serves 8, with one apple-quarter “monster” per person.
Equipment You Need
- Paring knife – for cutting the mouth shapes and slicing the cheese or mango into tongues.
- Cutting board – gives you a stable surface for detail work on small apple pieces.
- Small mixing bowl – for the citric acid or lemon water soak.
- Butter knife or small spatula – for spreading peanut butter neatly into the mouths.
- Serving platter – to arrange your finished monsters for the table.
How to Make Make-Ahead Halloween Monster Apple Bites?
This recipe comes together in three quick stages: soaking the apples, cutting the details, and assembling the faces. None of it requires cooking, which is exactly why it fits so well into a lineup of party finger foods halloween food ideas that need to be ready before guests show up.
Soak the Apples
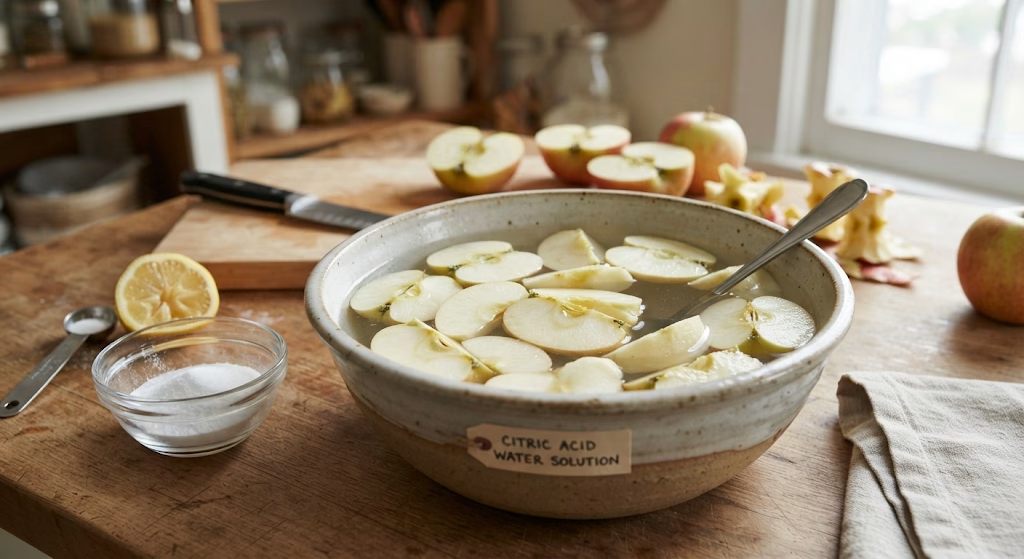
Stir the citric acid or fresh lemon juice into your quart of cold water. Drop the apple quarters in and let them sit for about five minutes. This step is what lets you prep hours ahead without the fruit turning brown and unappetizing on the platter.
Cut the Mouths
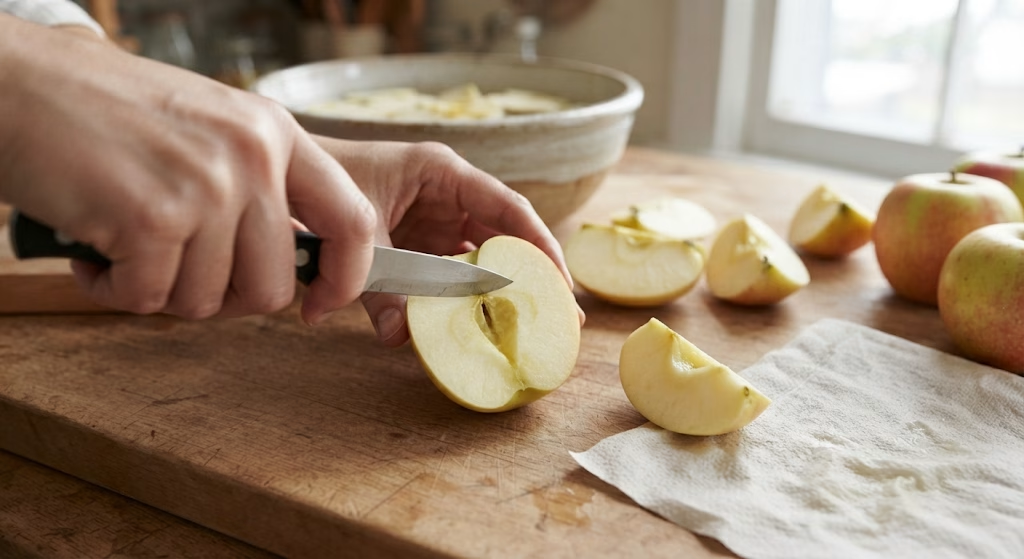
Pat the apple quarters dry with a paper towel. Using your paring knife, carve a shallow “mouth” shape into the curved side of each piece. Keep the cut fairly deep so there’s room to hold the peanut butter and toppings without them spilling out.
Prep the Tongues
While the apples dry, slice your cheddar cheese or mango into small triangle shapes. These will sit inside the mouth as the “tongue,” so aim for pieces about the size of your thumbnail so they don’t overwhelm the bite.
Fill and Build the Teeth
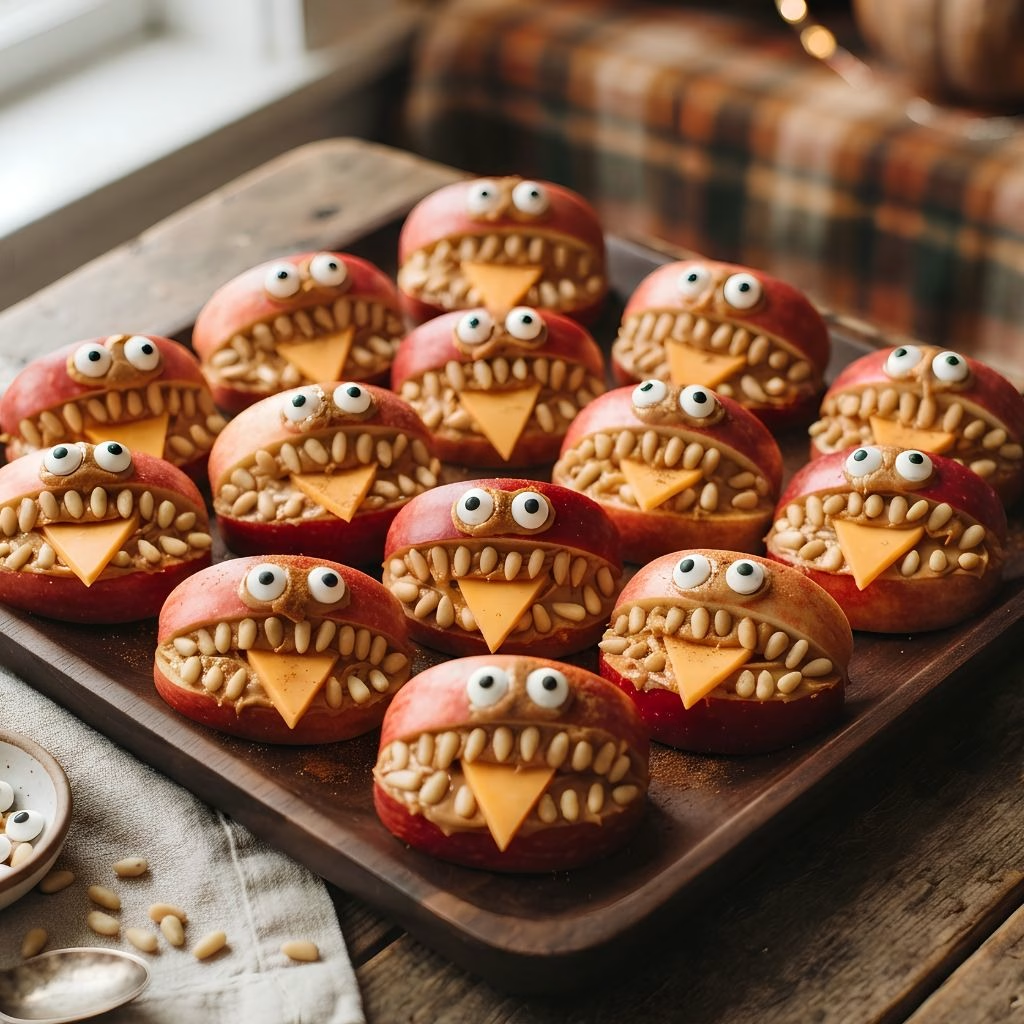
Spread a thin layer of peanut butter inside each carved mouth using your butter knife. Press the pine nuts into the peanut butter along the top and bottom edges of the mouth to form rows of teeth. Work quickly since peanut butter firms up a bit once it’s been in the fridge.
Add the Tongue and Eyes
Tuck one cheese or mango triangle into the center of each mouth so it looks like a tongue poking out. Dab a tiny bit of peanut butter above the mouth and press one or two candy eyeballs into place. This last step is what turns a plain apple slice into a genuinely fun halloween party food table idea.
Chill or Serve
If you’re serving right away, arrange the monsters on your platter and set them out. If you’re prepping ahead, cover the tray loosely and refrigerate until 30 minutes before your guests arrive, then bring them out at room temperature for the best texture.
Additional Tips for Making This Recipe Better
I’ve made this recipe more times than I can count, and here’s what actually moves the needle:
- I always cut my apples as close to the soak as possible, since apples that sit around uncut start to soften and get harder to carve cleanly.
- I keep my peanut butter at room temperature before I start, because cold peanut butter cracks the apple instead of spreading smoothly.
- I press the pine nuts in at a slight angle instead of straight down, since it makes the “teeth” look more natural and less like they’re just glued on.
- I like laying my finished monsters on a bed of shredded lettuce or kale, which keeps them from sliding around on the platter and adds a nice pop of green.
- I prep my citric acid soak the night before if I know it’s going to be a busy morning, so all I have to do the day of is cut and assemble.
Common Mistakes to Avoid
- I once skipped the citric acid soak thinking I’d serve fast enough, and the apples browned within 20 minutes anyway. Don’t skip this step if you’re prepping more than 15 minutes ahead.
- I’ve used natural peanut butter in a pinch, and it genuinely does not hold the pine nuts in place, so I always stick with a conventional, thicker brand now.
- I’ve cut mouths too shallow before, and the fillings just fall right out when you pick the piece up, so go a little deeper than feels natural.
- I’ve let apples sit out too long after cutting, and even with the soak they start to look tired after a few hours, so I always assemble them within the same day I plan to serve.
- I’ve overcrowded the platter before, and it honestly just makes the monsters harder to grab and less appealing, so I try to leave breathing room between each piece.
How to Serve Make-Ahead Halloween Monster Apple Bites
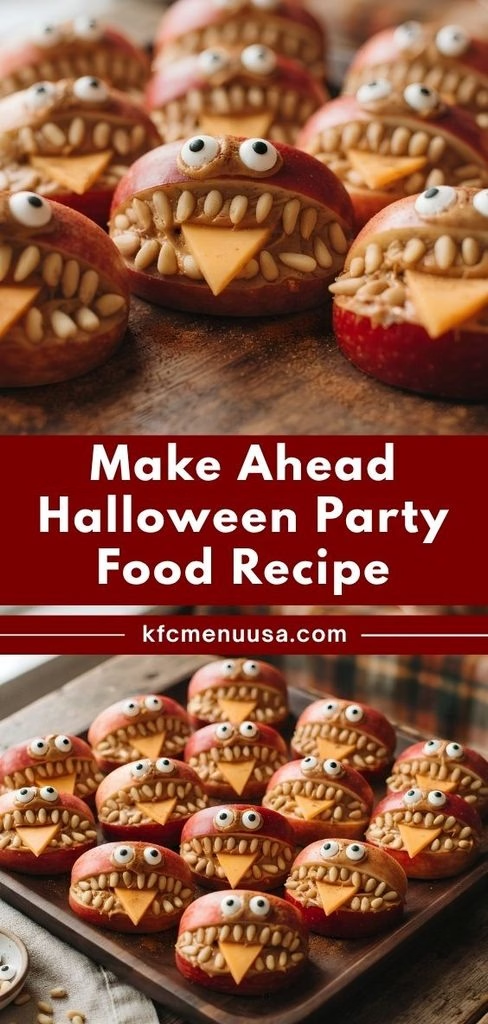
I like arranging these on a dark platter so the green apples and orange candy eyeballs really pop against the background. It instantly reads as one of the better easy halloween food ideas at any table.
Scatter a few extra candy eyeballs or some black or orange sprinkles around the edges of the tray for a bit of theatrical flair. These monster bites also pair really well with a spread of other spooky treats; if you’re building out a full dessert table, something like this Halloween Ghost Cupcakes Recipe adds a sweeter, baked option right alongside the fresh fruit.
For a bigger buffet, group these apple monsters with a couple of warm or savory bites so guests get both a fresh option and something heartier, which is really the secret to a well-balanced halloween party food table idea.
Variations
- Swap the peanut butter for sunflower seed butter if you’re serving a nut-free crowd or have kids with allergies at the party.
- Use dairy-free cheese shreds pressed into triangle shapes instead of cheddar for a dairy-free tongue option.
- Try green grapes halved lengthwise in place of the mango for an extra pop of color and a lower-sugar bite.
- Add a drizzle of melted dark chocolate along the mouth edges for a slightly sweeter, more dessert-leaning version.
- If you want something to serve alongside these for a full spread, a rich, layered option like this Halloween Dirt Cake Recipe rounds things out nicely for anyone craving something more indulgent.
Nutritional Information
Here’s roughly what you’re looking at per apple monster serving, based on the ingredients above:
- Calories: about 125 kcal
- Protein: about 3g
- Carbohydrates: about 10g
- Fat: about 9g
Make Ahead and Storage
You can prep the apples up to 4 hours ahead if you keep them fully submerged in the citric acid or lemon water soak, then pat them dry and assemble just before serving so the peanut butter and toppings don’t shift or dry out.
If you have leftovers, store them in an airtight container in the fridge and eat them within 24 hours, since the apple texture starts to soften noticeably after that point.
I don’t recommend freezing this one. Fresh apples get watery and mushy once thawed, and the peanut butter and candy eyeballs don’t hold up well through a freeze-thaw cycle either.
Why You’ll Love This Recipe
If you’re the person who ends up handling all the party food, here’s why this one earns a permanent spot on the menu:
- It’s genuinely quick. With no oven and no cook time, you can have a full platter ready in about 15 active minutes, which makes it one of the easier make ahead halloween party appetizers out there.
- It’s endlessly adjustable. Swap the tongue, swap the nut butter, or change up the eyeball placement depending on who’s coming to the party.
- It works for every age group. Kids love the silly monster faces, and adults appreciate that it’s a fresher option next to all the candy and baked goods.
- It travels well. Once assembled and chilled, these hold their shape nicely on the way to a potluck or classroom party.
- It’s a lighter option on a table full of sweets, which makes it a smart addition if you’re rounding out traditional halloween dinner recipes with something a little fresher.
FAQs
Can I make these the night before my party?
You can cut and soak the apples the night before, but I’d hold off on assembling the full monster face until the morning of, since the peanut butter and toppings look and taste best fresh.
What can I use instead of pine nuts for the teeth?
Slivered almonds work well as a substitute and give a similar shape and crunch if pine nuts aren’t available where you shop.
Are these good for a halloween party food table with a lot of sweets already?
Yes, they’re actually a great addition for that exact reason. They add a fresh, slightly savory bite that balances out a table full of cookies, cake, and candy.
How do I keep the apples from turning brown before the party?
Soak the cut apple quarters in cold water mixed with citric acid or lemon juice for about five minutes, then pat them dry before assembling.
Can I turn this into a nut-free recipe for school parties?
Yes, swap the peanut butter for sunflower seed butter and skip the pine nuts in favor of small pretzel sticks or seeds for the teeth.

Make Ahead Halloween Party Food Recipe
Ingredients
Method
- Stir the citric acid or fresh lemon juice into your quart of cold water. Drop the apple quarters in and let them sit for about five minutes. This step is what lets you prep hours ahead without the fruit turning brown and unappetizing on the platter.
- Pat the apple quarters dry with a paper towel. Using your paring knife, carve a shallow “mouth” shape into the curved side of each piece. Keep the cut fairly deep so there’s room to hold the peanut butter and toppings without them spilling out.
- While the apples dry, slice your cheddar cheese or mango into small triangle shapes. These will sit inside the mouth as the “tongue,” so aim for pieces about the size of your thumbnail so they don’t overwhelm the bite.
- Spread a thin layer of peanut butter inside each carved mouth using your butter knife. Press the pine nuts into the peanut butter along the top and bottom edges of the mouth to form rows of teeth. Work quickly since peanut butter firms up a bit once it’s been in the fridge.
- Tuck one cheese or mango triangle into the center of each mouth so it looks like a tongue poking out. Dab a tiny bit of peanut butter above the mouth and press one or two candy eyeballs into place. This last step is what turns a plain apple slice into a genuinely fun halloween party food table idea.
- If you’re serving right away, arrange the monsters on your platter and set them out. If you’re prepping ahead, cover the tray loosely and refrigerate until 30 minutes before your guests arrive, then bring them out at room temperature for the best texture.
Notes
- I always cut my apples as close to the soak as possible, since apples that sit around uncut start to soften and get harder to carve cleanly.
- I keep my peanut butter at room temperature before I start, because cold peanut butter cracks the apple instead of spreading smoothly.
- I press the pine nuts in at a slight angle instead of straight down, since it makes the “teeth” look more natural and less like they’re just glued on.
- I like laying my finished monsters on a bed of shredded lettuce or kale, which keeps them from sliding around on the platter and adds a nice pop of green.
- I prep my citric acid soak the night before if I know it’s going to be a busy morning, so all I have to do the day of is cut and assemble.