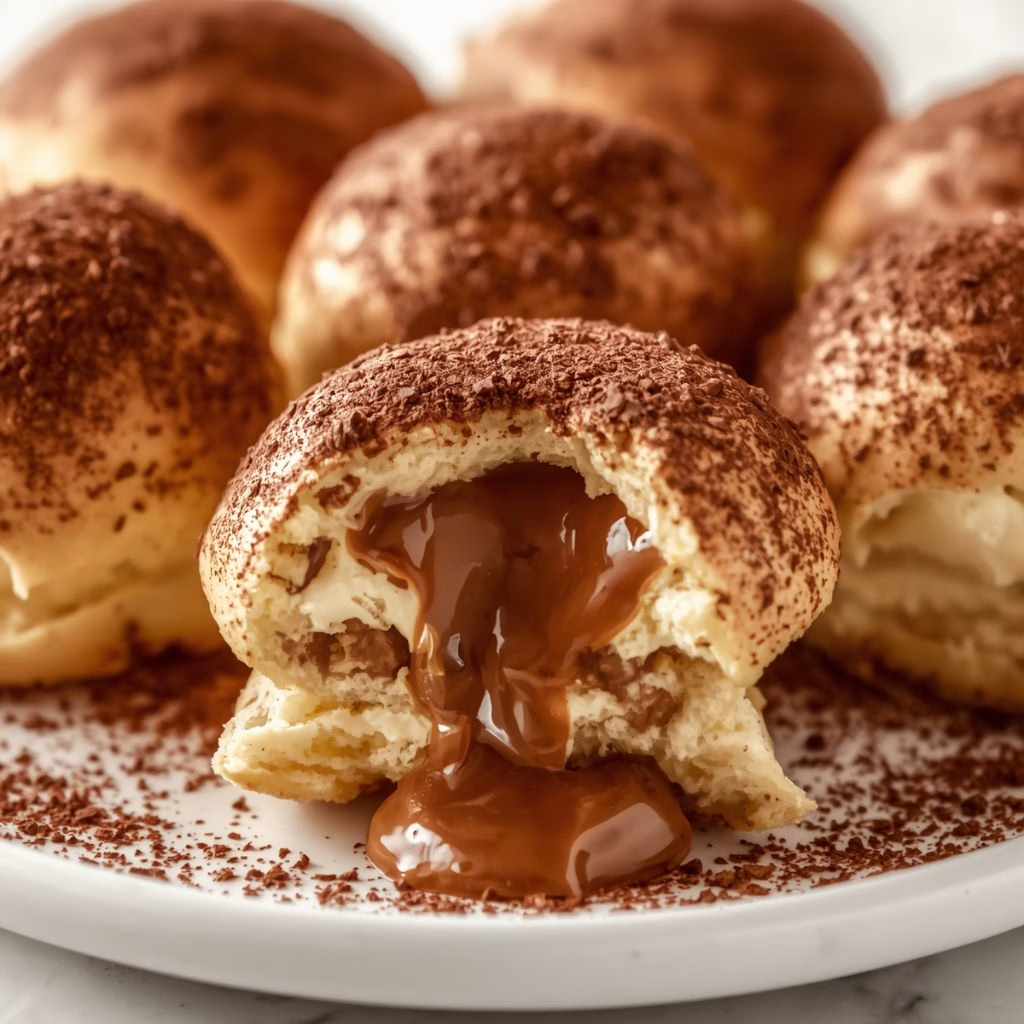
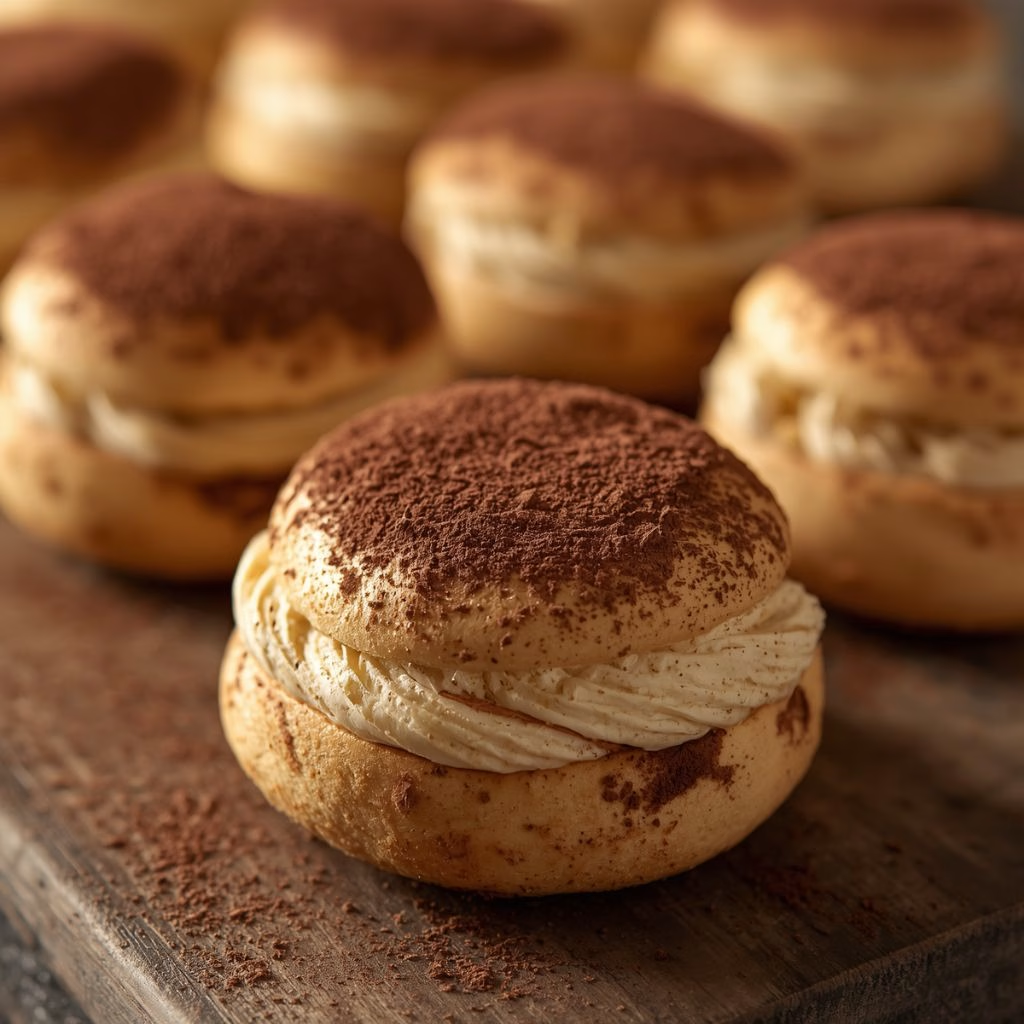
The first time I pulled this Tiramisu Maritozzi Buns (Italian Cream Buns) out of the oven, I knew I’d stumbled onto something special. I brushed the tops with maple syrup, watched them turn glossy and golden, and honestly could barely wait for them to cool before slicing one open.
Once I filled them with coffee syrup and pillowy vanilla cream, I understood why Italians have been obsessed with maritozzi for generations. I promise this recipe looks fancier than it actually is, and I’ll walk you through every step I use in my own kitchen.

Cooking Time
- Prep Time: 30 minutes
- Cook Time: 15 minutes
- Total Time: 4 hours (includes dough rising and cooling)
Ingredients
Dough Ingredients
- 250 ml warm milk – wakes up the yeast and keeps the dough tender
- 8 g active dry yeast – the reason your buns puff up light and airy
- 415 g bread flour or all-purpose flour – gives the dough its structure and chew
- 50 g cane sugar – feeds the yeast and helps the crust turn golden
- 70 ml olive oil – the classic Italian fat that makes maritozzi dough so soft
- 2 tsp salt – balances sweetness and strengthens the gluten, don’t skip it
- 60 ml maple syrup – brushed on top for that bakery-style shine
Coffee Soak Ingredients
- 3 tsp instant coffee – dissolves into a rich, aromatic soak
- ½ cup boiling water or freshly brewed espresso – use espresso for a deeper coffee punch
Vanilla Cream Filling Ingredients
- 240 ml cold whipping cream – whips up light and cloud-like when properly chilled
- 60 ml cream cheese or mascarpone – adds tang and keeps the filling from collapsing
- 45 g powdered sugar – sweetens without any graininess
- 2 tsp vanilla extract – rounds out the filling with warm flavor
- Cocoa powder, for dusting – the finishing touch that ties in the tiramisu flavor
Note: This recipe makes 12 buns, enough to serve 6-8 people generously.
Equipment You Need
- 2-3 baking sheets – for arranging and baking the buns in batches
- Stand mixer with dough hook – makes kneading this soft, sticky dough far easier
- Pastry brush – for brushing maple syrup on top and coffee soak inside
- Piping bag or spoon – to fill the buns neatly with vanilla cream
- Bench scraper – helps divide the dough into even portions
- Wire cooling rack – lets the buns cool fully before filling
How to Make Tiramisu Maritozzi Buns Recipe?
Once you’ve gathered everything, this recipe comes together in four simple stages: mixing the dough, shaping and baking, whipping the filling, and assembling. None of it is difficult, it just takes a little patience while the dough rises. Here’s exactly how I do it at home.
Activate the Yeast
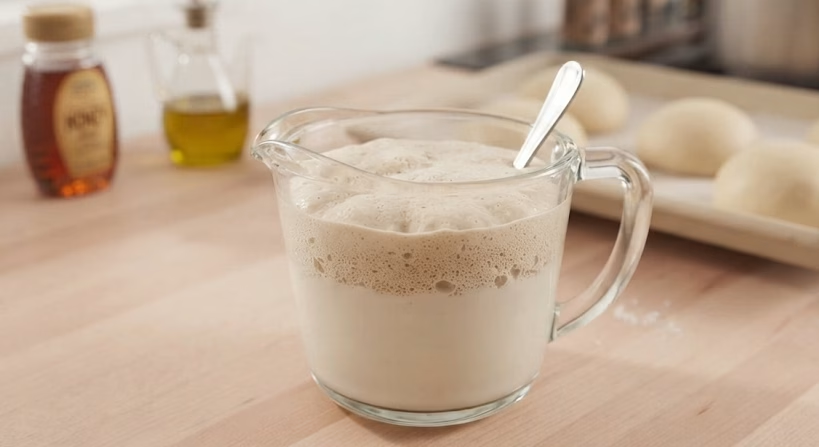
Warm your milk to around 100-110°F, then stir in the active dry yeast. Let this sit undisturbed for about 10 minutes until it turns foamy on top. This step confirms your yeast is alive and ready to work. If nothing happens after 10 minutes, your yeast may be old, so start over with a fresh batch.
Mix and Knead the Dough
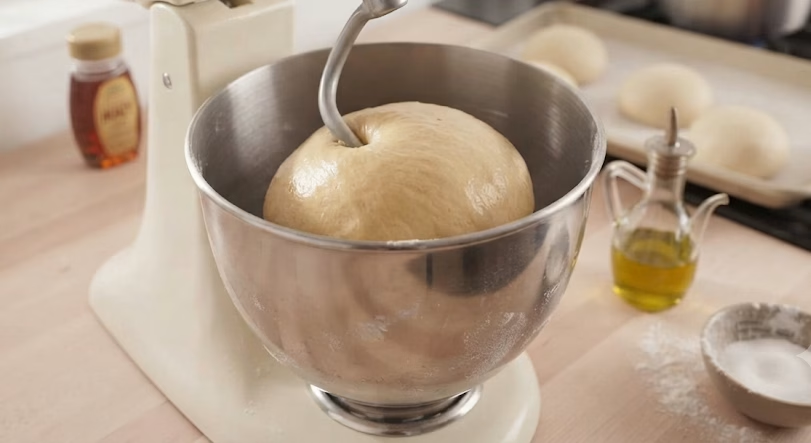
Add flour and sugar to the yeast mixture, then mix with a dough hook until just combined. Pour in the olive oil gradually, in three additions, letting each one absorb before adding more. Add the salt and knead on medium speed for 8-10 minutes until the dough pulls cleanly away from the bowl.
Let the Dough Rise
Transfer your dough to a lightly oiled bowl and cover it with plastic wrap or a damp towel. Set it somewhere warm in your kitchen for 60-90 minutes, or until it has doubled in size. I like placing mine near a sunny window or inside a slightly warmed oven.
Shape the Buns
Turn the dough out onto a floured surface and divide it into 12 equal pieces, roughly 60-70g each. Cup each piece under your palm and roll it in a circular motion until it forms a smooth, tight ball. This tightening step is what gives maritozzi their signature domed shape.
Second Proof
Arrange the shaped balls on lined baking sheets, leaving 2-3 inches of space between each one. Cover them loosely with a clean towel and let them proof again for about an hour, until they look puffy and nearly doubled. Skipping this second rise leaves you with dense, flat buns.
Bake the Buns
Preheat your oven to 375°F (190°C) while the buns finish proofing. Brush the tops generously with maple syrup for that glossy bakery finish, then bake for 15 minutes until golden brown. Cool completely on a wire rack before you even think about filling them.
Whip the Vanilla Cream
In a mixing bowl, combine cold whipping cream, cream cheese or mascarpone, powdered sugar, and vanilla extract. Whisk on medium-high speed until medium peaks form, being careful not to overwhip. Keep the finished cream chilled until you’re ready to pipe it into the buns.
Make the Coffee Soak
Stir instant coffee into boiling water, or use freshly brewed espresso if you have it on hand. Let this mixture cool to room temperature before using it, since warm coffee will melt your cream filling instantly. This soak is what gives the buns their tiramisu character.
Assemble the Buns
Slice each cooled bun about two-thirds of the way through so it opens like a pocket. Brush the inside generously with the cooled coffee soak, then pipe or spoon the whipped cream filling in. Smooth the top with a spatula and dust with cocoa powder right before serving.
Additional Tips for Making This Recipe Better
I’ve made these buns more times than I can count, and here’s what actually moves the needle for me:
- I always weigh my flour on a digital scale instead of using cups, because a few extra grams makes the dough noticeably stiffer.
- I chill my mixing bowl and whisk before whipping the cream, which helps it firm up faster and hold its shape longer.
- I brush the coffee soak on while the buns are fully cool, otherwise my cream starts melting the moment I pipe it in.
- I like rolling my dough balls twice, letting them rest for a few minutes between rolls, since it gives me a much smoother, tighter finish.
- I keep a small offset spatula nearby for smoothing the cream, since it gives a cleaner, more professional-looking finish than a butter knife.
Common Mistakes to Avoid
- I once rushed the second proof and ended up with dense, chewy buns instead of light, airy ones, so now I never skip it.
- I’ve overwhipped my cream before and watched it turn grainy in seconds, so I stop as soon as medium peaks form.
- I tried soaking warm buns in coffee syrup once and the cream melted immediately, so I always let everything cool fully first.
- I’ve added oil too quickly in the past and ended up with a greasy, hard-to-knead dough, so I now pour it in slowly, in three parts.
- I underestimated how sticky this dough gets, so I keep a light dusting of flour nearby instead of adding too much at once, which can toughen the crumb.
How to Serve Tiramisu Maritozzi Buns?
I like arranging these buns on a wooden board or a simple white platter so the golden tops and cocoa dusting really stand out. A generous, even dusting of cocoa powder right before serving gives them that classic tiramisu look.
For brunch, I’ll serve them alongside a small espresso cup or cappuccino, which mirrors the coffee flavor inside the buns. They also pair beautifully with Afghan Noodle Soup with Hot Garlic Oil Recipe for anyone planning a cozy multi-course meal.
If I’m setting up a dessert table, I like slicing a couple in half so guests can see the cream filling before they even take a bite. A few chocolate-covered coffee beans scattered around the platter add a nice finishing touch.
Variations
- Dairy-free: swap the milk, whipping cream, and cream cheese for your favorite plant-based versions.
- Sugar-free: use a granulated sugar substitute in the dough and a powdered sugar alternative in the filling.
- Boozy twist: add a splash of coffee liqueur or dark rum to the coffee soak for a grown-up version.
- Citrus swap: replace the coffee soak with an orange or lemon glaze for a brighter, non-caffeinated bun.
- Chocolate lovers: fold mini chocolate chips into the whipped cream filling for extra richness.
- Nutty finish: sprinkle crushed hazelnuts or toasted almonds over the cream before dusting with cocoa.
Nutritional Information
Here’s a rough breakdown per bun, based on the standard recipe with dairy ingredients:
- Calories: approximately 260 kcal
- Protein: approximately 5g
- Carbohydrates: approximately 30g
- Fat: approximately 13g
Make Ahead and Storage
You can make the dough up to a day ahead and refrigerate it overnight for a slow, cold rise, then bring it to room temperature before shaping. Unfilled baked buns keep well in an airtight container at room temperature for 2-3 days, or in the freezer for up to a month.
Once filled with cream, these buns are best enjoyed the same day, but they’ll hold up in the fridge in a sealed container for up to 2 days. Let refrigerated filled buns sit at room temperature for about 10-15 minutes before serving so the cream softens and the dough stays soft rather than firm from the cold.
Why You’ll Love This Recipe?
These buns have become one of my most requested bakes, and honestly, it’s not hard to see why:
- Eggless and easy to make vegan: I can swap in plant-based milk, cream, and cream cheese without losing any texture or flavor.
- Bakery-quality results at home: the olive oil dough gives a soft, tender crumb that genuinely rivals what I’ve had in Italian pastry shops.
- Make-ahead friendly: I can prep the dough the night before, which makes morning baking so much more manageable.
- Endlessly customizable: from citrus glazes to boozy soaks, I can switch up the flavor profile depending on the occasion, just like Ruth’s Chris Copycat Chopped Salad Recipe can be adapted with different toppings and dressings:
- Impressive presentation: these buns always look like I spent hours on them, even on the days I really didn’t.
FAQs
Can I find maritozzi buns near me?
Maritozzi are still fairly niche outside Italy, so your best bet is checking local Italian bakeries or specialty coffee shops. Making them at home guarantees you get that fresh, tiramisu-inspired version every time.
What’s the difference between this and a classic maritozzi recipe?
A classic maritozzi recipe uses plain whipped cream, while this version adds a coffee syrup soak and a mascarpone-based filling for a tiramisu twist. The dough itself follows the same olive oil-enriched method.
How is this different from a traditional tiramisu recipe?
A traditional tiramisu recipe layers coffee-soaked ladyfingers with mascarpone cream in a dish, while these buns turn those same flavors into a handheld, yeasted treat. You get the tiramisu taste in a completely different, portable form.
Can I use a store-bought option like Tesco tiramisu as inspiration for the filling?
Yes, a Tesco tiramisu style flavor profile (coffee, mascarpone, cocoa) is exactly what this recipe recreates from scratch. Using fresh mascarpone and real coffee here gives a more authentic result than most store-bought tubs.
Can I make these buns without a stand mixer?
Yes, though it takes more effort kneading by hand since the dough is soft and slightly sticky. A stand mixer just makes the process faster and more consistent.

Tiramisu Maritozzi Buns (Italian Cream Buns)
Ingredients
Method
- Warm your milk to around 100-110°F, then stir in the active dry yeast. Let this sit undisturbed for about 10 minutes until it turns foamy on top. This step confirms your yeast is alive and ready to work. If nothing happens after 10 minutes, your yeast may be old, so start over with a fresh batch.
- Add flour and sugar to the yeast mixture, then mix with a dough hook until just combined. Pour in the olive oil gradually, in three additions, letting each one absorb before adding more. Add the salt and knead on medium speed for 8-10 minutes until the dough pulls cleanly away from the bowl.
- Transfer your dough to a lightly oiled bowl and cover it with plastic wrap or a damp towel. Set it somewhere warm in your kitchen for 60-90 minutes, or until it has doubled in size. I like placing mine near a sunny window or inside a slightly warmed oven.
- Turn the dough out onto a floured surface and divide it into 12 equal pieces, roughly 60-70g each. Cup each piece under your palm and roll it in a circular motion until it forms a smooth, tight ball. This tightening step is what gives maritozzi their signature domed shape.
- Arrange the shaped balls on lined baking sheets, leaving 2-3 inches of space between each one. Cover them loosely with a clean towel and let them proof again for about an hour, until they look puffy and nearly doubled. Skipping this second rise leaves you with dense, flat buns.
- Preheat your oven to 375°F (190°C) while the buns finish proofing. Brush the tops generously with maple syrup for that glossy bakery finish, then bake for 15 minutes until golden brown. Cool completely on a wire rack before you even think about filling them.
- In a mixing bowl, combine cold whipping cream, cream cheese or mascarpone, powdered sugar, and vanilla extract. Whisk on medium-high speed until medium peaks form, being careful not to overwhip. Keep the finished cream chilled until you’re ready to pipe it into the buns.
- Stir instant coffee into boiling water, or use freshly brewed espresso if you have it on hand. Let this mixture cool to room temperature before using it, since warm coffee will melt your cream filling instantly. This soak is what gives the buns their tiramisu character.
- Slice each cooled bun about two-thirds of the way through so it opens like a pocket. Brush the inside generously with the cooled coffee soak, then pipe or spoon the whipped cream filling in. Smooth the top with a spatula and dust with cocoa powder right before serving.
Notes
- I always weigh my flour on a digital scale instead of using cups, because a few extra grams makes the dough noticeably stiffer.
- I chill my mixing bowl and whisk before whipping the cream, which helps it firm up faster and hold its shape longer.
- I brush the coffee soak on while the buns are fully cool, otherwise my cream starts melting the moment I pipe it in.
- I like rolling my dough balls twice, letting them rest for a few minutes between rolls, since it gives me a much smoother, tighter finish.
- I keep a small offset spatula nearby for smoothing the cream, since it gives a cleaner, more professional-looking finish than a butter knife.