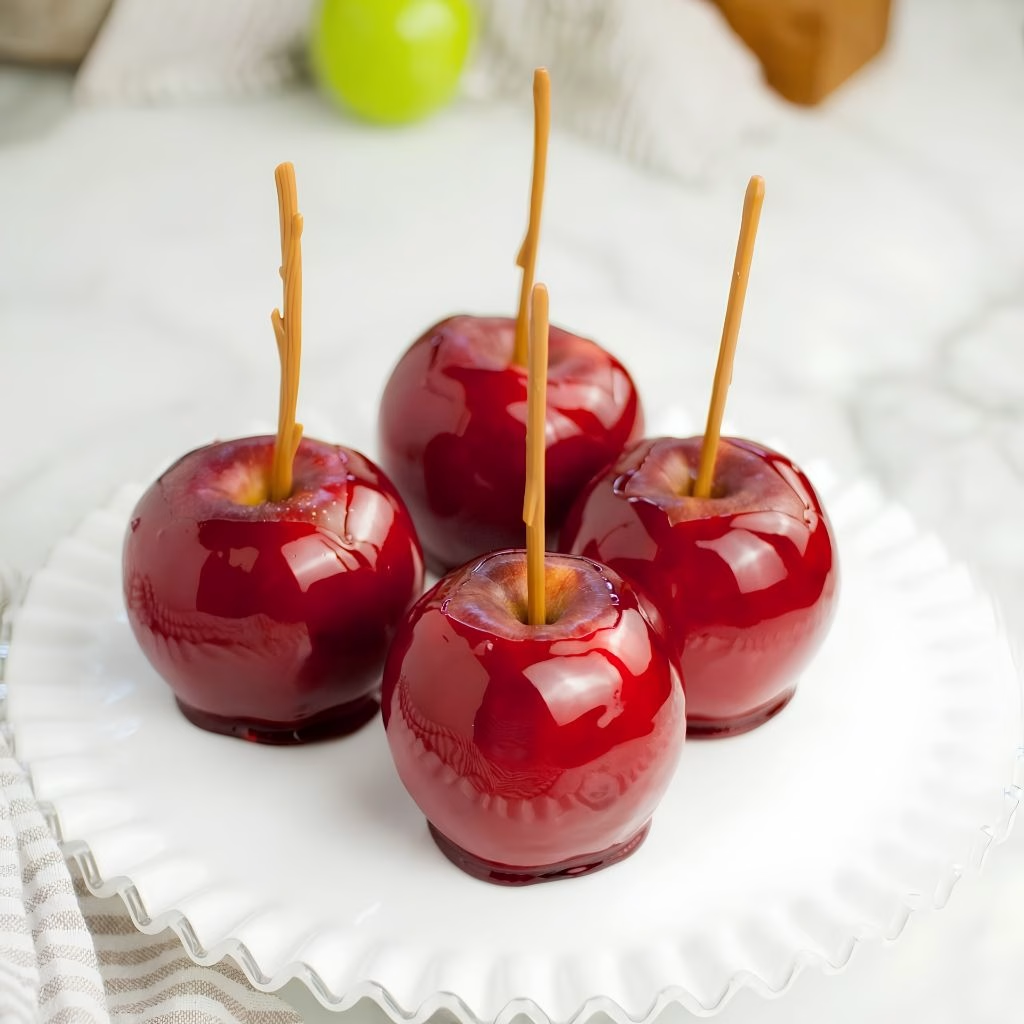
I still remember the first time I dipped a chilled apple into hot ruby-red syrup and watched it turn glassy right in front of me. It felt like kitchen magic. Once I got the hang of the sugar temperature, I realized this Classic Candy Apple Recipe is honestly one of the easiest fall treats I make every single year.
I love that it only needs a handful of pantry staples, yet it looks like something straight out of a county fair. If you’ve been searching for a candy apple recipe easy enough for a weekend project with the kids, this is the one I keep coming back to.

Cooking Time
- Prep Time: 15 minutes
- Cooking Time: 15 minutes
- Total Time: 30 minutes (plus optional overnight apple chilling for the shiniest shell)
Ingredients
- 6 to 8 medium apples, stems removed
- 2 cups granulated white sugar, the base of your candy shell
- 1 cup light corn syrup, keeps the sugar from turning grainy or crystallizing
- 3/4 cup water, helps dissolve the sugar evenly before it boils
- 1/2 teaspoon red food coloring (gel or liquid), gives that classic fair-style red
- 1 teaspoon cinnamon candy or cinnamon extract, adds the warm cinnamon flavor candy apples are known for
- 6 to 8 wooden sticks, for holding and dipping the apples
- Edible glitter or sprinkles, completely optional but fun for decorating
Note: This recipe serves 6 to 8 people, one candy apple per serving.
Equipment You Need
- Candy thermometer, for tracking the exact hard crack stage
- Heavy-bottomed saucepan, cooks the sugar evenly without scorching
- Silicone baking mat or parchment paper, gives apples a non-stick surface to set on
- Wooden candy apple sticks, for dipping and holding the apples steady
- Heat-resistant spatula or spoon, for stirring hot syrup safely
- Baking sheet, holds the apples upright while the coating hardens

How to Make Classic Candy Apples Recipe?
Making candy apples really comes down to two things: prepping your apples properly and getting your sugar to the right temperature. Once those two pieces are handled, the actual dipping takes just a few minutes. Here’s exactly how I do it every time, step by step.
Step 1: Wash and Dry the Apples
I always start by washing my apples in hot water to strip off any waxy coating, since wax stops the candy shell from sticking. After washing, I dry them completely with a clean towel because even a little moisture will make the coating slide right off. Push a wooden stick firmly into the top of each apple where the stem used to be.

Step 2: Chill the Apples
For the smoothest, shiniest shell, I like to pop my apples in the fridge for at least an hour, or even overnight if I have time. Cold apples make the hot sugar set almost instantly, which cuts down on drips and uneven coating. This one step made the biggest difference in how professional my candy apples looked.

Step 3: Cook the Sugar Syrup
In a heavy saucepan, combine the sugar, corn syrup, and water over medium-high heat. I stir just until the sugar dissolves, then stop stirring completely and let it boil undisturbed. Clip on your candy thermometer and let the mixture climb all the way to 300°F, the hard crack stage.
Step 4: Add Color and Flavor
Once the syrup hits 300°F, I pull it off the heat right away since it keeps cooking from residual heat. Carefully stir in the red food coloring and cinnamon candy or extract, working quickly since the mixture starts thickening fast. Be careful here, as the syrup is extremely hot and can bubble up when you add liquid coloring.
Step 5: Dip the Apples
Working one at a time, I tilt the pan slightly and dip each cold apple in, twirling it so the syrup coats it evenly all the way around. Let the excess syrup drip off for a few seconds before lifting the apple out completely. This is also the moment to roll it in sprinkles or edible glitter if you’re decorating.
Step 6: Set and Cool
Place each dipped apple stick-side up on your prepared silicone mat or greased parchment paper. I let mine sit at room temperature for about 10 to 15 minutes until the shell hardens into that satisfying glassy crack. Avoid the fridge for setting, since condensation can make the shell sticky.
Additional Tips for Making This Recipe Better
After making candy apples more times than I can count, I’ve picked up a few tricks that make the process so much smoother.
- I always use a candy thermometer instead of guessing, because even a few degrees off changes the texture completely.
- I never walk away from the syrup once it’s boiling, since it can go from perfect to burnt in under a minute.
- I like using tart apples for the best flavor contrast against the sweet coating.
- I keep a bowl of ice water nearby to quickly cool my spoon between stirs, which helps me judge the syrup’s thickness.
- If I want a candy apple mix with different flavors, I split the syrup and add extracts separately once it’s off the heat.
Common Mistakes to Avoid
I’ve made just about every mistake possible with this recipe, so let me save you the trouble.
- I used to skip washing the apples, and the coating just slid right off within an hour.
- I once stirred the syrup while it boiled, and it turned grainy and dull instead of glassy.
- I pulled the sugar off the heat too early once, and the shell stayed soft and sticky instead of snapping.
- I dipped warm apples straight from the counter, which made the coating pool unevenly at the bottom.
- I added food coloring too slowly, which cooled the syrup down before I could dip properly, so now I work fast and have everything ready beforehand.
How to Serve Classic Candy Apples
I love setting these out on a wooden board lined with parchment for a rustic fall display, especially around Halloween parties. Standing them stick-up in a small bucket of dried leaves or shredded paper makes a really fun centerpiece for kids’ parties. A light drizzle of white chocolate or a dusting of crushed nuts right after dipping adds extra texture and looks beautiful.
For an easy dessert table pairing, I’ll often serve them alongside my caramel apple recipe so guests can pick their favorite style. Slice them into wedges on a platter if you want a shareable candy apple slices recipe version instead of whole apples.
Variations
- Swap the corn syrup for an equal weight of sugar if you want a candy apple recipe without corn syrup.
- Crush jolly rancher candy apples style hard candies and stir them into the syrup for a fruity twist on the classic coating.
- Use sugar-free corn syrup and a sugar substitute for a lower-sugar version of the candy apple coating.
- Try a store-bought candy apple kit if you’re short on time, then customize it with your own toppings.
- Roll finished apples in crushed nuts, mini chocolate chips, or toffee bits before the shell fully sets.
- Add a drop of peppermint or orange extract instead of cinnamon for a different seasonal flavor.
Nutritional Information
Here’s roughly what you can expect per candy apple, though exact numbers will vary based on apple size and coating thickness.
- Calories: approximately 280 to 320 per apple
- Protein: less than 1 gram per apple
- Carbohydrates: around 70 to 75 grams per apple
- Fat: 0 grams per apple
Make Ahead and Storage
You can prep your apples and chill them up to a day in advance, which actually helps the candy shell set faster and shinier. I don’t recommend making the syrup ahead of time since it hardens quickly once cooked.
Store finished candy apples at room temperature, wrapped individually in cellophane or wax paper, for up to 2 to 3 days. Avoid refrigerating them, as moisture in the fridge makes the sugar shell turn sticky and dull.
Candy apples don’t freeze well because the shell cracks and becomes soggy once thawed, so I always recommend making them fresh and enjoying them within a few days.
Why You’ll Love This Classic Candy Apple Recipe
This recipe has earned a permanent spot in my fall baking rotation, and here’s why I think you’ll love it too.
- It’s incredibly simple, needing just a handful of ingredients you likely already have in your pantry.
- It’s endlessly customizable, letting you play with the candy apple coating color, flavor, and toppings.
- It’s a genuine crowd-pleaser at parties, since watching the syrup harden into a glassy shell is half the fun.
- It works for nearly any occasion, from Halloween to fall festivals to simple weekend baking with kids.
- It pairs beautifully with other fall treats, like my apple pie recipe, for a full autumn dessert spread.
FAQs
Can I make candy apples without corn syrup?
Yes, you can replace the corn syrup with an equal weight of granulated sugar, though the shell may crystallize slightly faster.
Why did my candy apple coating turn out cloudy instead of shiny?
This usually happens when the syrup is stirred while boiling or when the apples weren’t fully dry before dipping.
What’s the best apple to use for this recipe?
Tart, crisp apples work best since their tanginess balances the sweetness of the candy coating.
How long do homemade candy apples stay fresh?
They stay fresh at room temperature for about 2 to 3 days when wrapped individually in wax paper or cellophane.
Can I use a candy apple kit instead of making the syrup from scratch?
Absolutely, a candy apple kit works well if you’re short on time, and you can still add your own toppings for a homemade touch.

Classic Candy Apple Recipe
Ingredients
Method
- I always start by washing my apples in hot water to strip off any waxy coating, since wax stops the candy shell from sticking. After washing, I dry them completely with a clean towel because even a little moisture will make the coating slide right off. Push a wooden stick firmly into the top of each apple where the stem used to be.
- For the smoothest, shiniest shell, I like to pop my apples in the fridge for at least an hour, or even overnight if I have time. Cold apples make the hot sugar set almost instantly, which cuts down on drips and uneven coating. This one step made the biggest difference in how professional my candy apples looked.
- In a heavy saucepan, combine the sugar, corn syrup, and water over medium-high heat. I stir just until the sugar dissolves, then stop stirring completely and let it boil undisturbed. Clip on your candy thermometer and let the mixture climb all the way to 300°F, the hard crack stage.
- Once the syrup hits 300°F, I pull it off the heat right away since it keeps cooking from residual heat. Carefully stir in the red food coloring and cinnamon candy or extract, working quickly since the mixture starts thickening fast. Be careful here, as the syrup is extremely hot and can bubble up when you add liquid coloring.
- Working one at a time, I tilt the pan slightly and dip each cold apple in, twirling it so the syrup coats it evenly all the way around. Let the excess syrup drip off for a few seconds before lifting the apple out completely. This is also the moment to roll it in sprinkles or edible glitter if you’re decorating.
- Place each dipped apple stick-side up on your prepared silicone mat or greased parchment paper. I let mine sit at room temperature for about 10 to 15 minutes until the shell hardens into that satisfying glassy crack. Avoid the fridge for setting, since condensation can make the shell sticky.
Notes
- I always use a candy thermometer instead of guessing, because even a few degrees off changes the texture completely.
- I never walk away from the syrup once it’s boiling, since it can go from perfect to burnt in under a minute.
- I like using tart apples for the best flavor contrast against the sweet coating.
- I keep a bowl of ice water nearby to quickly cool my spoon between stirs, which helps me judge the syrup’s thickness.
- If I want a candy apple mix with different flavors, I split the syrup and add extracts separately once it’s off the heat.