I started making these caramel apples the year I decided homemade caramel from scratch just wasn’t worth the stress anymore. Between watching a candy thermometer and hoping it doesn’t seize up, I figured there had to be an easier way, and there absolutely is.
Now I whip up a batch of these in under an hour, and honestly, nobody at the table has ever guessed I skipped the stovetop drama. If you’ve been hunting for the Easy Caramel Apples Recipe that actually works on the first try, I think this is the one you’ll keep coming back to.

Cooking Time
- Prep Time: 15 minutes
- Cooking Time: 3 minutes (melting the caramel)
- Total Time: 53 minutes (includes chilling)
Ingredients
- 7 small Granny Smith apples (about 2 ¼ lbs) — the tartness balances the sweet caramel and the firm flesh holds toppings well
- 15 oz soft chewy caramels (such as Werther’s Original Chewy Caramels) — unwrapped and ready to melt down for the coating
- 3 tablespoons heavy cream — thins the melted caramel just enough for smooth, even dipping
- various toppings of choice (crushed nuts, sprinkles, mini chocolate chips, sea salt) — totally optional, but they make each apple look like a gift
Note: this recipe serves 21 (about 3 servings per apple), making 7 whole caramel apples.
Equipment You Need
- Microwave-safe bowl (about 5-cup size) — for melting the caramels and cream together
- 7 wooden craft sticks or caramel apple sticks — inserted into each apple for easy dipping and eating
- Baking sheet or 13×9-inch dish — lined with parchment to catch drips and hold the apples while they set
- Parchment paper — prevents the caramel from sticking once it cools
- Non-stick cooking spray — lightly coats the parchment so nothing sticks
- Rubber spatula — for stirring the caramel mixture until silky smooth

How to Make Easy Caramel Apples Recipe?
This whole process comes together in a handful of simple steps, and there’s really no room to mess it up. Once your apples are prepped and your caramel is melted, the actual dipping takes just a few minutes. Here’s exactly how I do it every single time.
Prep the Apples
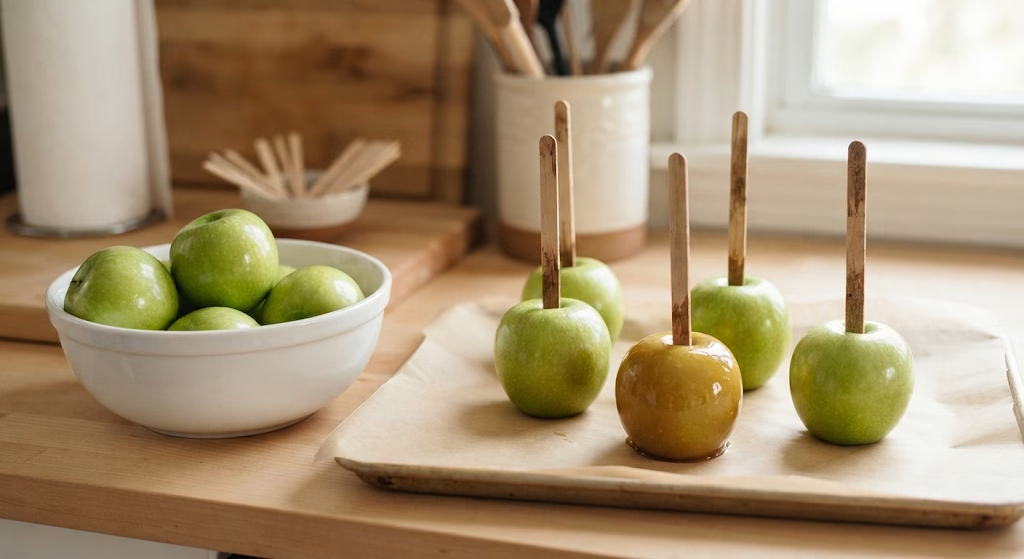
Start by rinsing your apples thoroughly and drying them completely with a paper towel, since any leftover moisture or wax coating will keep the caramel from sticking properly. Insert a caramel apple stick firmly into the top of each apple where the stem used to be. Set them aside on your lined tray while you prepare everything else.
Get Your Toppings Ready
If you’re planning to roll your apples in nuts, sprinkles, or mini chocolate chips, pour each topping into its own small bowl before you start dipping. Line your baking sheet with parchment paper, spray it lightly with non-stick spray, and place it in the fridge to chill while you melt the caramel.

Melt the Caramel
Place your unwrapped caramels and heavy cream into a microwave-safe bowl. Heat everything in 30-second bursts, stirring well between each round, until the mixture turns completely smooth and glossy. This usually takes about 2 to 3 minutes total, depending on your microwave’s strength.
Dip the Apples
Working quickly while the caramel is still warm, tilt and swirl each apple into the melted mixture, turning it to coat the sides evenly. Lift the apple out and let any extra caramel drip back into the bowl before moving on to the next one.
Add Toppings and Chill
Immediately roll the bottom half of each dipped apple through your chosen toppings while the caramel is still tacky. Set the finished apples back onto the chilled, parchment-lined tray and refrigerate for about 15 to 20 minutes until the caramel firms up completely.
Additional Tips for Making This Recipe Better
I’ve made more batches of these than I can count, and a few small habits genuinely make the process smoother.
- I always dry my apples completely before dipping, since even a little water makes the caramel slide right off.
- I like chilling my lined tray in the fridge ahead of time, which helps the caramel set faster once the apples go on.
- I work with one apple at a time so the caramel doesn’t cool and thicken too much before I finish dipping.
- I keep my toppings prepped in individual bowls before I even start melting the caramel, since things move fast once it’s ready.
- I always buy a couple extra apples in case one splits or the stick doesn’t hold steady.
Common Mistakes to Avoid
- I once skipped drying my apples fully, and the caramel just slid straight off within minutes.
- I let my caramel sit too long before dipping, and it thickened up so much it wouldn’t coat evenly anymore.
- I used large apples instead of small ones, and the caramel-to-apple ratio felt off and much too sweet.
- I forgot to spray my parchment paper once, and the finished apples stuck stubbornly to the tray.
- I tried rushing the chilling step, and the caramel never fully set before I tried moving the apples.
How to Serve Easy Caramel Apples?
I love setting these out on a big platter lined with extra parchment or a few fall leaves for a bit of seasonal flair. A light drizzle of melted chocolate over the top adds a bakery-style finish without much extra work.
They’re perfect for Halloween parties, fall gatherings, or as a homemade gift wrapped individually in cellophane with a ribbon. If you’re already planning a full dessert table for the season, these apples look right at home next to something like a batch of spooky no-bake treats.
Variations
- Try homemade caramel apples without corn syrup by using a soft caramel candy base like this one instead of a cooked sugar syrup
- Swap in a kraft caramel apple recipe style by using classic Kraft caramels in place of the Werther’s chewy variety
- Go old fashioned apple caramel recipe style with a stovetop-melted caramel instead of the microwave method
- Use light or dark chocolate as a drizzle for a caramel apple candy feel rather than a full dip
- Add crushed pretzels or toffee bits for extra crunch and a sweet-and-salty combo
- Try a caramel apple recipe with condensed milk swirled into the melted caramel for a creamier, richer bite
Nutritional Information
Here’s an approximate breakdown per serving, which comes out to about a third of one apple, not including any extra toppings.
- Calories: 115 kcal
- Protein: 1 g
- Carbohydrates: 20 g
- Fat: 3 g
Make Ahead and Storage
You can prep your apples by washing, drying, and inserting the sticks a few hours ahead of time, then keep them chilled in the fridge until you’re ready to dip.
Once dipped, store finished caramel apples in the refrigerator in an airtight container or wrapped individually in plastic wrap, and they’ll stay fresh for up to one week.
These don’t freeze particularly well since the texture of the apple changes once thawed, so it’s best to enjoy them fresh from the fridge rather than pulling them from the freezer.
Why You’ll Love This Recipe?
This has become one of my favorite fall traditions, and here’s exactly why I think you’ll feel the same.
- It’s incredibly simple: With just a handful of ingredients and one bowl for the caramel, this easy caramel apples recipe skips all the fuss of a made-from-scratch version.
- It’s endlessly customizable: From nuts to sprinkles to a chocolate drizzle, you can dress these up however fits the occasion.
- It’s perfect for gifting: Wrapped individually, these make a thoughtful homemade treat for teachers, neighbors, or party favors.
- It’s a crowd-pleaser: Kids and adults both light up when they see a tray of these at a fall party or gathering.
- It comes together fast: Even with chilling time built in, you’re looking at under an hour from start to finish.
FAQs
Can I use a different type of apple for this recipe for caramel apples?
Yes, though I stick with Granny Smith for their tartness and firm texture, sweeter varieties like Honeycrisp or Fuji work fine too.
Why did my caramel slide off the apple?
This almost always comes down to moisture or leftover wax on the apple skin, so make sure your apples are completely dry before dipping.
Can I make this a caramel apple dessert recipe ahead of a party?
Absolutely, you can dip and top your apples a day in advance and simply keep them chilled in the fridge until serving time.
What if I don’t have a microwave to melt the caramel?
You can melt the caramels and cream in a small saucepan over medium-low heat instead, just stir constantly so nothing scorches.
How do I keep the caramel from sticking to my baking sheet?
A layer of parchment paper sprayed lightly with non-stick cooking spray keeps everything from sticking once the caramel sets.
If you’re rounding out a full fall dessert spread, these caramel apples pair beautifully with something like Halloween candy corn fudge for an easy no-bake table that barely needs any oven time. And for a chocolatey option that comes together just as fast, a tray of Halloween chocolate bark rounds things out nicely too.

Easy Caramel Apples Recipe
Ingredients
Method
- Start by rinsing your apples thoroughly and drying them completely with a paper towel, since any leftover moisture or wax coating will keep the caramel from sticking properly. Insert a caramel apple stick firmly into the top of each apple where the stem used to be. Set them aside on your lined tray while you prepare everything else.
- If you’re planning to roll your apples in nuts, sprinkles, or mini chocolate chips, pour each topping into its own small bowl before you start dipping. Line your baking sheet with parchment paper, spray it lightly with non-stick spray, and place it in the fridge to chill while you melt the caramel.
- Place your unwrapped caramels and heavy cream into a microwave-safe bowl. Heat everything in 30-second bursts, stirring well between each round, until the mixture turns completely smooth and glossy. This usually takes about 2 to 3 minutes total, depending on your microwave’s strength.
- Working quickly while the caramel is still warm, tilt and swirl each apple into the melted mixture, turning it to coat the sides evenly. Lift the apple out and let any extra caramel drip back into the bowl before moving on to the next one.
- Immediately roll the bottom half of each dipped apple through your chosen toppings while the caramel is still tacky. Set the finished apples back onto the chilled, parchment-lined tray and refrigerate for about 15 to 20 minutes until the caramel firms up completely.
Notes
- I always dry my apples completely before dipping, since even a little water makes the caramel slide right off.
- I like chilling my lined tray in the fridge ahead of time, which helps the caramel set faster once the apples go on.
- I work with one apple at a time so the caramel doesn’t cool and thicken too much before I finish dipping.
- I keep my toppings prepped in individual bowls before I even start melting the caramel, since things move fast once it’s ready.
- I always buy a couple extra apples in case one splits or the stick doesn’t hold steady.