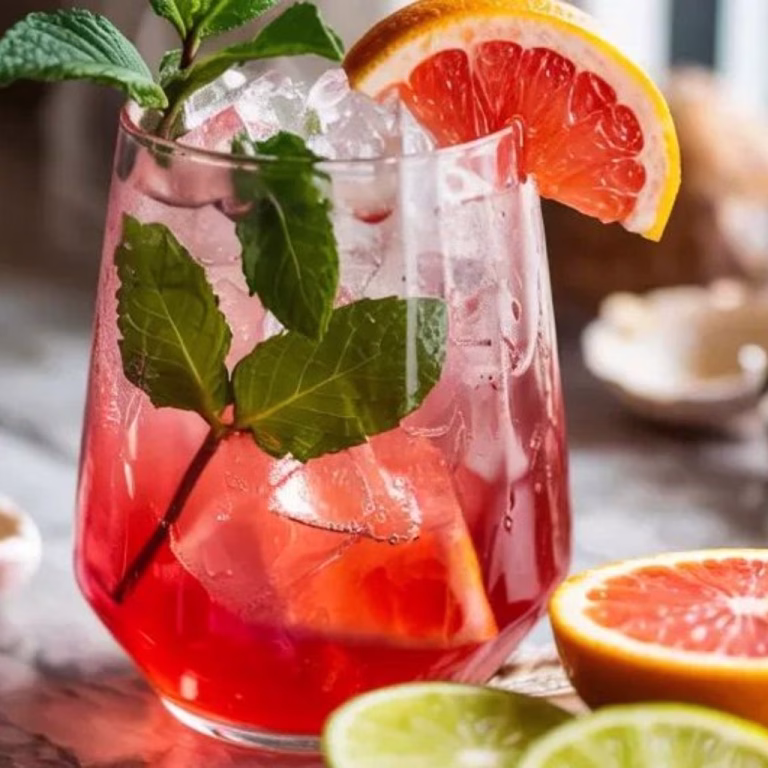
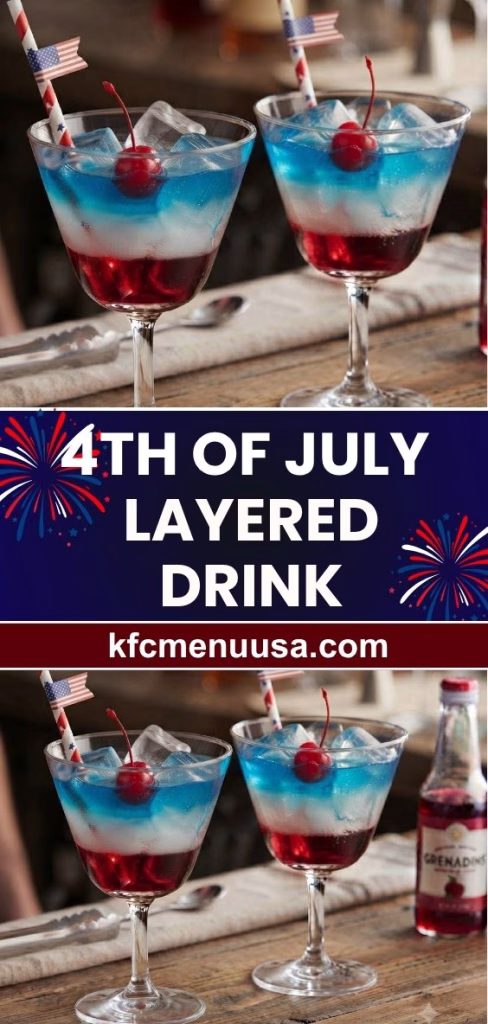
I still remember the first time I layered a red, white, and blue drink for a backyard cookout, and honestly, I was hooked before I even took a sip. It looks like something from a fancy cafe, but I promise it’s ridiculously simple once you know the trick. I love that I can set up a little drink station and let everyone build their own glass.
It’s become my go-to for every patriotic get-together I host now. If you’ve never made a 4th of July Layered Drink Recipe before, I’m walking you through exactly how I do it, step by step.
Ingredients Needed
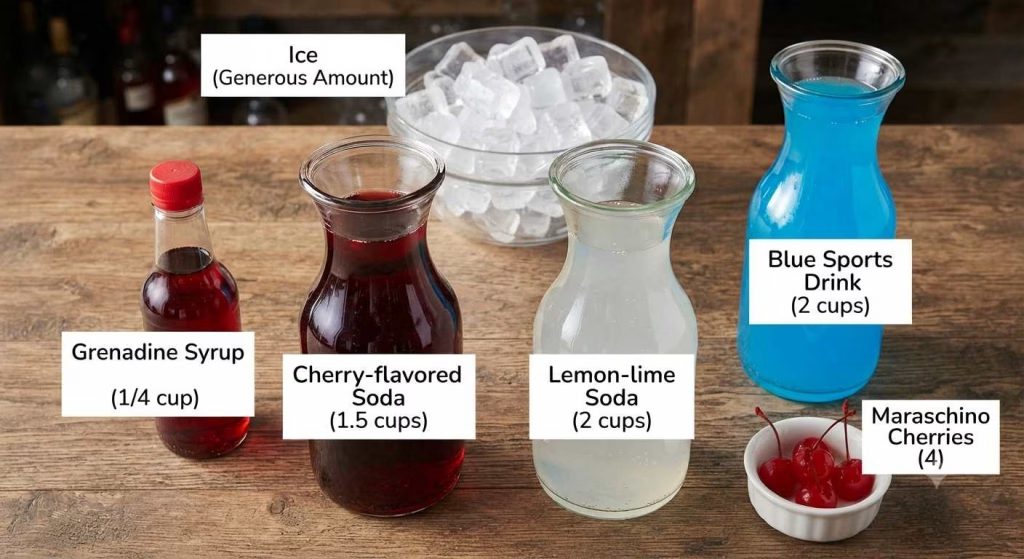
- Cherry-flavored soda (1.5 cups) – this gives the bottom layer its deep red color and forms the sweetest base of the drink.
- Grenadine syrup (1/4 cup) – stirred into the cherry soda, it deepens the red color and boosts the sugar content so it sinks and stays put.
- Lemon-lime soda (2 cups) – this becomes the middle “white” layer, and it’s naturally less sweet than the cherry soda, which is exactly why it floats above it. You can also serve it alongside this refreshing Homemade Lemonade Recipe for guests who enjoy citrus drinks.
- Blue sports drink like Gatorade or Powerade (2 cups) – this forms the top layer, and since it has the lowest sugar content of the three, it stays floating on top instead of sinking.
- Ice (a generous amount) – use medium to large cubes rather than crushed or pebble ice, since bigger cubes slow the pour and help the layers separate cleanly.
- Maraschino cherries (4, for garnish) – a simple finishing touch that adds a pop of color and a little extra sweetness on top.
Note: This recipe as written makes 4 individual servings, so if you’re hosting a bigger crowd, simply double or triple every ingredient amount listed above to match your guest count.
Variations
- Swap in diet or zero-sugar versions of each soda if you want a lighter drink, just remember the layering trick still depends on relative sugar differences, so taste-test your substitutes first.
- Try a tropical twist by using a pineapple-coconut soda for the white middle layer instead of lemon-lime.
- Make it a mocktail for adults by adding a splash of rum or vodka to the bottom layer only, since alcohol can mess with the layering if added to every layer.
- Use cranberry-apple juice for the red layer instead of cherry soda for a less sugary, more natural option.
- Add a few drops of food coloring to any layer if your drinks aren’t turning out vibrant enough on their own.
- For a caffeine-free party punch, stick with the same three-drink formula but choose your own store brands, as long as the sugar levels stay in descending order from bottom to top.
Cooking Time
- Prep Time: 15 minutes
- Cooking Time: 0 minutes (no cooking required)
- Total Time: 20 minutes
Equipment You Need
- Tall clear glasses – lets you actually see and show off those pretty layers.
- A metal spoon – used to slow-pour each layer so the colors don’t blend.
- A measuring cup – keeps each layer’s liquid amount consistent across glasses.
- A tablespoon measure – helpful for precisely portioning the grenadine.
- A pitcher – handy for mixing the cherry soda and grenadine before pouring.
How to Make Red White & Blue Layered Drink Recipe?
Making this drink is all about patience and technique rather than complicated cooking, so don’t worry about needing any special skills. The whole process comes down to layering liquids in the right order based on their sugar content. Once you get the pouring method down, you’ll be able to whip these up in minutes.
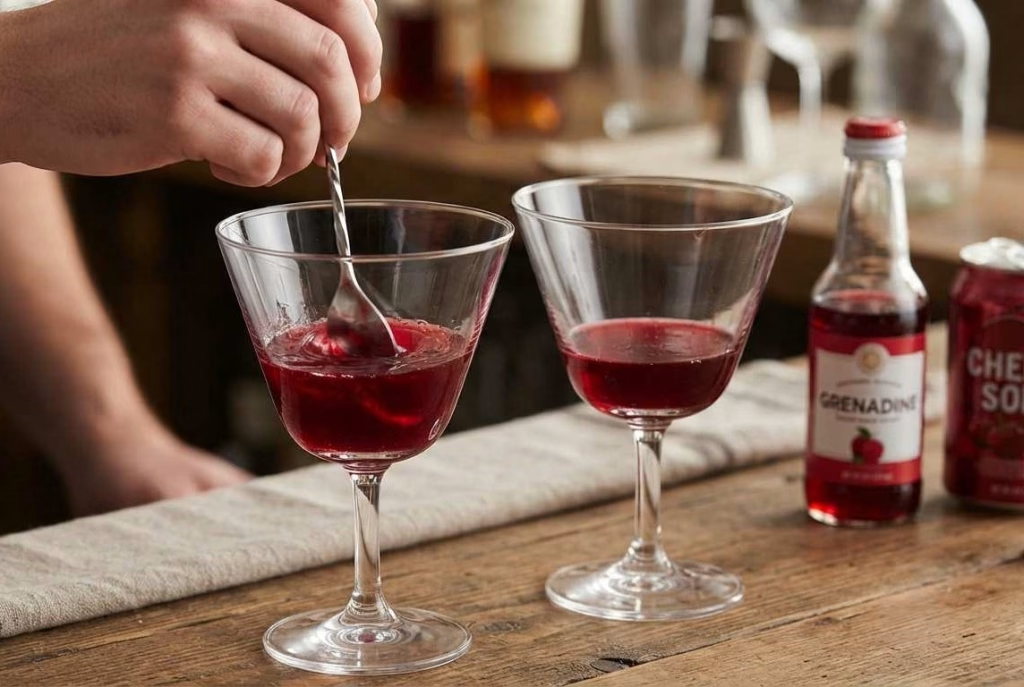
Prepare the Red Base Layer
Pour about 3 tablespoons of cherry soda into the bottom of each glass to start building your base. Add 1 tablespoon of grenadine to each glass and stir it in well. This combination creates the sweetest, densest layer, which is exactly why it needs to sit at the very bottom.
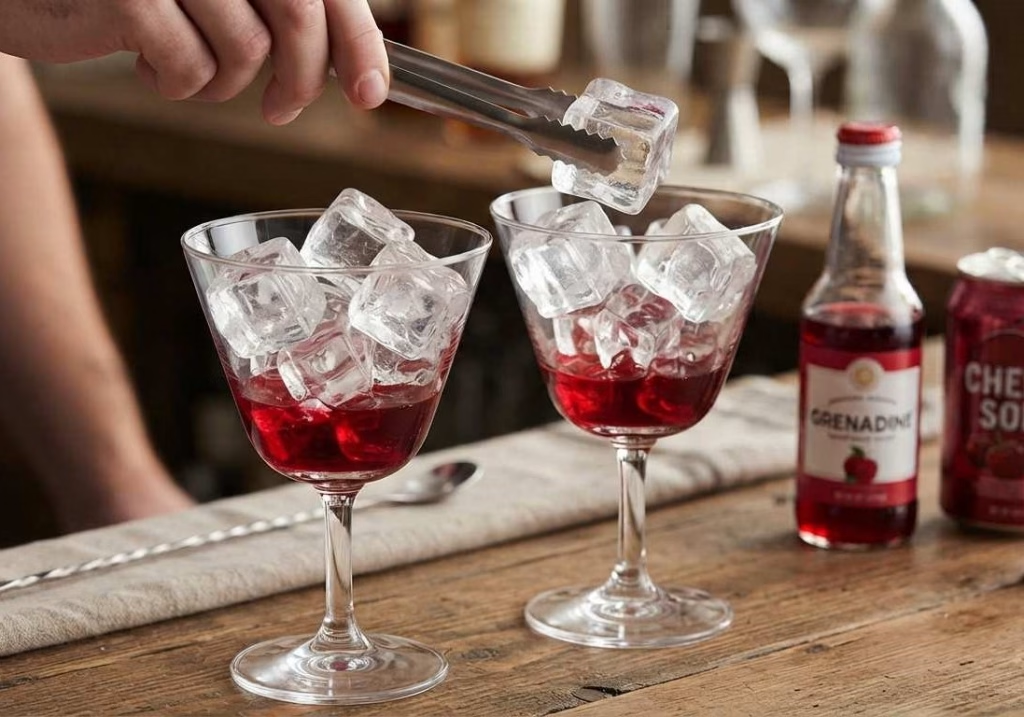
Fill the Glass with Ice
Once your red layer is set, fill each glass all the way to the top with ice. I like to use medium or large cubes here since they slow down the liquid as it pours and give the layers a chance to settle separately. Skipping this step is the number one reason layered drinks turn out muddled instead of crisp and distinct.
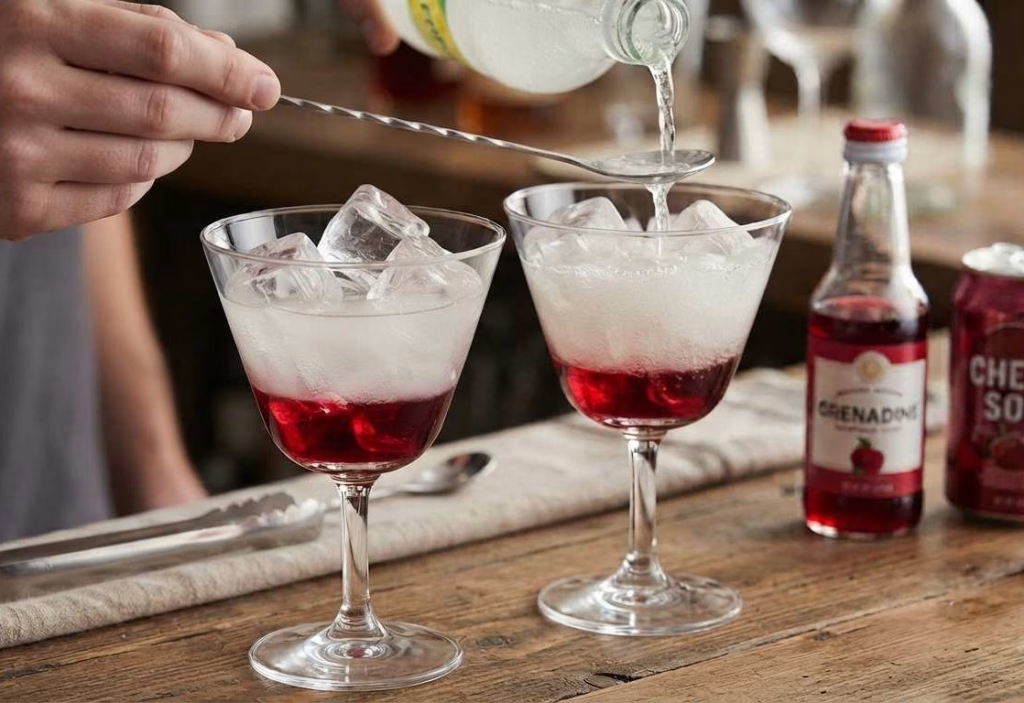
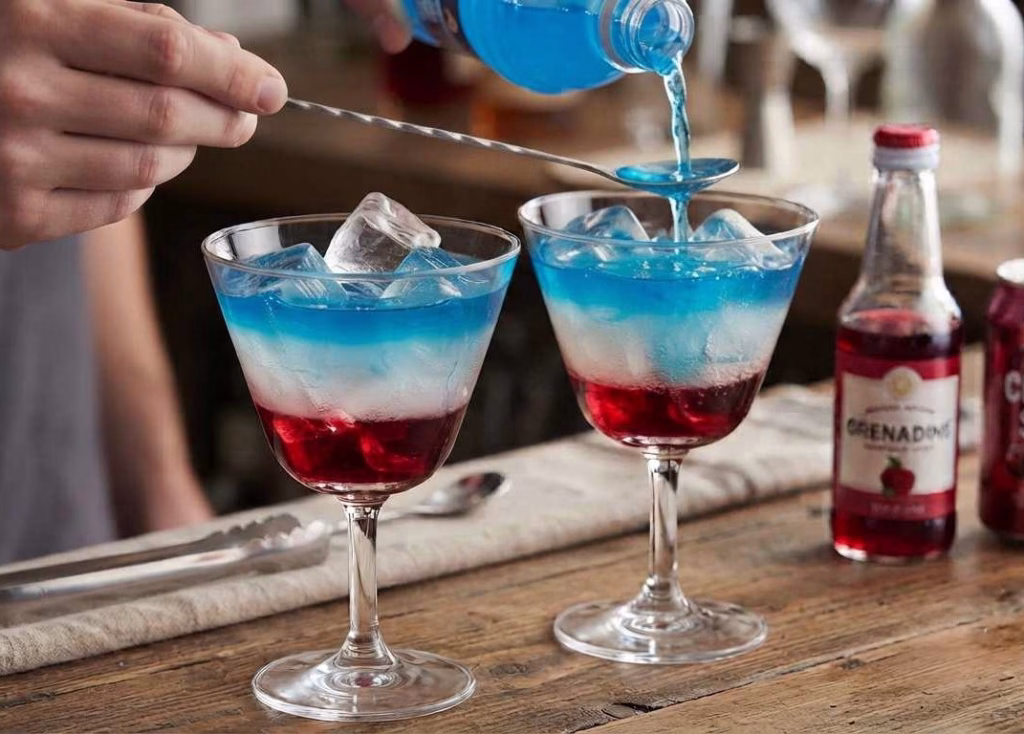
Add the Middle White Layer
Grab your metal spoon and hold it upside down just above the ice in the glass. Slowly pour the lemon-lime soda over the back of the spoon so it trickles down gently instead of splashing in. Fill each glass until it’s about half to two-thirds full, keeping your pour slow and steady the entire time.
Top with the Blue Layer
Repeat the exact same slow-pour method using the blue sports drink, again pouring it over the back of the spoon. Continue until each glass is nearly full, leaving just a little room at the top. This layer floats highest because it has the lowest sugar content of all three liquids.
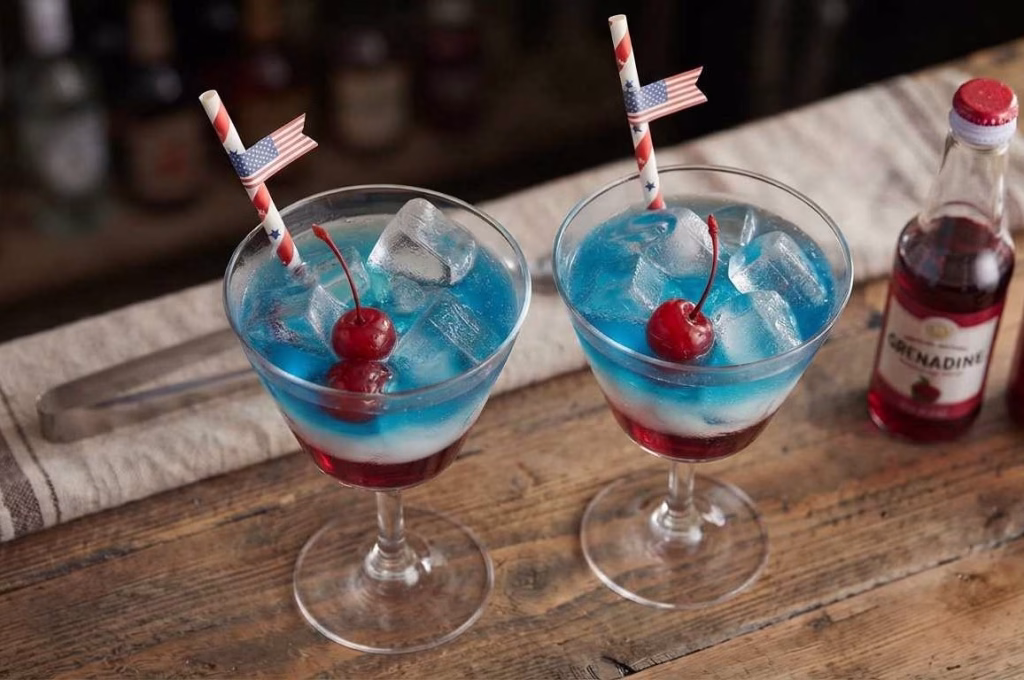
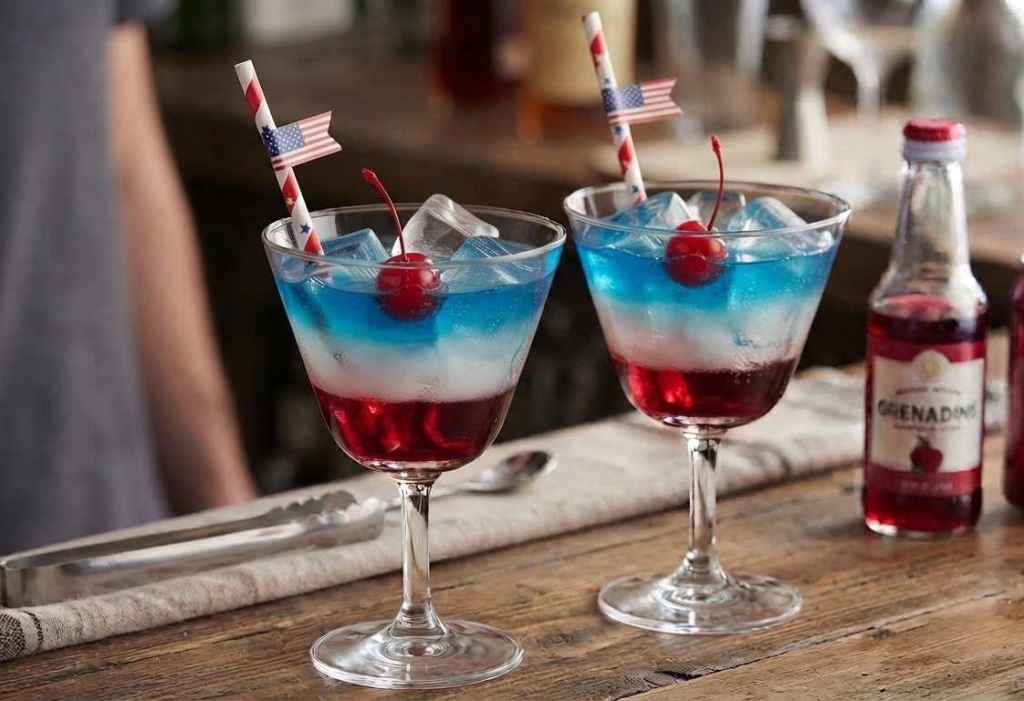
Garnish and Serve
Drop a maraschino cherry into each finished glass and add a fun paper straw if you like. These drinks are best enjoyed the moment they’re built, while all three colors are still crisp and separated. They also pair perfectly with a sweet Dirt Pudding Cup Recipe for a festive party dessert. Serve immediately so your guests get the full “wow” effect before the layers start to mix.
Additional Tips for Making This Recipe Better
- I always double-check the sugar content on my drink labels before starting, since the whole layering trick depends on sweetest at the bottom and lightest at the top.
- I’ve found pouring over the back of a spoon works so much better than pouring directly, so I never skip that step anymore.
- I stick with medium or large ice cubes because crushed ice melts too fast and blurs the layers together.
- I don’t rush the pour, even though it’s tempting; going slow really is what makes the difference between a clean drink and a cloudy one.
- I keep the white middle layer even though it’s hard to see, because it acts as a buffer that stops my red and blue layers from turning purple in the middle.
How to Serve Red White & Blue Layered Drink?
I love setting these out on a tray lined with a festive napkin so the colors really pop against a white or navy background. A few starry paper straws or a mini flag pick sitting in the ice makes the whole presentation feel extra celebratory.
If I’m hosting a bigger party, I’ll set up all the ingredients buffet-style so guests can layer their own glass and watch the colors form right in front of them. A dollop of whipped cream on top with a cherry balanced on it also makes for a gorgeous final touch that photographs beautifully
Nutritional Information
Here’s a quick look at what’s in one serving of this layered drink, based on the standard recipe.
- Calories: 182 kcal
- Protein: 1 g
- Carbohydrates: 33 g
- Fat: 0 g
Make Ahead and Storage
Preparing Ahead: You can measure out your cherry soda, grenadine, lemon-lime soda, and blue sports drink into separate containers a day in advance to save time. Just don’t pour anything into the glasses until you’re ready to serve, since the layers won’t hold once they sit for a while.
Refrigerating: Keep any unopened or measured sodas chilled in the fridge until you’re ready to build the drinks. Once assembled, these are meant to be enjoyed right away rather than stored, as the layers naturally blend together within a short time.
Freezing: I don’t recommend freezing this drink since carbonated sodas lose their fizz and texture once frozen and thawed. It’s really best made fresh, right before your guests are ready to drink it.
Why You’ll Love This Recipe
This layered drink checks every box for a summer celebration, and here’s exactly why it’s become one of my favorites.
- It’s incredibly easy to make, needing zero cooking skills, just a steady hand and a spoon.
- It’s endlessly customizable, so I can swap the sodas or juices to match any holiday’s color scheme, not just the Fourth of July.
- It’s a total showstopper visually, making even a simple backyard party feel a little more special.
- It’s kid and adult friendly, so everyone at the party can enjoy their own glass without needing separate recipes.
- It comes together in under 20 minutes, which means I’m never stuck in the kitchen when I’d rather be outside with my guests.
4th of July Layered Drink Recipe
Ingredients
Method
- Pour about 3 tablespoons of cherry soda into the bottom of each glass to start building your base. Add 1 tablespoon of grenadine to each glass and stir it in well. This combination creates the sweetest, densest layer, which is exactly why it needs to sit at the very bottom.
- Once your red layer is set, fill each glass all the way to the top with ice. I like to use medium or large cubes here since they slow down the liquid as it pours and give the layers a chance to settle separately. Skipping this step is the number one reason layered drinks turn out muddled instead of crisp and distinct.
- Grab your metal spoon and hold it upside down just above the ice in the glass. Slowly pour the lemon-lime soda over the back of the spoon so it trickles down gently instead of splashing in. Fill each glass until it’s about half to two-thirds full, keeping your pour slow and steady the entire time.
- Repeat the exact same slow-pour method using the blue sports drink, again pouring it over the back of the spoon. Continue until each glass is nearly full, leaving just a little room at the top. This layer floats highest because it has the lowest sugar content of all three liquids.
- Drop a maraschino cherry into each finished glass and add a fun paper straw if you like. These drinks are best enjoyed the moment they’re built, while all three colors are still crisp and separated. Serve immediately so your guests get the full “wow” effect before the layers start to mix.
Notes
- I always double-check the sugar content on my drink labels before starting, since the whole layering trick depends on sweetest at the bottom and lightest at the top.
- I’ve found pouring over the back of a spoon works so much better than pouring directly, so I never skip that step anymore.
- I stick with medium or large ice cubes because crushed ice melts too fast and blurs the layers together.
- I don’t rush the pour, even though it’s tempting; going slow really is what makes the difference between a clean drink and a cloudy one.
- I keep the white middle layer even though it’s hard to see, because it acts as a buffer that stops my red and blue layers from turning purple in the middle.