I still remember the first time I rolled this No-Bake Lemon Truffles Recipe between my palms and thought, “wait, this is IT?” No oven, no fuss, just a handful of pantry staples and a whole lot of citrusy joy.
I make a batch almost every week now because they disappear that fast in my house. If you love lemon desserts but hate turning on the oven in summer, this one’s for you. Let me walk you through exactly how I make them, mistakes and all.
Ingredients You’ll Need for Lemon Truffles
Here’s everything that goes into my lemon truffle base and coating, along with why each one earns its spot in the bowl.
- Almond flour – 1 cup – This is the backbone of the truffle. It gives that soft, slightly crumbly bite and a mellow nutty flavor that plays beautifully against the lemon.
- Shredded coconut – 3/4 cup – Adds lightness and a gentle chew. Pulse it in a blender first so it blends seamlessly with the almond flour instead of sitting in stringy clumps.
- Melted coconut oil – 3 tablespoons – This is your binder. It firms up in the fridge and holds everything together, so don’t skip chilling time.
- Fresh lemon juice – from 1 lemon – Always use fresh, never bottled. Bottled juice tastes flat and often carries a metallic aftertaste that dulls the whole dessert.
- Lemon zest – 1/2 teaspoon – This delivers concentrated lemon flavor without adding extra liquid, which keeps your mixture from turning soggy.
- Vanilla extract – 1 teaspoon – Rounds out the sharpness of the lemon and adds warmth in the background.
- Maple syrup – 1/4 cup – Your natural sweetener. It blends in smoothly and keeps the truffles refined-sugar-free.
- Salt – 1 pinch – Just enough to wake up all the other flavors.
- White chocolate – 100 grams – Melted for dipping, this gives you that irresistible creamy shell.
- Coconut oil (for coating) – 2 teaspoons – A small amount thins the melted chocolate so it coats smoothly and sets with a softer bite.
Note: These measurements are calculated to make roughly 8 to 10 truffles, so scale everything up evenly if you’re feeding a crowd or prepping for a party.
Tasty Variations to Try
- Dairy-free swap: Use a good quality vegan white chocolate bar instead of regular white chocolate for a fully plant-based treat.
- Nut-free option: Replace almond flour with sunflower seed meal or oat flour if you’re baking for someone with allergies.
- Sugar-conscious version: Swap maple syrup for a sugar-free syrup alternative, keeping the quantity the same.
- Extra citrus punch: Add a drop of pure lemon extract if you want an even bolder lemon flavor.
- Coating swap: Try dark chocolate or milk chocolate instead of white for a different flavor profile entirely.
- Coconut lovers: Roll the finished truffles in extra shredded coconut instead of dipping in chocolate for a simpler, rustic finish, similar to Mini Maple Veggie Potato Skewer Ladder Recipe when serving bite-sized treats for parties.
Cooking Time
- Prep Time: 20 minutes
- Chilling Time: 30 to 40 minutes
- Total Time: About 1 hour
Equipment You Need
- Mixing bowl – for combining your almond flour, coconut, and wet ingredients
- Blender or food processor – to grind the coconut down to a fine texture
- Baking tray – to hold your rolled truffles while they chill
- Parchment paper – so nothing sticks to the tray
- Small saucepan and heatproof bowl – for creating a Bain Marie to melt the chocolate
- Fork or spoon – for dipping and coating each truffle evenly
- Microwave (optional) – a quicker alternative for melting chocolate
How to Make No-Bake Lemon Truffles?
Making these truffles is refreshingly simple, and you really can’t mess it up too badly. I’ll break every stage down so you know exactly what to expect from start to finish. Grab your bowl and let’s get rolling.
Step 1: Grind the Coconut
Add your shredded coconut to a blender and pulse until it reaches the same fine texture as your almond flour. This step matters because coarse coconut shreds create an uneven, crumbly truffle that won’t hold its shape properly.
Step 2: Combine the Dry Ingredients
Tip the ground coconut and almond flour into a mixing bowl along with a pinch of salt. Give everything a quick stir so the salt distributes evenly throughout the mixture. This little step makes a bigger flavor difference than you’d expect.
Step 3: Add the Wet Ingredients
Pour in your melted coconut oil, fresh lemon juice, lemon zest, maple syrup, and vanilla extract. Mix everything together until it forms a slightly sticky, cohesive dough. It should hold together when pressed between your fingers.
Step 4: Roll Into Balls
Scoop out tablespoon-sized portions and roll them into smooth balls using your palms. Place each one onto a parchment-lined tray as you go. If the mixture sticks to your hands, a light coating of coconut oil on your palms solves that instantly.
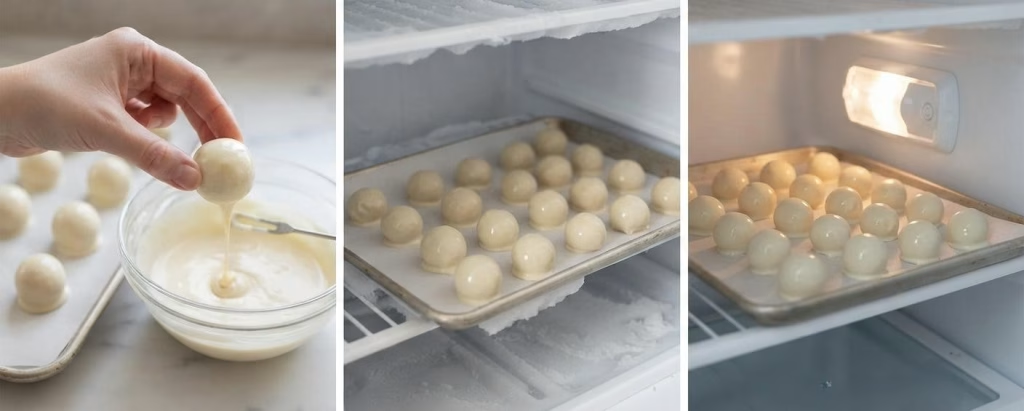
Step 5: Chill in the Freezer
Slide the tray into the freezer for about 15 to 20 minutes while you prepare your chocolate coating. This firms up the truffles so they hold their shape and don’t fall apart during dipping.

Step 6: Melt the Chocolate
Set up a Bain Marie by placing a heatproof bowl over a pot of gently simmering water, then melt your white chocolate slowly. Stir in a small splash of coconut oil to loosen the texture for a smoother, glossier coating.
Step 7: Dip and Coat
Take each chilled truffle and dip it into the melted chocolate, letting the excess drip back into the bowl. Set each coated truffle back onto your parchment-lined tray as you finish dipping the rest.
Step 8: Final Chill
Place the tray in the refrigerator for around 30 minutes, or until the chocolate coating has fully set and hardened. Once firm, they’re ready to eat or store away for later.
Additional Tips for Making This Recipe Better
I’ve made these truffles more times than I can count, so here’s what I’ve picked up along the way.
- I always use fresh lemon zest, not the pre-packaged kind, because it packs so much more punch and aroma.
- If my mixture feels too dry, I add lemon juice a half-teaspoon at a time rather than dumping it all in at once.
- I warm the truffles slightly between my palms right before dipping, since it helps the chocolate stick better to the surface.
- I like using a fork instead of my fingers for dipping, since it keeps my hands clean and gives a neater, thinner coat.
- I never skip the freezer step before coating, because soft truffles fall apart the second they touch warm chocolate.
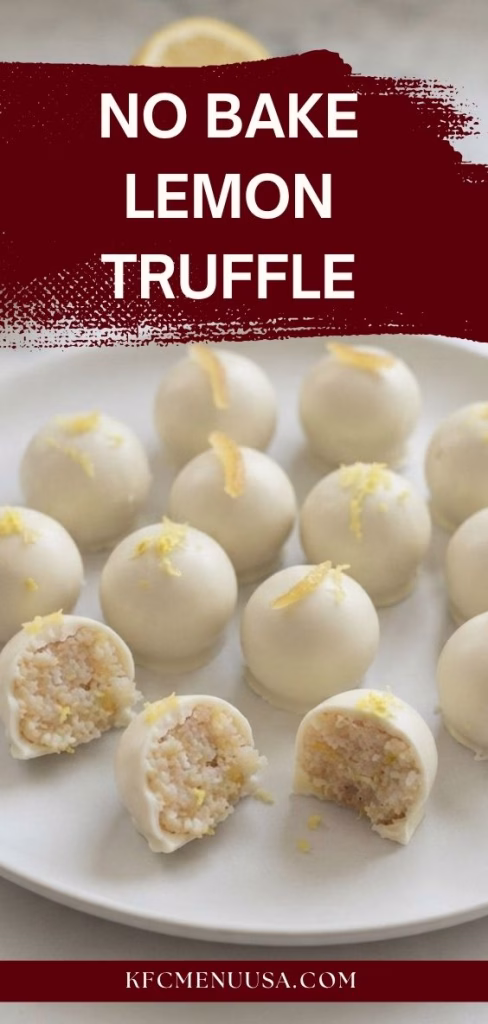
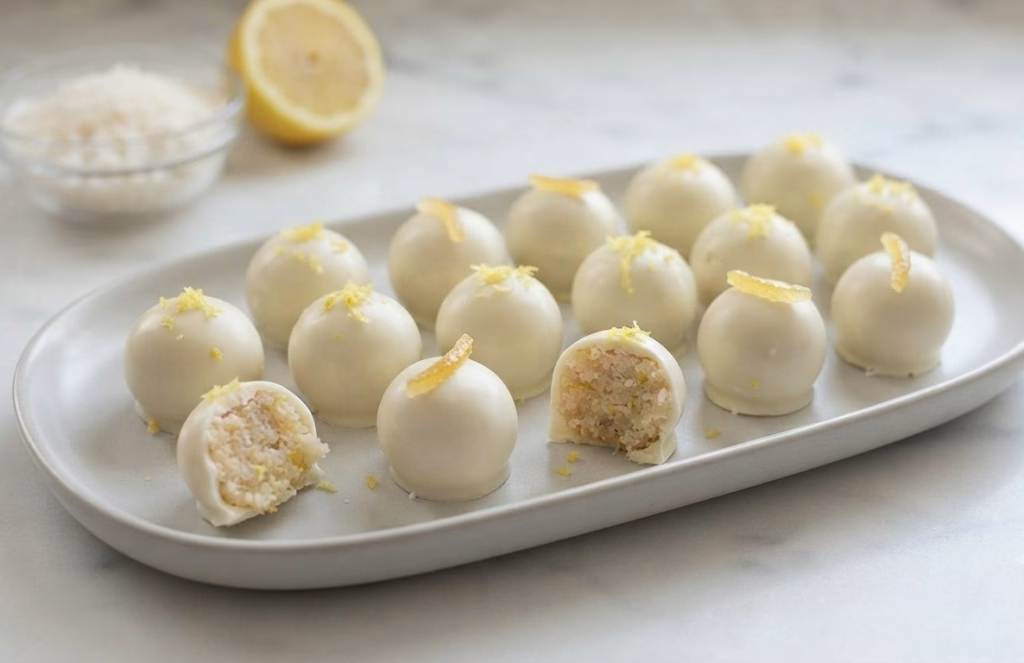
How to Serve No-Bake Lemon Truffles?
These truffles look gorgeous on a simple white platter with a light dusting of extra lemon zest scattered across the top. I love arranging them in small paper cases if I’m bringing them to a gathering, since it makes them feel like a proper bakery treat.
A few edible flowers or mint leaves tucked between the truffles add a lovely pop of color for special occasions. They also pair wonderfully with a cup of tea or coffee for an afternoon pick-me-up.
If you’re serving them at a party, you can also include a refreshing Dragon Fruit Sangria Punch Recipe alongside the dessert table for a vibrant combination. If you’re serving them at a party, try drizzling a little extra melted white chocolate over the top in a zig-zag pattern right before it sets.
Nutritional Information
Here’s a general idea of what you’re getting per truffle, though exact values will shift slightly depending on your chosen brands and portion sizes.
- Calories: Approximately 130 to 150 per truffle
- Protein: Around 3 grams per truffle
- Carbohydrates: Roughly 10 to 12 grams per truffle
- Fat: About 9 to 10 grams per truffle
Make Ahead and Storage
Room Temperature: These truffles hold up nicely at room temperature for around 2 to 3 days if kept in an airtight container away from direct heat or sunlight.
Refrigeration: Storing them in the fridge is my go-to method, since it keeps them firm and fresh for a solid 7 to 10 days without any loss in flavor.
Freezing: You can freeze these truffles for up to 2 to 3 months in a sealed, freezer-safe container. When you’re ready to enjoy one, just let it thaw in the fridge overnight or sit at room temperature for an hour or two.
Why You’ll Love This Recipe?
This lemon truffle recipe checks every box for an easy, crowd-pleasing dessert, and here’s exactly why it deserves a spot in your regular rotation.
- No oven required: You can whip up an entire batch without ever turning on your oven, which makes it perfect for warmer months.
- Naturally vegan and gluten-free: Every ingredient here is plant-based and grain-free, so it fits a wide range of dietary needs without any substitutions.
- Great for meal prep: These truffles store beautifully in the fridge or freezer, making them an easy grab-and-go snack throughout the week.
- Kid-friendly and portable: They’re small, mess-free, and easy to pack into lunchboxes or snack bags for little ones on the move.
- Endlessly customizable: You can switch up the coating, sweetener, or flavor add-ins to make this recipe your own every single time.
No-Bake Lemon Truffles Recipe
Ingredients
Method
- Add your shredded coconut to a blender and pulse until it reaches the same fine texture as your almond flour. This step matters because coarse coconut shreds create an uneven, crumbly truffle that won’t hold its shape properly.
- Tip the ground coconut and almond flour into a mixing bowl along with a pinch of salt. Give everything a quick stir so the salt distributes evenly throughout the mixture. This little step makes a bigger flavor difference than you’d expect.
- Pour in your melted coconut oil, fresh lemon juice, lemon zest, maple syrup, and vanilla extract. Mix everything together until it forms a slightly sticky, cohesive dough. It should hold together when pressed between your fingers.
- Scoop out tablespoon-sized portions and roll them into smooth balls using your palms. Place each one onto a parchment-lined tray as you go. If the mixture sticks to your hands, a light coating of coconut oil on your palms solves that instantly.
- Slide the tray into the freezer for about 15 to 20 minutes while you prepare your chocolate coating. This firms up the truffles so they hold their shape and don’t fall apart during dipping.
- Set up a Bain Marie by placing a heatproof bowl over a pot of gently simmering water, then melt your white chocolate slowly. Stir in a small splash of coconut oil to loosen the texture for a smoother, glossier coating.
- Take each chilled truffle and dip it into the melted chocolate, letting the excess drip back into the bowl. Set each coated truffle back onto your parchment-lined tray as you finish dipping the rest.
- Place the tray in the refrigerator for around 30 minutes, or until the chocolate coating has fully set and hardened. Once firm, they’re ready to eat or store away for later.
Notes
- I always use fresh lemon zest, not the pre-packaged kind, because it packs so much more punch and aroma.
- If my mixture feels too dry, I add lemon juice a half-teaspoon at a time rather than dumping it all in at once.
- I warm the truffles slightly between my palms right before dipping, since it helps the chocolate stick better to the surface.
- I like using a fork instead of my fingers for dipping, since it keeps my hands clean and gives a neater, thinner coat.
- I never skip the freezer step before coating, because soft truffles fall apart the second they touch warm chocolate.